|
|
Post Reply 
|
Page <12 |
| Author |
 Printable Version Printable Version Google Google Delicious Delicious Digg Digg StumbleUpon StumbleUpon Windows Live Windows Live Yahoo Bookmarks Yahoo Bookmarks reddit reddit Facebook Facebook MySpace MySpace Newsvine Newsvine Furl Furl Topic Search Topic Search  Topic Options Topic Options
|
JR 
Senior Member 
Joined: 31 Aug 2018 Location: Manistee, MI Online Status: Offline Posts: 364 |
 Topic: Adding shelves above bed Topic: Adding shelves above bedPosted: 18 Feb 2021 at 8:10am |
|
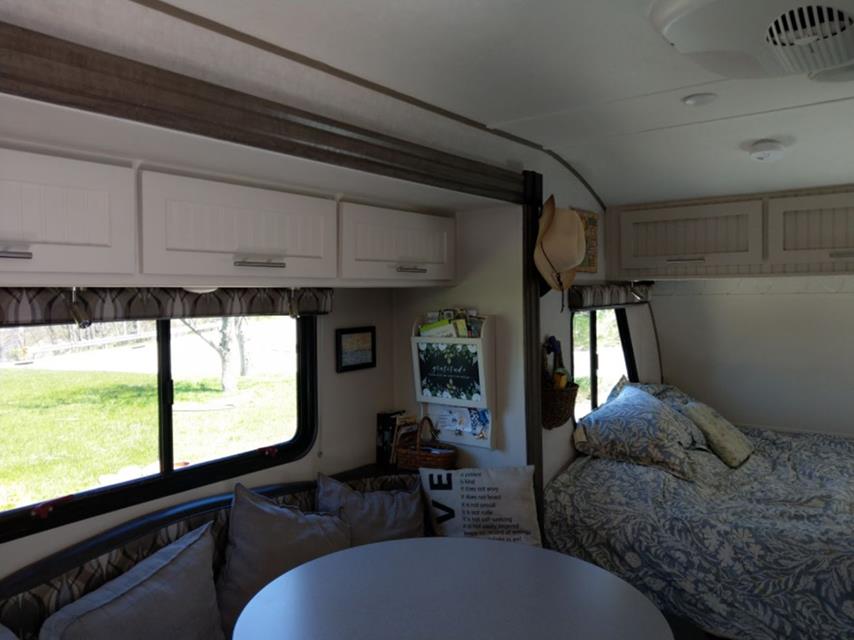
Best part is that the clothing hasn't fallen out yet... Just some different thoughts.
|
|
|
Jay
179/2019 |
|
 |
|
|
marwayne
Senior Member

Joined: 25 Oct 2011 Location: Edmonton AB Can Online Status: Offline Posts: 1002 |
Posted: 18 Feb 2021 at 3:33pm |
|
Hi JR, nice job, all l can say great minds think alike. I put cabinets over the windows, at the foot end of the top bunk and a cabinet at the foot end of the bottom bunk. The other thing I did put in flush mount handles and finger pulls on the awning doors
|
|
|
If you want something done right, do it yourself.
2011 RP172, 2016 Tundra 5.7 Litre, Ltd. |
|
|
|
|
geewizard
Senior Member
Joined: 16 Apr 2017 Location: Spokane Online Status: Offline Posts: 347 |
Posted: 19 Feb 2021 at 8:51am |
|
Very nice cabinets. How are they attached to the walls and ceiling?
|
|
|
2021 Winnebago Micro Minnie 1708FB
2017 R-Pod 177 (Blue) HRE SOLD 2004 Outfitter Apex 8 camper 2014 Toyota Tundra DC |
|
|
|
|
JR
Senior Member
Joined: 31 Aug 2018 Location: Manistee, MI Online Status: Offline Posts: 364 |
Posted: 21 Feb 2021 at 7:46am |
|
In answer to your question on how I made the over the bed
cabinet in my 179 as nearly as I can remember, I made it 2 ½ years ago, keeping
in mind that I am not a carpenter and my terminology will be a stretch but here
goes. I wanted to keep the cabinet off
and above the window valences. With that
in mind the finished bottom of the cabinet is 18.5 inches deep and the finished
front of the cabinet is 12.75 inches tall.
I used a sheet of 3/16 plywood/bead board for the exterior of the front
and bottom. Using some scraps out the sheet
of plywood I cut two end pieces for the cabinet that looked like a pregnant
triangle to match the curvature of the front wall/ceiling of the trailer. Once those end pieces were cut to the correct
pattern I cut to fit 3 cross members for the cabinet skeleton out of pine 1x2s.
The end pieces were screwed into the
cross members. One cross member at the
bottom back lays flat, the bottom front cross member was in the upright
position when the end plates were screwed on and then the front top cross
member was also in the upright position when the end plates were screwed on. I then used more 1x2s as spanners between the bottom
2 cross members and the front 2 cross members (I think I used 5 spanners on the
bottom and 4 spanners between the front cross members) After the assembling all
these parts it’s installed in the trailer using screws in the end plates into
the aluminum framing (about 6 to 8 screws running on the top edge of the end
plates, then securing the bottom edge and front edge into the wall with screws
and into the aluminum framing if possible.
Using long enough screws and if you can find the wood framing secure the
top cross member and the lower back cross member into the wood framing behind
the wall/ceiling of the trailer. Once
you have the skeleton of the cabinet installed you can install the exterior
finishing (I chose bead board). On the
front of the cabinet using the spanners for the edge support of the door openings
cut out the doors from the front skin and reuse these pieces after trimming them
out to be the doors. Paint; mount the
finished doors with hinges, door supports, and door pulls as to your décor. Install a false bottom on the inside of the
cabinet of luan that you can run the lighting electrical wiring through from
the ceiling light in the cabinet to the head of the bed for installation of a
task reading light. Wala you have a
cloths storage cabinet. The task
lighting, hinges, door supports, and handles were purchased off Amazon. The cabinet is doing what we had in mind for
it and it seems to be holding up. If
need further information or have more questions you can PM me. Hope this helps you.
Once we got the cabinet installed then we had to update the décor on the factory installed cabinet over the dining area, so we changed out the
glass inserts in the cabinet doors with bead board and painted them all. It never ends. |
|
|
Jay
179/2019 |
|
|
|
|
geewizard
Senior Member
Joined: 16 Apr 2017 Location: Spokane Online Status: Offline Posts: 347 |
Posted: 23 Feb 2021 at 9:09am |
|
Thanks JR. Good info.
|
|
|
2021 Winnebago Micro Minnie 1708FB
2017 R-Pod 177 (Blue) HRE SOLD 2004 Outfitter Apex 8 camper 2014 Toyota Tundra DC |
|
|
|
|
Post Reply
|
Page <12 |
| Forum Jump | Forum Permissions You cannot post new topics in this forum You cannot reply to topics in this forum You cannot delete your posts in this forum You cannot edit your posts in this forum You cannot create polls in this forum You cannot vote in polls in this forum |


 Adding shelves above bed