|
|
Post Reply 
|
| Author |
 Printable Version Printable Version Google Google Delicious Delicious Digg Digg StumbleUpon StumbleUpon Windows Live Windows Live Yahoo Bookmarks Yahoo Bookmarks reddit reddit Facebook Facebook MySpace MySpace Newsvine Newsvine Furl Furl Topic Search Topic Search  Topic Options Topic Options
|
Wirat 
Groupie 

Joined: 31 Jan 2020 Location: Florida Online Status: Offline Posts: 67 |
 Topic: My Newbie "Bearing" Experience... Topic: My Newbie "Bearing" Experience...Posted: 20 Mar 2020 at 8:02am |
|
Should I start by saying "Bear with me on this?", LOL. OK here comes a long winded post, hold on. I'll try not to lose my bearing...
 I understand there are probably many
experienced members here that have already forgotten more about bearing
maintenance than I will ever know. That being said, if you are in that group,
you can probably skip this looong post now. This is for the benefit of newbies like me who cannot leave well enough alone or who are
considering DIY bearing maintenance on your R-Pod. Learn from my mistakes! Bottom line up front: -Always use the same type of grease whether you use what’s
already in there or change over to a different type. Different types of grease
bases, i.e.; lithium and molybdenum do not blend and may separate leaving your
bearings unprotected. Find out what is in your axle before you go and buy
supplies. -Plan to replace the old bearing seals with new seals. You will
likely destroy the old seals while removing them and new ones are cheap, about $5-$6
a pair. -Buy or borrow an $8 bearing seal removal tool to remove the
old seals. It looks like a large screwdriver or bar with a flat metal T at the end. I
wish I had done this but I didn’t know about them at the time and all the
videos I watched had people popping out the old seals using large screwdrivers
with no issues. Not in my case, it was like they were welded in and getting the
old seals out is what caused me the most time, damage and aggravation.
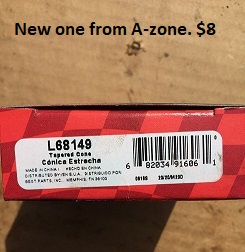
-Before you start, know the part numbers for the bearings and
seals that are in your camper and either have a spare set on hand, or know where to
buy them locally if you need to. I destroyed an inner bearing trying to get the
seal out and the RV place near me said “Special order, will take 9 days”, while
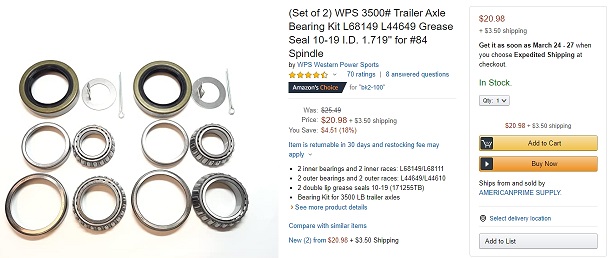
Autozone had it in stock for $8. -It may be less of a headache to simply replace all the
bearings and seals rather than inspecting, cleaning and reusing the old ones. My
Lippert axle came with Chinese basic bearings which are the same ones sold at
all the auto parts stores and online. You can buy a 2-side set for about $25
online that includes everything and more you will need to replace all the
parts. For me, the peace of mind knowing it’s all new is worth the money. Plus,
it will save you the cleaning time and messing with the old bearings. If you
have the expensive Timken bearings, I would keep those, but if you are needing
this information you probably don’t have them…
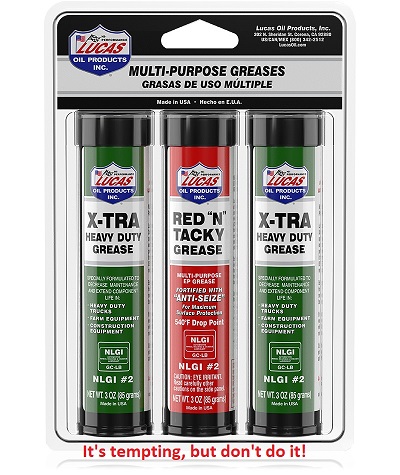
Lippert claims they use Lucas Red N Tacky #2 to pack the bearings at the factory. I called them. I also called Lucas oil. The Lucas Oil rep told me you should not use different types of grease bases because they do not mix, they separate, and that may leave your bearings unprotected. OK so what happened to me is I was told the bearings were not packed that well at the factory so I decided to top of the hubs using the zerk fittings and my mini grease gun. I went around trying to find the best grease in the small 3 oz tubes and could only find the Lucas 3-pack at Lowes. It has one tube of Red N Tacky and two tubes of Green X-tra Heavy Duty. Big mistake! If I had only bought just the Red N Tacky, I would not be writing this post…
I started the job and the hubs took much more grease than I anticipated, so I looked over the tubes and it appeared to me the only difference is that Red N Tacky had extra anti-seize additives and the green did not. I figured it’s better to use a “lesser” grease with a good one than
not have enough. And it was not clear on the tubes what the base was or not to
mix them. It does say on the back at the top of the package in fine print not to mix, but I
missed that part in the sea of text they have there. Again, I’m new at this. I only drove about 100 miles with the mixed greases after I learned
all this about the greases not being compatible, so I decided it best to take
off the hubs, clean out all the old grease and repack everything with fresh Red
N Tacky #2. Watching videos online, some from RV dealers, it shows how to do
it, pretty simple, just takes time, basic tools, new grease and lots of paper
towels. The videos I watched all had the mechanic using a long flat tip screw
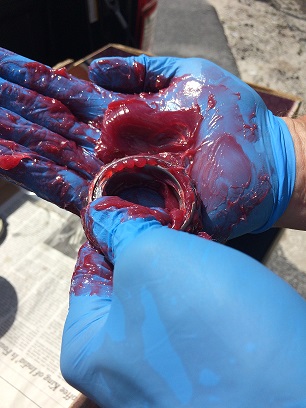
driver to pop out the old seals. I have that… Everything was going fine for me except for when I started to try
and pry out the old seals, but the screw driver method went nowhere. No bueno. I searched online and found that another way to remove seals is to turn the hub over and use a
wooden dowel from the inside to tap on the seated inner bearing to push out the
old seal from inside out. Wood is softer than metal so allegedly it won’t damage the
bearing. NOT! It worked on one side, but when I tried it on the other side
the spring from the inner seal lodged in the bearing case and mangled the
bearing case as I was tapping it out. So now I destroyed the bearing while
trying to get the old seal out. I had no extra bearings so that’s when I had to
call around and found one at Autozone. Mental note – carry an extra set just in
case.
One thing I did notice is that for all the green grease I
pumped in zerks it did not appear the factory bearings were packed very well. The old grease was mostly brown, but not from being dirty (remember I only drove 100 miles)
but because red and green mixed makes brown. So, if you see this in yours it
may be that previous owners or mechanics used different greases. The mixed
grease seemed thinner than the fresh Red N Tacky to me also. If you bought a used R-Pod that's a few years old or older, I would put bearing maintenance on the top of the list because; 1) It's an annual maintenance item anyways. 2) You really can't trust what's in there or if any maintenance was done since new. 3) Your entire camper and investment is riding on a single axle with two wheels. It only takes one side to go out and it could be "bye bye R-Pod". I am not a fan of single axle campers for this reason. The takeaway from this post and my long-winded wall of text
(sorry) is to hopefully save someone else the time cost and aggravation that I
had. Good thing I’m retired and have lots of time. I feel totally confident in
doing it again if needed and there’s no reason to be intimidated if you have
basic mechanical skills and tools. My advice would be to buy new seals, maybe even all new bearings,
have the seal remover tool as a minimum or even the more expensive kits if you
can borrow it, etc. Best thing would be to have a competent person show you how
the first time. Also, review different videos from authoritative sources like
Etrailer, etc. (no backyard mechanics, that got me in trouble) before you start you want to have a mental picture in your mind of what steps you will take. Oh, and there is the thin metal dust cap that’s on the hub you will need to remove too. None of the videos I watched had it and so getting that off I used a 1” wood chisel to gently tap and wiggle around the lip until it pulled away far enough to pull off by hand.
Replacing the seals and the dust cap I used the
end of a 2X4 piece of wood to gently tap and rotate, tap and rotate until is was
seated evenly. If you have the fancy bearing, race and seal driver tool kit they come with seal installer
disks you tap on. I have an R-Pod 191 with the 3500 Lippert axle and 10-inch
electric brakes. Many R-pods have the same. Here are the industry standard part
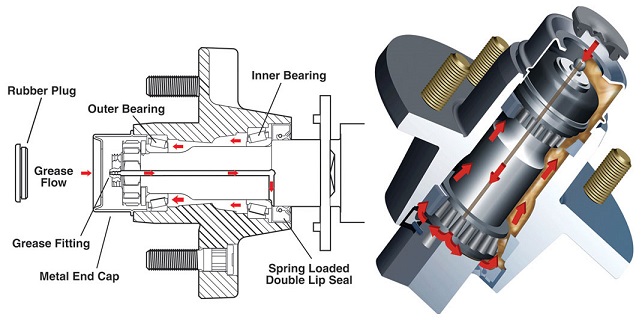
numbers for the bearings and seals; Inner bearing: L68149 Outer bearing: L44649 Bearing seal: L333960/ 171255TB You can also buy a complete
set that has more than what you need (see photo above) for a changeover. Now THIS is what I'm talkin' bout!!!
And I guess I should add this too - you read about getting grease in the brake assembly and people say "Don't use the Zerks, hand pack because the grease will blow past the seals and enter the brake assembly." Well there was NO grease in my brake drum area and I used the Zerks. For me the Zerk fittings functioned exactly as designed, so each type, age, seal condition, etc. of the trailer will vary. If the trailer is 15 years old, never had the seals changed and been in water, etc. no wonder they will leak. I pumped new fresh grease in the Zerk while I had the hub off to clean out the tube where the grease goes in the spindle and comes out the base where the inner bearing sits. The grease comes out the hole slowly like a wiggly worm about the same speed it comes out the grease gun. Not at 10,000 psi to blow out the seals like you read in some places. The grease gun may be able to build up to 10,000 psi, but the path of least resistance will allow the fresh grease to travel through the system and back out the front. Again, on a clapped-out, 15 year old trailer that's been in water and has never been maintained, I can understand that failing.
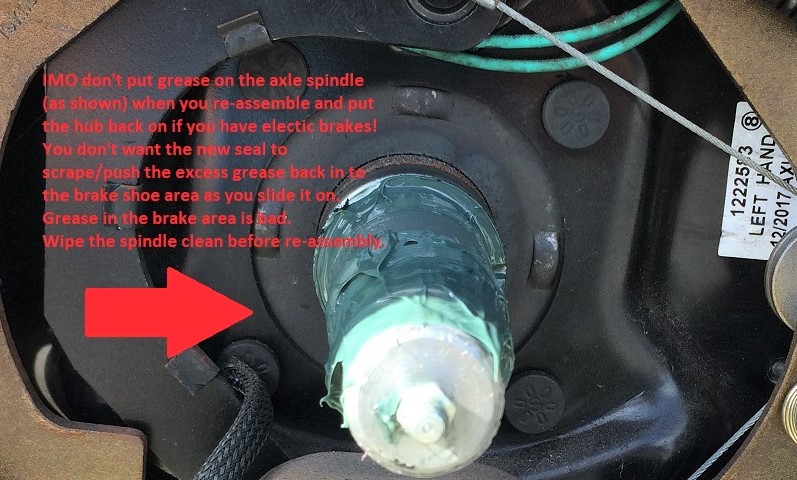
What would certainly put grease in the brake area though after I thought about it is if you put grease all over the axle spindle before you slide the newly packed hub assembly back on. The new seal is going to scrape and push any excess grease on the spindle toward the back on the outside of the seal lips as you slide it back on. That grease is now built up on the outside of the seal in the brake area. It may not be enough to make a difference, but I don't want ANY grease back there that shouldn't be. It's my understanding that if the bearings are packed well that's the only area that needs grease. If you've ever had a digital prostate exam and you had to wipe off the extra lube left over from the doctor's finger, you get the idea.
Take care and I hope my post here will help others avoid the same mistakes I made... |
|
|
2019 R-Pod 191
|
|
 |
|
|
StephenH
podders Helping podders - pHp 

Joined: 29 Nov 2015 Location: Wake Forest, NC Online Status: Offline Posts: 6326 |
Posted: 20 Mar 2020 at 8:50am |
|
I had made the same mistake. Thanks for posting this. I have since bought a full-sized grease gun and buy the big single tubes of the red #2 grease so I don't make the same mistake again.
|
|
|
StephenH
Happy is the man that findeth wisdom,... ouR escaPOD mods Former RPod 179 Current Cherokee Grey Wolf 24 JS |
|
|
|
|
lostagain
Senior Member

Joined: 06 Sep 2016 Location: Quaker Hill, CT Online Status: Offline Posts: 2595 |
Posted: 20 Mar 2020 at 9:15am |
|
Thanks for the very informative post Wirat. Great job and very informative!
|
|
|
Never leave footprints behind.
Fred & Maria Kearney Sonoma 167RB Our Pod 172 2019 Ford F-150 4x4 2.7 EcoBoost |
|
|
|
|
Wirat
Groupie
Joined: 31 Jan 2020 Location: Florida Online Status: Offline Posts: 67 |
Posted: 20 Mar 2020 at 9:32am |
That, coming from you sir, makes me feel so much better! Thank you. |
|
|
2019 R-Pod 191
|
|
|
|
|
Kup-Pod
Senior Member

Joined: 08 Jun 2017 Location: Guelph, Ontario Online Status: Offline Posts: 153 |
Posted: 21 Mar 2020 at 11:57am |
|
This is a great post, thank you very much Wirat for being willing to let us learn from your mistakes. I had no idea that the greases were that incompatible!!
Good information and much appreciated.
|
|
|
2017 RP-178
2021 F150 5.0l "Lead me on a level path" |
|
|
|
|
crw8sr
Senior Member
Joined: 12 Oct 2017 Location: Omaha Nebraska Online Status: Offline Posts: 328 |
Posted: 21 Mar 2020 at 5:20pm |
|
This will be on my spring project list.
|
|
|
Chuck & Lyn
Izzy, Morkie. RIP Zoe Joy & Gracie, Yorkie 2018 R Pod 190 2019 Traverse In moments of adversity;when life's a total wreck, I think of those worse off than me and really feel like heck. |
|
|
|
|
Buffalohunter
Groupie

Joined: 12 Oct 2019 Location: Bellingham, Wa Online Status: Offline Posts: 57 |
Posted: 27 Apr 2020 at 6:09pm |
|
Great...just wondering how it all gets done with great info/pictures
|
|
|
R-pod-2020 189
2013 Toyota Tacoma |
|
|
|
|
Post Reply
|
| Forum Jump | Forum Permissions You cannot post new topics in this forum You cannot reply to topics in this forum You cannot delete your posts in this forum You cannot edit your posts in this forum You cannot create polls in this forum You cannot vote in polls in this forum |


 My Newbie "Bearing" Experience...