
|
|
Post Reply 
|
Page 12> |
| Author |
 Printable Version Printable Version Google Google Delicious Delicious Digg Digg StumbleUpon StumbleUpon Windows Live Windows Live Yahoo Bookmarks Yahoo Bookmarks reddit reddit Facebook Facebook MySpace MySpace Newsvine Newsvine Furl Furl Topic Search Topic Search  Topic Options Topic Options
|
JandL 
Senior Member 

Joined: 29 Mar 2014 Location: California Online Status: Offline Posts: 364 |
 Topic: Brake Replacement Topic: Brake ReplacementPosted: 31 Oct 2015 at 4:54pm |
|
I replaced my brakes this weekend and it turned out to be easier than I thought it would be. I was just going to replace the shoes, magnet and turn the drums but it turned out to be cheaper to replace the brakes as a complete assembly and buy new brake drums. At a local machine shop the charge for turning the drum was $17 and to turn the face where the magnet rubs was $54. I have a Lippert axle so I used Lippert parts. If I had the Dexter axle it would have been a lot cheaper. Lippert Components (#296650) 10" x 2.25" Right-Hand Electric Brake Assembly was $69 and Lippert Components (#296649) 10'' x 2.25" Left-Hand Electric Brake Assembly was $72, I purchased these from Amazon. The drums I got from Trailer Parts Superstore, Lippert Components (#122460) 10" x 2-1/4" Brake Drum & Hub, 5 studs on 4.5” bolt circle, [Includes wheel bearings 1-1/16" (L44649) x 1-3/8" (L68149), and grease seal (I.D. = 1.719"). Drums are pre-greased]. With shipping the drums were $81 each, they weigh 20.5 pounds each. I had to buy a new set of lip seals [Lippert Components #333960 double lip grease seals] because the drums came pre-greased and it was not the grease I use. There was nothing wrong with the grease they came with. They grease I like is Valvoline #W615 Multi-Purpose Grease /GM. I like this grease because it exceeds the Lippert requirements, everybody sells it and it’s an opaque red color. Each year when I pull off the drums to inspect the brakes I can see if the grease is dirty by how much of the red color has changed. Before removing the brake assembly you have to remove the closed end crimp wire connector. I do not recommend this connector for exterior crimps; they work great for use inside the trailer. I crimped the wires to the magnet with a Nylon-insulated, double crimp, step down, 12-10/22-18 butt splice with window, AMP (#327639). I used an Ideal Ind (#30-500) Ratchet Crimp Tool for 22-10 Ga. They are other very good manufactures of ratcheting crimp tools for the Red, Blue and Yellow insulated terminals. I have seen the Ideal crimper sell for from $60-$80. I also use an Ideal Ind. 45-091, ($36), Stripmaster Wire Stripper, #10 to #18 AWG. The butt splices were then insulated with adhesive lined heat shrink tubing; make sure you slide the tubing over before crimping the wires together. You could also crimp them with Molex Perma-Seal terminals, they make a step down butt splice with adhesive lined heat shrink on it and it but takes a special crimp tool Molex (#64016-0041) $56 from Waytek Wire. If you use the wrong crimper you will damage the heat shrink tubing. The new assembly bolts right up. You the slide the drum/hub on and install the new outer bearings and cotter pin and you’re done. I used the ezlube fitting to finish the job. I put a few pumps of grease in and then spun the drum and them added a few more pumps of grease till it just start to ooze out past the castle nut. Remounted the wheel and torqued the lug nuts. On the Pod instruction page, under “Axle bearing maintenance” Podster has put together very detailed information about servicing the bearing “My 2015 178 Initial Bearing Service”, this provides a lot more detail information.
What it looks like at the start New lip seals 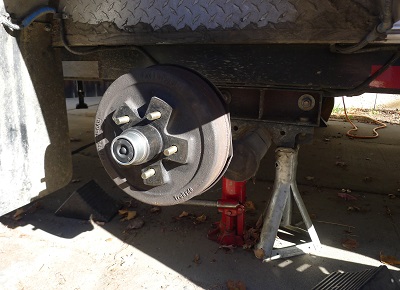  
Valvoline grease new brake assembly closed end crimp connectors   
step down butt splice 18-22 end step down butt splice 12-10 end  
heat shrink installed proper crimp the right tools for the job   
shrinking tubing to seal connectors new brakes EZlube hub   
What it looks like finished torqueing lug nuts  
|
|
|
JandL
2013 Honda Ridgeline 2012 177 2 Paynes in a Pod |
|
 |
|
|
Podster
Senior Member

Joined: 16 Sep 2014 Location: San Antonio Online Status: Offline Posts: 1108 |
Posted: 31 Oct 2015 at 6:22pm |
|
Excellent write-up and pics, thank you!
Is this the set used here from Amazon? If not, do you have a link? I would like to compare. Oh wait...I see them now, I'll have to compare the two sources and see it there is any significant difference... |
|
|
Cliff & Raelynn
Ranger 4.0/178 (1/2 ton 5,800lb tow capacity) |
|
|
|
|
JandL
Senior Member
Joined: 29 Mar 2014 Location: California Online Status: Offline Posts: 364 |
Posted: 31 Oct 2015 at 6:29pm |
|
Lippert Components 296649 10'' x 2.25'' Left-Hand Electric Brake Assembly
http://www.amazon.com/gp/product/B00C3NAVH4?psc=1&redirect=true&ref_=oh_aui_detailpage_o07_s00 Lippert Components 296650 10" x 2.25" Right-Hand Electric Brake Assembly http://www.amazon.com/gp/product/B00C3ZUR8U?psc=1&redirect=true&ref_=oh_aui_detailpage_o07_s01 |
|
|
JandL
2013 Honda Ridgeline 2012 177 2 Paynes in a Pod |
|
|
|
|
JandL
Senior Member
Joined: 29 Mar 2014 Location: California Online Status: Offline Posts: 364 |
Posted: 31 Oct 2015 at 9:13pm |
|
An update to my brake installation. On the right side I had 2 issues to deal with. One was the two 12 gauge wires that needed to be crimped to the wires coming off the magnet. To crimp two 12 gauge wires in one end of a butt splice you would need it to be an 8 gauge size. They make 8 gauge step down butt connectors but they only neck down to a 10 gauge and the wire coming off the magnet is 16 gauge. I ended up having to use a closed end splice and insulating it with 4-1 shrink ratio adhesive lined heat shrink tubing. The tool I used is a NTM (Nichifu) NH-36B closed end crimping tool, Waytek Wire carry’s this crimper Item #477 ($118) and the closed end connector size Number 8, item #37025. The second issue I had was the drum would not slide over the brake pads till I turned the brake adjuster star nut to draw the shoes in to make a smaller diameter. The brakes will self-adjust as I apply the brakes driving down the road when I recalibrate my brake controller for the new brakes.
  
|
|
|
JandL
2013 Honda Ridgeline 2012 177 2 Paynes in a Pod |
|
|
|
|
Camper Bob
podders Helping podders - pHp
Joined: 26 Sep 2011 Location: Portland Oregon Online Status: Offline Posts: 913 |
Posted: 01 Nov 2015 at 10:26am |
|
I admire your mechanical ability. I do have one question. What made you decide to replace the brakes? Were their problems with the existing pair? We have about 15K travel miles on ours and I wouldn't know what to look for to indicate that the brakes needed replacing. They still seem to stop the trailer, just fine. Safe Travels.
|
|
|
Camper Bob and Camper Sue
Gracie the Wonder Dog (12 LB. Mini Dachshund) 2013 Rpod 171HRE(ORPod) 2016 Lance 1685 2015 Nissan Pathfinder |
|
|
|
|
JandL
Senior Member
Joined: 29 Mar 2014 Location: California Online Status: Offline Posts: 364 |
Posted: 01 Nov 2015 at 10:54am |
|
The thickness of the pads determines when to replace. On my new brakes they are .192 thick and the ones on the trailer had gotten down to a little less than .100 thick. In Lipperts trailer axle book they say to replace the brakes when they are .06 (1/16”) thick. I think that is way to thin. When they get too thin they are not able to handle and dissipate heat as well as a thicker pad. I live in California and travel over some big hills so I want to know that my brakes are going to slow me down when I need them.
Brake Drum Inspection (from the Lippert manual) The brake shoes contact the drum surface and the magnet contacts the armature. These surfaces are subject to wear and should be inspected periodically. The drum surface should be re-machined if wear is more than .030” or out of round by more than .015”. The drum should be replaced if scoring or wear is greater than .090”. The inner surface of the brake drum that contacts the brake magnet is the armature surface. If the armature surface is scored or worn unevenly, it should not be machined more than .030”. The magnets should be replaced whenever the armature surface is refaced and vice versa. Shoes and Linings Linings should be replaced if the material is worn to 1/16” or less. Shoes should also be replaced if they become contaminated with grease or oil or have become scored, pitted or gouged. Heat cracks are normal and rarely require attention. When replacing shoes, both shoes on the same brake and the brakes on the same axle should all be replaced at the same time, once again ensuring even braking capacity. |
|
|
JandL
2013 Honda Ridgeline 2012 177 2 Paynes in a Pod |
|
|
|
|
techntrek
Admin Group - pHp 
Joined: 29 Jul 2009 Location: MD Online Status: Offline Posts: 9062 |
Posted: 02 Nov 2015 at 4:41pm |
|
I added this to the "manual". Thanks.
|
|
|
|
|
malkbean2
Groupie 
Joined: 31 Jan 2017 Online Status: Offline Posts: 80 |
Posted: 14 Jun 2018 at 8:06am |
|
I opened the little rubber plug on the back of the brake and found a loose piece of metal inside. Poked it with a little screwdriver, it just flops around. I'm guessing this is not good. As best I can tell the brakes work just fine.
Does anybody have any idea what it is? 178 pulled with a grand caravan |
|
|
|
|
malkbean2
Groupie
Joined: 31 Jan 2017 Online Status: Offline Posts: 80 |
Posted: 14 Jun 2018 at 8:08am |
|
I opened the little rubber plug on the back of the brake and found a
loose piece of metal inside. Poked it with a little screwdriver, it just
flops around. I'm guessing this is not good. As best I can tell the
brakes work just fine.
Does anybody have any idea what it is? 178 pulled with a grand caravan |
|
|
|
|
malkbean2
Groupie
Joined: 31 Jan 2017 Online Status: Offline Posts: 80 |
Posted: 15 Jun 2018 at 8:55am |
|
It was the cylinder piece that slides on the brake adjuster. The darn thing just had fallen off -- or maybe was never put on.
|
|
|
|
|
Post Reply
|
Page 12> |
| Forum Jump | Forum Permissions You cannot post new topics in this forum You cannot reply to topics in this forum You cannot delete your posts in this forum You cannot edit your posts in this forum You cannot create polls in this forum You cannot vote in polls in this forum |


 Brake Replacement