|
|
Post Reply 
|
Page 123> |
| Author |
 Printable Version Printable Version Google Google Delicious Delicious Digg Digg StumbleUpon StumbleUpon Windows Live Windows Live Yahoo Bookmarks Yahoo Bookmarks reddit reddit Facebook Facebook MySpace MySpace Newsvine Newsvine Furl Furl Topic Search Topic Search  Topic Options Topic Options
|
Pod People 
Senior Member 
Joined: 22 Sep 2011 Location: Chapel Hill,NC Online Status: Offline Posts: 1078 |
 Topic: Pod People's 179 Mod's Topic: Pod People's 179 Mod'sPosted: 11 Aug 2018 at 3:03pm |
|
Last year (September, October, November), Laura and I went on a 3 month cross country round trip from North Carolina to the west coast. We were towing our 2011 R Pod 173 with our 2012 Ford Expedition. We went through the northern part of the country and stopped in Salmon Idaho for a week visiting friends. Then it was off to Glacier, Yellowstone and ultimately Vancouver, BC. We had planned on traveling on to Alaska, but the multitude of fires in BC turned us back-the smoke was horrible and many roads were actually closed. So, we headed south and spent a month traveling and exploring the coasts of Washington and Oregon. While there, we boondocked for as long as 2 weeks at a time. Then, we traveled south through the redwoods to the bay area. We stayed in the bay area for a week visiting our sister. Then we headed back east through Yosemite , more national parks, state parks and on to Texas where we stopped at Padre Island National seashore for more boondocking at the gulf coast. Then it was off through Louisiana, Alabama and finally back to NC.
I tell you all of this to let you know that we spent a LOT of time in our 173, which we loved. We had done several similar, cross country trips in the 173, so were well acquainted with it’s operation, the positives and the negatives. We had talked several times (many times actually!!) about getting a larger trailer. We thought we wanted a 179. We had enviously looked at several in campgrounds and dealers. On the way home, we decided that we needed a change. We have traveled a LOT in our 173 and had done a ton of mods to make it comfortable and more usable for our style of traveling. So, it was a big decision to let go of our beloved 173. Buying another trailer meant that we would have to do a lot of mods and additional work, but we decided it was worth the effort and expense.
So, on the way home, we started looking for another trailer. . We looked at all of the R Pod 179 knock off copycats, looked at other small trailers, looked at other R Pod models and still wanted a 179. We decided that there really is no suitable substitute in our minds for the R Pod 179 for our purposes.
So, we found a very lightly used 2015 179 and bought it in November, 2017. We easily sold our beloved 173 to some local friends who will become traveling buddies.
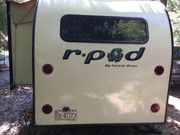
Hello 179, goodbye 173.
So, we started modifying our “new to us” 179. We knew a lot of what we wanted because we were copying some of the mods we did on the 173. Obviously, there is a lot of difference between a 173 and a 179, so there was also a lot of new work to be done as well.
It is now about 8 months since we bought our 179. Most of our mods have been completed. We have been on an extended 2 week trip and tested them, added a few and changed some. We have used the trailer and all of it’s systems, have used our mods and can truly say that we love the 179. It is a great trailer and we hope to travel in it for years to come.
We have done a lot to make the 179 better suited for our needs, but there is more to come. We use our pod primarily for long distance, multi-week travel. We try to boondock as much as possible. So, our mods are directed at comfort, efficiency and practicality.
So, I wanted to write up what we have done and hope to help other owners with some new ideas or things to do. It can be hard to get started, but doing mods is so worthwhile. The R Pod is a great platform to start making your personal camper.
So I will be writing a series of posts about our mods. I took the hint from Stephen H and will be putting these posts under one heading called ”Pod People’s 179 Mods”. Stay tuned.
Safe travels Vann
|
|
|
Vann & Laura 2015 RPod 179 
|
|
 |
|
|
Pod People
Senior Member
Joined: 22 Sep 2011 Location: Chapel Hill,NC Online Status: Offline Posts: 1078 |
Posted: 11 Aug 2018 at 3:12pm |
|
A Frame The first thing we did was to have our local welder move the spare tire to the tongue. This required that the gas tank also be moved as far forward as possible to allow room for the tire. He cut off the existing gas tank mount and moved it approximately 3” forward. We reused the original spare tire mounting bracket. He cut off the bottom section of the “L” and welded the vertical section directly to the A frame. While working on the A frame, we also added a battery disconnect switch. Note that we also tied the spare tire cover securely (we lost one previously). We also added a 4” PVC tube for tarp poles, R Dome poles or fishing poles. Vann 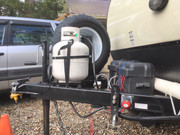 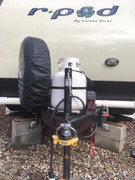 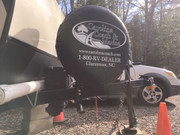 |
|
|
Vann & Laura 2015 RPod 179
|
|
|
|
|
Pod People
Senior Member
Joined: 22 Sep 2011 Location: Chapel Hill,NC Online Status: Offline Posts: 1078 |
Posted: 11 Aug 2018 at 3:24pm |
|
Rear Bike Rack We moved the spare tire to the A frame so that we could carry our bikes on the rear. While at the welder’s shop, we had a 2” receiver added underneath the existing 1 ¼” receiver. The welder added some reinforcement triangle gussets to the receiver/frame connection. He also welded a new 2”x2” frame member going across the width of the pod from side frame to side frame to anchor the back end of the 2” receiver with a piece of angle iron. When we carry the bikes, we use 2 ratchet straps that go from the top of the bike rack down to an eyebolt in each corner of the frame for stability. We also use a hitch tightner between the bike rack shank and the receiver. The combination of all of these modifications results in a very tight, completely stable bike rack. Vann 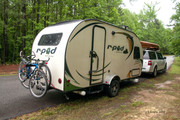 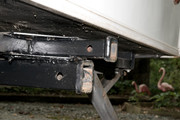  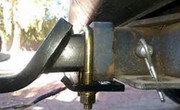 |
|
|
Vann & Laura 2015 RPod 179
|
|
|
|
|
Pod People
Senior Member
Joined: 22 Sep 2011 Location: Chapel Hill,NC Online Status: Offline Posts: 1078 |
Posted: 11 Aug 2018 at 3:26pm |
|
Additional Taillights Once the bikes are on the rack, the original taillights are
partially blocked. So, I added another
set of taillights above the originals. I ordered them from Etrailer.com and
they are exact copies of the original. I
drilled a 1 ½” hole in the outer pod skin which came through inside the kitchen
cabinets. I pulled the original
taillights out of the pod about 6” (with wires still connected) so that I could
access the wiring. I drilled a hole in
the cabinet shelving so I could run the new, upper taillight wiring down to the
original lights. It was then an easy job
to splice the 3 new taillight wires (red, black and white) into the existing
taillight wiring. Once all of the wiring splices were complete,
I screwed all 4 taillights in place and sealed around them with clear silicone
caulk. Vann
|
|
|
Vann & Laura 2015 RPod 179
|
|
|
|
|
john in idaho
Senior Member

Joined: 04 Nov 2014 Location: Eagle Idaho Online Status: Offline Posts: 611 |
Posted: 11 Aug 2018 at 3:53pm |
|
Have you considered changing to Load Range E tires? I did that in June on our 2015 179. What a difference the 80 lbs of air pressure and stiffer sidewalls make.
|
|
|
|
|
poston
podders Helping podders - pHp

Joined: 28 Mar 2018 Location: Nevada Online Status: Offline Posts: 197 |
Posted: 11 Aug 2018 at 4:02pm |
I'm glad you're staying in the pod family! I'm looking forward to following your mods. It's so great that you and Stephen H and all the others regale us with your mod efforts. It helps me do mods and gives me ideas to think about. |
|
|
-- Jim Virginia City, Nevada 2016 R-pod 180 2015 Nissan Xterra Pro-4X |
|
|
|
|
Pod People
Senior Member
Joined: 22 Sep 2011 Location: Chapel Hill,NC Online Status: Offline Posts: 1078 |
Posted: 11 Aug 2018 at 4:16pm |
|
Hey John in Idaho, what brand/size tires do you have?? I did change tires-I went with the Goodyear Endurance. they are 215/75/14 and are load range D. they use 60psi. I have noticed a better ride with the stiffer sidewalls. I don't see as much bouncing as I did with my previous Maxxis 8008, but then again they were on the old 173 so that might not be a fair comparison. Vann
|
|
|
Vann & Laura 2015 RPod 179
|
|
|
|
|
Guests
Guest Group 
|
Posted: 11 Aug 2018 at 4:26pm |
|
Thanks for writing this up. We'll all be looking forward to future "installments" of your mods and adventures. Being a former RP173 owner, I'll always have a "soft spot" for that particular model. That said, the 179 is a very popular model in the current offerings. |
|
|
|
|
Pod People
Senior Member
Joined: 22 Sep 2011 Location: Chapel Hill,NC Online Status: Offline Posts: 1078 |
Posted: 11 Aug 2018 at 4:28pm |
|
Renogy 100 watt solar suitcase system Another major mod was the installation of our Renogy 100
watt suitcase system. We had used the
same basic setup in our previous 173 pod, so the installation was pretty
simple. I wrote up a full review of the original installation (http://www.rpod-owners.com/forum_posts.asp?TID=8194&KW=Renogy+solar+panel+install&PID=77377&title=installing-a-renogy-100-watt-suitcase-solar-panel#77377
). I wired the new receptacle on the
driver side of the pod and installed the controller inside the bedroom area in
easy view. I also installed a digital
battery indicator with the solar charge controller. This system keeps our 2 six volt golf cart
batteries fully charged. Vann https://s19.postimg.cc/da2jppxk3/DSC_4665_Vann_holding_panel_accessories_6-12-16_Medium_Large.jpg https://s19.postimg.cc/freax04lv/DSC_4715_Renogy_panels_set_up_6-15-16_Medium_Large.jpg https://s19.postimg.cc/56km9tzmr/IMG_0549_sewer_storage_open_Large.jpg https://s19.postimg.cc/auqx0dw5v/IMG_0534_solar_controller_Large.jpg |
|
|
Vann & Laura 2015 RPod 179
|
|
|
|
|
Pod People
Senior Member
Joined: 22 Sep 2011 Location: Chapel Hill,NC Online Status: Offline Posts: 1078 |
Posted: 11 Aug 2018 at 4:33pm |
|
Well, for some reason the pictures did not post-I will try again 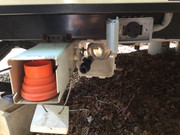 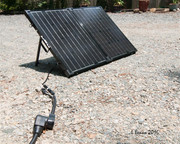 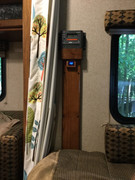 |
|
|
Vann & Laura 2015 RPod 179
|
|
|
|
|
Post Reply
|
Page 123> |
| Forum Jump | Forum Permissions You cannot post new topics in this forum You cannot reply to topics in this forum You cannot delete your posts in this forum You cannot edit your posts in this forum You cannot create polls in this forum You cannot vote in polls in this forum |


 Pod People's 179 Mod's