
|
|
Post Reply 
|
Page <1234> |
| Author |
 Printable Version Printable Version Google Google Delicious Delicious Digg Digg StumbleUpon StumbleUpon Windows Live Windows Live Yahoo Bookmarks Yahoo Bookmarks reddit reddit Facebook Facebook MySpace MySpace Newsvine Newsvine Furl Furl Topic Search Topic Search  Topic Options Topic Options
|
offgrid 
Senior Member 
Joined: 23 Jul 2018 Online Status: Offline Posts: 5290 |
 Calendar Event: Solar Panel Calendar Event: Solar PanelPosted: 26 May 2020 at 9:33am |
|
The problem with the cheap little 100 watt inverters are that they are "modified sine wave" which really means they are "modified square wave". That makes them electronically noisy and inefficient, and over time they can damage electronic devices connected to them. Its a cleaner, more reliable, and more efficient solution to get a 12Vdc/120Vac TV and dispense with needing an inverter at all. The 12V TV's aren't expensive and you can sell the old one on Craigslist for a few bucks. They bolt right up to the existing wall mounts.
|
|
|
1994 Chinook Concourse
1995 RV6A Experimental Aircraft 2015 Rpod 179 - sold |
|
 |
|
|
StephenH
podders Helping podders - pHp

Joined: 29 Nov 2015 Location: Wake Forest, NC Online Status: Offline Posts: 6285 |
Posted: 26 May 2020 at 6:27pm |
|
Supersonic televisions are the only ones I saw that were as low as $132. My small inverter works and cost a whole lot less. Other brands, including Jensen and Free Signal were all well over $200. However, that is a separate issue from solar power. As little as we watch television, the solar panel and battery we have would power the little inverter and the television which appears to work quite well using it for a long time. Most often though, we turn it on only to find that there either is no signal or a weak signal. Even if there is a signal, there is usually nothing worth watching anyway.

|
|
|
StephenH
Happy is the man that findeth wisdom,... ouR escaPOD mods Former RPod 179 Current Cherokee Grey Wolf 24 JS |
|
|
|
|
offgrid
Senior Member
Joined: 23 Jul 2018 Online Status: Offline Posts: 5290 |
Posted: 26 May 2020 at 6:42pm |
|
I have the supersonic one, works fine. I sold the ac one that came with the pod on CL for $35. I have a couple of small square wave inverters but don't like them, never have. Noisy both electronically and audibly, and I've had electronics damaged by them. I never watch regular TV even at home so don't miss it travelling, but I do watch movies from my collection or stream NF and HBO while travelling so use the Tv quite a bit, especially on rainy days. It is not a separate issue from solar if you use the TV a lot as the inverter wastes a significant amount of energy, requiring more solar and battery to compensate.
|
|
|
1994 Chinook Concourse
1995 RV6A Experimental Aircraft 2015 Rpod 179 - sold |
|
|
|
|
CamFrye
Newbie 

Joined: 09 Jun 2020 Location: Colorado Online Status: Offline Posts: 6 |
Posted: 09 Jun 2020 at 4:24pm |
|
JR,
We are looking to do a roof mounted flexible panel as well. I'm curious to know what adhesive you used and if you had any insight or advice you'd be willing to share? Thanks.
|
|
|
2020 R Pod 172
2019 Subaru Ascent |
|
|
|
|
190 Fan
Newbie
Joined: 13 Oct 2020 Location: Indiana Online Status: Offline Posts: 3 |
Posted: 26 Oct 2020 at 2:28pm |
|
Hi Guys, I am new to this forum and I am not sure if I am replying in the right place. I recently purchased an RPOD 190 2021.5. I am looking to complete the solar panel kit installation. I purchased the Go Power Overlander 190 watts with the 30 amp Bluetooth controller. I installed the panel on the roof with 3m VHB tape and covered the feet with Eternabond tape. So far I have done 2 trips from my home in Indiana. One to Michigan and one to Cave country in KY. The panel have held intact . I am happy with the installation. The part I have not finished is connecting the wires to the controller. When I looked behind the solar wire label I only found 2 10 gauge (Red and black) wires coming from the roof. No other wires. The wires were like a loop. When I pull the wires there is no end. I did not want to pull any more. Can anyone provide any advise on how to complete this connection on my 2021 RPOD 190?
I will appreciate it |
|
|
|
|
offgrid
Senior Member
Joined: 23 Jul 2018 Online Status: Offline Posts: 5290 |
Posted: 26 Oct 2020 at 3:07pm |
|
First, glad you got a glass/aluminum frame solar module. Much better choice than a so-called "flexible" modules with a polymer front surface. I would recommend using mechanical fasteners to augment the 3M VHB tape though the tape is not a reliable attachment system (ask me how I know).
Re the electrical connection, I believe that the continuous loops of wire go from the roof to the battery and you are expected to cut them to add in the controller. But, to be sure, if you don;t have a multimeter, get one. Use it to confirm where the wires go. To do that first see if the there are two wires at the battery that look to be the same as the ones behind the label and on the roof. If there are then disconnect them from the battery, use the dc V scale on your meter, and confirm there is no voltage between them. If there isn't then use the ohms scale to see what the resistance is between them. Should be showing an open circuit (very high or infinite resistance). Then, short them together. Then go on the roof, confirm there is no voltage between the two wires and confirm zero (or very low) resistance. Then you can short those together on the roof. Then you can safely cut the two wires behind the label, strip them, and confirm zero (or low) resistance on each of the two pairs. If you're not sure which pair goes to the battery and which to the roof, disconnect one set and check the resistance with your meter again. At that point you will know for certain which wires go where so you can disconnect the two wires from each other at the battery and roof and complete connections to your controller, solar module, and battery, being cautious to get the polarities right. Add an inline fuse at the + battery terminal if there isn't already one there. If the wires are 10 gauge you can use a 30A fuse, 20A for 12 gauge wire. |
|
|
1994 Chinook Concourse
1995 RV6A Experimental Aircraft 2015 Rpod 179 - sold |
|
|
|
|
190 Fan
Newbie
Joined: 13 Oct 2020 Location: Indiana Online Status: Offline Posts: 3 |
Posted: 26 Oct 2020 at 3:47pm |
|
Offgrid,
thanks a lot for you recommendation on the wiring. I will follow your advice. On the panel installation to the roof what I did is that I added 1 foot of heavy aluminum angular segments in addition to the small ones that came with the kit. After I installed them I covered everything with Eternabond tape (as recommended by Hobotech) to avoid moisture and dust to get into the VHB tape. After the 2 trips I have checked the panel and tried to lift it with strong force but I do not see any movement whatsoever. I will keep monitoring and let this forum know how it goes. I saw in the tape specs that it holds up to 145 lbs per inch. For each foot long 2x2 angular segment I added I covered it with 2 lines of one inch VHB 4950 tape. I put 4 - 1foot long segments in addition to the small ones that came with the kit. If you think about it I applied 96” of VHB tape. The key was to ensure that both surfaces were extremely clean. I cleaned everything several times with alcohol solution and let it dried before applying the tape and installing the panel on the roof. As soon as I learn how to attach a picture here I will show what I did. Thank you again for your great advice. |
|
|
|
|
offgrid
Senior Member
Joined: 23 Jul 2018 Online Status: Offline Posts: 5290 |
Posted: 26 Oct 2020 at 4:36pm |
|
Yes, VHB can work well if the surfaces are very clean with no metal oxidation and there is absolutely no moisture present during application. Its a pressure sensitive adhesive so you also need to apply quite a bit of force to activate it. That's hard to do if you have a large surface area. We had 30-40 kilowatts of solar modules blow off a roof that were attached with VHB tape. The remaining 60-70 kW was still well attached, so its hit or miss. We never were able to clearly determine why some areas held and others didn't. After that fiasco I still used adhesive attachments for some projects but never without also having mechanical fasteners. Fool me once....
Click on the little tree icon an it will walk you though attaching a pic. Its a 2 step process. upload then attach. Also don't attach too big a photo, reduce the resolution first.
|
|
|
1994 Chinook Concourse
1995 RV6A Experimental Aircraft 2015 Rpod 179 - sold |
|
|
|
|
CamFrye
Newbie
Joined: 09 Jun 2020 Location: Colorado Online Status: Offline Posts: 6 |
Posted: 26 Oct 2020 at 5:15pm |
|
190Fan,
Offgrid recommendations are right on. I'm only going to add some detail from the installation of the solar controller on my 172: When I exposed my wiring by removing the little knock out panel in my upper cabinet behind the solar sticker, I could see the two 10 Ga wires (mine were brown and yellow) coming out of the roof, coiled inside the cabinet, and exiting back into the ceiling near the center of the camper (on it's way to the battery): 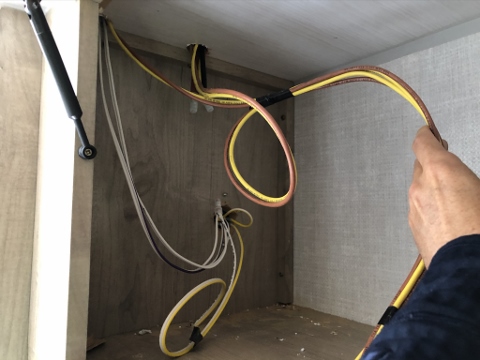 The bottom of the MC-4 port on the roof was visible from the inside of the cabinet, as were the wire nut connections from the port (red and black) to the trailer wiring (brown and yellow):  I tested the wires and MC-4 port, marked positive and negative (I could also locate the yellow and brown wires where they tied to the battery), disconnected the battery, tested them again... repeated that again because I wanted to be 100% sure... and finally cut the wiring in the cabinet. I connected the wires from the roof port (without the panel connected) into the correct terminals on the controller, did the same with the battery side, hooked everything else up and had a bit of a tantrum because the controller wasn't in "charge" mode. It took me about an hour and a half of being an idiot to find out I had a bad MC-4 connector and when I replaced it, everything worked great. Good luck.
|
|
|
2020 R Pod 172
2019 Subaru Ascent |
|
|
|
|
offgrid
Senior Member
Joined: 23 Jul 2018 Online Status: Offline Posts: 5290 |
Posted: 26 Oct 2020 at 5:47pm |
|
MC4's are great connectors but there is a learning curve to getting them installed right. They have a lot of specs they have to meet, they are actually rated for up to 1000Vdc in big commercial grid tied solar applications.
|
|
|
1994 Chinook Concourse
1995 RV6A Experimental Aircraft 2015 Rpod 179 - sold |
|
|
|
|
Post Reply
|
Page <1234> |
| Forum Jump | Forum Permissions You cannot post new topics in this forum You cannot reply to topics in this forum You cannot delete your posts in this forum You cannot edit your posts in this forum You cannot create polls in this forum You cannot vote in polls in this forum |


 Solar Panel - Event Date: 12 Feb 2020