
|
|
Post Reply 
|
Page 123> |
| Author |
 Printable Version Printable Version Google Google Delicious Delicious Digg Digg StumbleUpon StumbleUpon Windows Live Windows Live Yahoo Bookmarks Yahoo Bookmarks reddit reddit Facebook Facebook MySpace MySpace Newsvine Newsvine Furl Furl Topic Search Topic Search  Topic Options Topic Options
|
Gretchen 
Newbie 

Joined: 15 Oct 2011 Location: Tennessee Online Status: Offline Posts: 16 |
 Topic: adding another brake light - help Topic: adding another brake light - helpPosted: 18 Mar 2012 at 8:56pm |
|
yes, height was more the reason, not brightness. The factory lights are plenty bright, just low considering how tall many vehicles today are.
|
|
|
Gretchen in Tennessee; Excited new R-Pod 151 owner and quilter
He has set eternity in the hearts of men; yet they cannot fathom what God has done from beginning to end. Ecc 3:11b |
|
 |
|
|
techntrek
Admin Group - pHp 
Joined: 29 Jul 2009 Location: MD Online Status: Offline Posts: 9059 |
Posted: 18 Mar 2012 at 8:20pm |
|
As mentioned earlier, I would want a 3rd brake light not for additional brightness but to get it higher. Same reason all other vehicles have them now.
|
|
|
|
|
Goose
Senior Member 
Joined: 24 Sep 2010 Location: Arizona Online Status: Offline Posts: 672 |
Posted: 18 Mar 2012 at 10:09am |
|
A couple of L brackets and a few screws would keep it in place and out of the way on the inside of the window. To me the brake lights are plenty bright enough even during the day that a third brake light is not something that I personally am interested in doing. If I thought that the brake lights needed to be brighter, I would replace the brake lights with brighter ones, ones with more LED's You can find all kinds at the Grote Automotive Products web site, those 4 inch round lights are easy to replace. Goose
|
|
|
Mother Goose's Caboose..2011 RP171..07 Grand Cherokee
|
|
|
|
|
Gretchen
Newbie
Joined: 15 Oct 2011 Location: Tennessee Online Status: Offline Posts: 16 |
Posted: 18 Mar 2012 at 9:57am |
|
Yes David, I was kind of thinking of adhesive velcro too. I would like something a little more permanent but without holes, but if I can't use magnets, I don't know what else? Too bad Forest River didn't leave some places in the window frame to insert one.
|
|
|
Gretchen in Tennessee; Excited new R-Pod 151 owner and quilter
He has set eternity in the hearts of men; yet they cannot fathom what God has done from beginning to end. Ecc 3:11b |
|
|
|
|
Guests
Guest Group 
|
Posted: 18 Mar 2012 at 5:23am |
|
+1 on Tech's comments.
I think the window frames are aluminum. If you are thinking of using the magnets there, they wouldn't stick. Maybe velcro???
|
|
|
|
|
techntrek
Admin Group - pHp
Joined: 29 Jul 2009 Location: MD Online Status: Offline Posts: 9059 |
Posted: 17 Mar 2012 at 10:19pm |
|
Gretchen - thanks for the pic and write-up. Goose - not a bad idea. |
|
|
|
|
Goose
Senior Member
Joined: 24 Sep 2010 Location: Arizona Online Status: Offline Posts: 672 |
Posted: 17 Mar 2012 at 9:41pm |
|
I know that the back window is tinted, but you can still see through it fairly easily. It might be easier and no holes in the roof if you placed your third brake light inside the back window like they do on some SUV's. Goose
|
|
|
Mother Goose's Caboose..2011 RP171..07 Grand Cherokee
|
|
|
|
|
Gretchen
Newbie
Joined: 15 Oct 2011 Location: Tennessee Online Status: Offline Posts: 16 |
Posted: 17 Mar 2012 at 9:15pm |
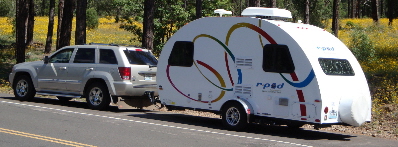
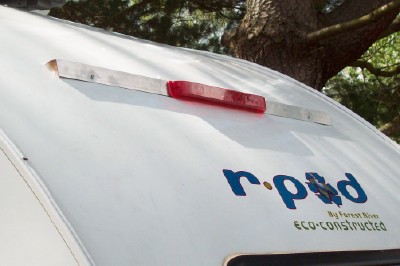  Here it is! The new brake light. Turns out it is also an additional turn light. I will feel MUCH safer driving now knowing others can better see when we slow down seeing as the factory brake lights are so pitifully low. This is a Optronics 11 light LED 3 wire Streamline light. I got it at the camper store around $20. Bought one 1/ 1/2 x 4ft. aluminum angle at Lowes. The light is completely enclosed in plastic, so nothing to waterproof there. I mounted it to the angle with stainless nuts and bolts, fished the wire thru to the back where I butt spliced and heat shrink wrapped the connections, than making one small hole all the way thru, fed the wires inside and covered in a neat little tape backed track running over to the side and down into the storage compartment where my handy husband did the wiring. The ends of the angle are closed with a neatly cut piece of cedar silicone calked in just so and a good bead of caulk along the top ONLY. I left the bottom unsealed to act as a drain incase any water does get in. It is held in by two stainless 1 inch screws, but mostly the caulk held it. Not bad for a housewife, huh? Now, if anyone has made an awning for the back window, I would love to know/steal your idea. I am thinking a piece of vinyl soffit would be light and let wind blow thru it. I would like to see if I can do this with magnets so as not to make any new holes. Thought appreciated. I can't wait to get camping!! |
|
|
Gretchen in Tennessee; Excited new R-Pod 151 owner and quilter
He has set eternity in the hearts of men; yet they cannot fathom what God has done from beginning to end. Ecc 3:11b |
|
|
|
|
Gretchen
Newbie
Joined: 15 Oct 2011 Location: Tennessee Online Status: Offline Posts: 16 |
Posted: 15 Mar 2012 at 8:58pm |
|
Just to tell you, I got a 4 ft long alluminum angle at Lowes, a 15 inche LED light at the camper place, made a foam gasket, drilled a few holes to mount the light to the angle, used butt clips with heat shrink covers over the wires calked into the angle and will try to find a couple of studs to screw the angle into with short stainless steel screws. I will use a thin tape backed wire cover to get the wires to the cover that goes down the edge, than make a hole near the bottom (or maybe come right up the under floor) into the pass thru storage where I'll turn it over to my hubby to hook up the wires. I think. .... more to follow

|
|
|
Gretchen in Tennessee; Excited new R-Pod 151 owner and quilter
He has set eternity in the hearts of men; yet they cannot fathom what God has done from beginning to end. Ecc 3:11b |
|
|
|
|
techntrek
Admin Group - pHp
Joined: 29 Jul 2009 Location: MD Online Status: Offline Posts: 9059 |
Posted: 15 Mar 2012 at 7:41pm |
|
Definitely interested.
|
|
|
|
|
Post Reply
|
Page 123> |
| Forum Jump | Forum Permissions You cannot post new topics in this forum You cannot reply to topics in this forum You cannot delete your posts in this forum You cannot edit your posts in this forum You cannot create polls in this forum You cannot vote in polls in this forum |


 adding another brake light - help
