
|
|
Post Reply 
|
Page <12 |
| Author |
 Printable Version Printable Version Google Google Delicious Delicious Digg Digg StumbleUpon StumbleUpon Windows Live Windows Live Yahoo Bookmarks Yahoo Bookmarks reddit reddit Facebook Facebook MySpace MySpace Newsvine Newsvine Furl Furl Topic Search Topic Search  Topic Options Topic Options
|
Jeepinator 
Groupie 
Joined: 08 Sep 2017 Location: Seacoast NH Online Status: Offline Posts: 72 |
 Topic: Removed sink in 179. Need to cover hole. Topic: Removed sink in 179. Need to cover hole.Posted: 26 Jun 2020 at 8:16pm |
|
Where did you find yours? It was out of stock on Amazon.
|
|
|
2018 Jeep Wrangler Willys
2017 179 |
|
 |
|
|
fwunder
Senior Member 

Joined: 04 Oct 2013 Location: New Jersey Online Status: Offline Posts: 1676 |
Posted: 27 Jun 2020 at 6:22am |
|
I ordered a 4x8 sheet of wall material (lauan), as well as matching tape direct from Forrest River. I had them cut sheet down to 2x4 for shipping saving. I have used it for several projects.  |
|
|
2014 RPod 178 => MyMods and Buying Habits
2008 4Runner Limited 4.0-liter V6 Yes, those are wild ponies dining on grass while dumping tanks! |
|
|
|
|
Podhaven
Newbie 

Joined: 26 Jun 2020 Online Status: Offline Posts: 3 |
Posted: 27 Jun 2020 at 6:43am |
|
Unfortunately we found it on Amazon about a month ago. Maybe try a boat supplier.
We did caulk around it so there wasn’t a chance of water getting behind. It would be able to be removed but not as easily as a piece of shower board. |
|
|
Plantman
2017 R-Pod 179 |
|
|
|
|
1nana2many
Groupie

Joined: 05 Apr 2018 Location: NE Kansas Online Status: Offline Posts: 62 |
Posted: 28 Jun 2020 at 1:00pm |
|
I recently removed the bathroom sink from our 179. I chose not to leave an access panel for future use. I think if I ever decide I need access to wiring/plumbing in there, we will cut out the back of the pantry cabinet leaving a 1” rim, then screw or rivet a new panel back into the cabinet. I think it would be better access then that little hole on the bathroom side and I don’t have to be as concerned about water issues or if the replacement panel is a perfect match because it won’t show. First thing I did was put painter’s tape over floor drain to avoid dropping screws/scraps in there! I then carefully cut through the caulk around sink and skirt. The plumbing drain pipes behind the wall are common household kitchen/bathroom sized P-trap and drain lines. We removed the P-trap, cut the pipe it was attached to shorter(we unscrewed/removed it to do this), then put a glue-on cap on making sure it was water tight. You may be able to buy a screw on cap, but we live in the country and used what we had in the spare plumbing parts. We then put that part back on. I was going to add a toilet paper holder with the water tight lid, but there was just not enough space to do it without moving a lot of stuff around and frankly, I didn’t want to mess around that much more with the plumbing and wiring in there! I found a piece of 1/16” panel board to match thickness of original wall panel. (the hardest part of this project!) and used two pieces. One that I could slide inside behind the wall panel. I put a screw in the middle of this piece to hold it where I wanted it while putting four rivets in the corners being very careful to avoid any plumbing/wiring...you know..first do no harm! I had put some construction glue on the edges that would be behind the wall to help adhere it in addition to the rivets. The second piece of 1/16” panel I cut as close to the exact side of the original hole as I could get. This piece also covered the framing on the left side of wall that the first piece did not. The goal with these two pieces was to bring the wall patch level with original bathroom wall. I glued the second piece to the first and air stapled it to the frame board at left corner. I painter’s tape to put pressure until glue dried overnight. I couldn’t find any tiles I personally liked that I had seen others do in a striped fashion around bathroom to cover the hole and repair, so I found a wood patterned vinyl floor covering that I used to cover the entire lower half of the walls wainscoting fashion. I wiped down the wall area with alcohol before I started applying floor glue to remove anything that might impede glue. It took five rows from bottom to top. I bought a white piece of quarter round (couldn’t find any cove the same size as original) and stained it to match my vinyl flooring, then sealed with spray on exterior water based Helmsman clear coat. Brad nailed it to corner frame. Sealed the edges and corners with the closest color matching polyurethane caulk I could find. We changed out the faucet and shower with chrome look shower only fixtures. The hose that came with new shower head was awful, so bought a metal one at the local Menards Lumber to replace it. I ordered the faucet and shower head on Amazon. I put faucet in upside down because that’s how it fit the backer without modifying it. There was absolutely no extra play in the water lines behind the faucet or I would have enlarged holes and raised it a bit. It works as is. You just move handle to right instead of left for warmer water. Ended up using a simple L-shaped TP holder so we can easily remove the roll to shower. Used stud-finder to find framing to attach it to. Pointed it up so the roll stays put when rolling down the road. I’m sorry but I forgot to take photos of wall patch before putting up the vinyl. I got the idea from someone else on this site. He had a photo. Any excess flooring glue was wiped away with rubbing alcohol. I did not cover the other two walls because it’s not noticeable when the shower curtain lives in the corner where the change takes place. No one who looked at my project even noticed it until I pointed it out. Sorry for font size. Tried to change it with no luck. Gave up. Hope this is helpful for someone. |
|
|
The mountains are calling and we must go...O.D., Keith & Jody
2016 RP179= O.D. (Olive Drab) 2008 Coachman Captiva 1993 Jayco 1206 popup 2016 F150 Supercrew |
|
|
|
|
1nana2many
Groupie
Joined: 05 Apr 2018 Location: NE Kansas Online Status: Offline Posts: 62 |
Posted: 28 Jun 2020 at 1:02pm |
|
Slide photos side to side to see more above.
|
|
|
The mountains are calling and we must go...O.D., Keith & Jody
2016 RP179= O.D. (Olive Drab) 2008 Coachman Captiva 1993 Jayco 1206 popup 2016 F150 Supercrew |
|
|
|
|
Post Reply
|
Page <12 |
| Forum Jump | Forum Permissions You cannot post new topics in this forum You cannot reply to topics in this forum You cannot delete your posts in this forum You cannot edit your posts in this forum You cannot create polls in this forum You cannot vote in polls in this forum |


 Removed sink in 179. Need to cover hole.
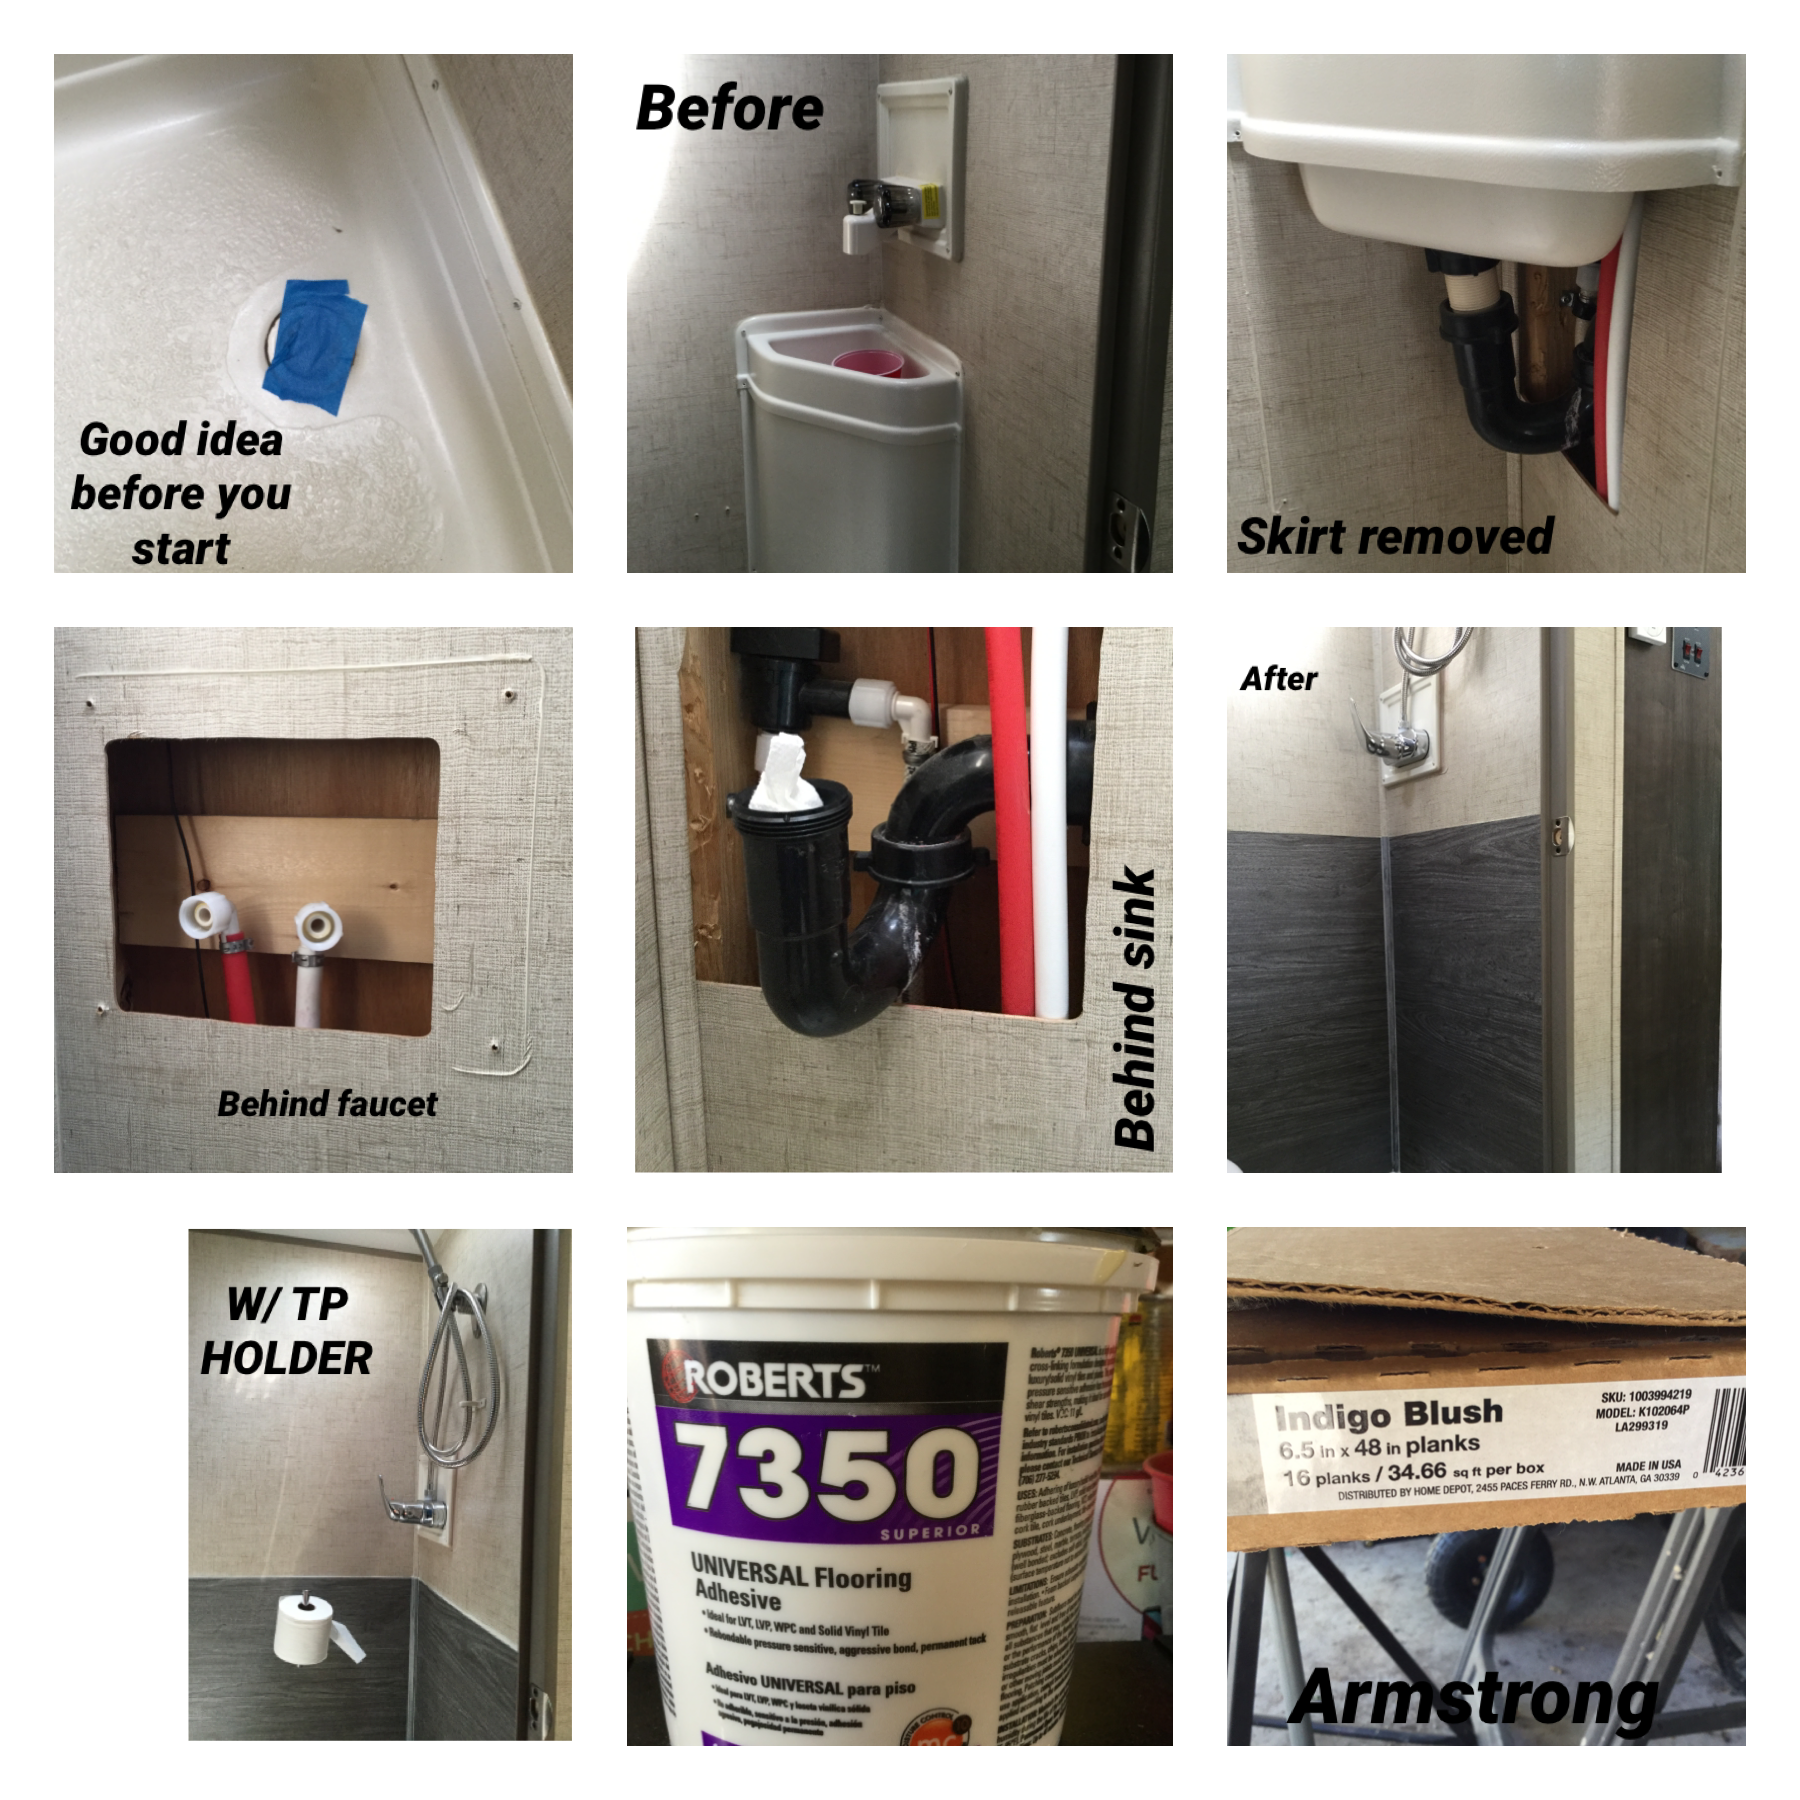 Rpod 179 Bathroom Sink Removal