
|
|
Post Reply 
|
| Author |
 Printable Version Printable Version Google Google Delicious Delicious Digg Digg StumbleUpon StumbleUpon Windows Live Windows Live Yahoo Bookmarks Yahoo Bookmarks reddit reddit Facebook Facebook MySpace MySpace Newsvine Newsvine Furl Furl Topic Search Topic Search  Topic Options Topic Options
|
|
bigfish6025 
Newbie 
Joined: 21 Mar 2019 Location: Alaska Online Status: Offline Posts: 3 |
 Topic: Upper cabinets separating from ceiling Topic: Upper cabinets separating from ceilingPosted: 20 Apr 2020 at 12:37am |
|
|
I've got a model 179 where the upper cabinets above the dinette are mounted to the top of the slide out. As I was dewinterizing today, I noticed that the cabinets are beginning to fall down. The screws have pulled down in the middle.
I placed a bottle jack on the bench and set it up to brace the cabinets. Then I carefully went in from the inside and ran a bead of gorilla glue. Then I jacked it up tight and tried to tighten the screws up. What can I do to make this fix even better? I would like to add more screws once the glue dries, but I don't want to poke a hole through the top of my slide out. What am I screwing into behind the cabinet wood? Thanks!!
|
||
 |
||
|
StephenH
podders Helping podders - pHp 

Joined: 29 Nov 2015 Location: Wake Forest, NC Online Status: Offline Posts: 6288 |
Posted: 20 Apr 2020 at 8:38am |
|
|
While I can't answer your question, I do appreciate finding out something else to look at in my 179. I expect if you use screws no longer than the ones that are already there, you won't have to worry about going through the top of the slide-out. You could substitute a size up on the existing screws such as #8 for #6 or #12 for #8, but make sure they are no longer than the ones that are in there.
|
||
|
StephenH
Happy is the man that findeth wisdom,... ouR escaPOD mods Former RPod 179 Current Cherokee Grey Wolf 24 JS |
||
|
||
|
Woodmiester
Senior Member

Joined: 03 Aug 2018 Location: Greenwood IN Online Status: Offline Posts: 142 |
Posted: 20 Apr 2020 at 1:36pm |
|
|
You may try, as an extra measure, to install a cleat beneath each side of your cabinet into the side wall of your push out.
Do some careful measuring so you don't push through, but I think that may solve your problem. I totally removed my tiny cabinet in my push out (over the sink on the 190) and built one twice as deep. I had no problems since I used the same size screws that were in the old cabinet, just used new holes. I DID place small cleats under the new cabinet on each side.
|
||
|
Swampfox
|
||
|
||
|
Olddawgsrule
Senior Member
Joined: 20 Sep 2017 Location: New Hampshire Online Status: Offline Posts: 1014 |
Posted: 20 Apr 2020 at 3:07pm |
|
|
Much like yourself, mine also started to fall. Much like Woodmiester I also built my own a little bigger.
I couldn't see any rhyme or reason for screw positions, so the tight was it's only screwed into the paneling. All of my screws (expect one) were loose. I chose to adhere nailers to top, side and bottom and use screws (of same length) to hold in place as the adhesive dries. If you wish to just re-screw your cabinet, as Stephen said, larger gauge screw. I would add get some quality adhesive (I'm a fan of PL http://www.homedepot.com/p/Loctite-PL-Premium-10-fl-oz-Polyurethane-Construction-Adhesive-1390595/202020473) and get it in where ever you can.
|
||
|
||
|
bigfish6025
Newbie
Joined: 21 Mar 2019 Location: Alaska Online Status: Offline Posts: 3 |
Posted: 21 Apr 2020 at 9:48am |
|
|
Thanks for these replies! I yanked one screw and it is pretty skinny, so using a larger gauge is a great idea.
I got good contact with my gorilla glue, so hopefully that and new screws will keep me from going larger custom cabinets, although I think that's a really cool solution. So you guys say that these are hanging up by the 1/4" paneling with no studs or backing meat of any kind? Surprised they stayed up this long, lol. Gotta keep the weight down I suppose. I'm good with it. |
||
|
||
|
Olddawgsrule
Senior Member
Joined: 20 Sep 2017 Location: New Hampshire Online Status: Offline Posts: 1014 |
Posted: 21 Apr 2020 at 11:16am |
|
|
I'm saying, I couldn't confirm that there was anything else.. So I went the direction of none being there and secured accordingly.
|
||
|
||
|
GlueGuy
Senior Member

Joined: 15 May 2017 Location: N. California Online Status: Offline Posts: 2629 |
Posted: 21 Apr 2020 at 1:11pm |
|
Be careful with the glue. You're really only glueing to the paper covering on the wall panel. I have no idea how strong that is. It might just unpeel itself.
|
||
|
bp
2017 R-Pod 179 Hood River 2015 Ford F150 SuperCrew 4WD 3.5L Ecoboost |
||
|
||
|
EchoGale
Senior Member
Joined: 10 Mar 2019 Location: FL Online Status: Offline Posts: 461 |
Posted: 21 Apr 2020 at 2:29pm |
|
|
Good point. I unglued the paper on my ceiling with a command hook and a lightweight plastic "chandelier."
|
||
|
Julie
|
||
|
||
|
bigfish6025
Newbie
Joined: 21 Mar 2019 Location: Alaska Online Status: Offline Posts: 3 |
Posted: 22 Apr 2020 at 10:05am |
|
Good point, false sense of security there. I appreciate the heads up on that. Definitely gonna sink some thicker screws in there for the double hold-down. |
||
|
||
|
2B's In A Pod
Newbie
Joined: 15 Oct 2017 Location: Edmonton, AB Online Status: Offline Posts: 7 |
Posted: 22 May 2020 at 11:36am |
|
|
I had a similar problem on my 2018, 172 model, that we purchased new and have enjoyed over the past 3 years while traveling a few thousand miles. The left side of the upper kitchen cabinet had become loose; it’s sagged down from the ceiling about 1/4 inch; see picture below. I was able to push it up again but wondered how to re-secure it? What type of support backing, in the wall, supports the cabinet eg. Is it metal or wood? The right side of the cabinet was still secure and firm to the ceiling. Therefore I contacted FR who said that there could be a chance that when the cabinet was secured it did not hit the backer. The backers for securing are made of metal and a strong magnet should be able to assist me in finding exactly where these backers are located to resecure the cabinet. With the use of a magnet I was able to locate the backer; it ended just below the bottom of the cabinet and therefore the original screws were not holding the cabinet. As a repair I installed some angle brackets that are screwed to the backer and hold up the cabinet; see attached pic. Although the screws in the ceiling are secure in the ceiling backer, they didn’t keep the wall end of the cabinet up. The magnet also helped me to locate the metal backers in the ceiling. 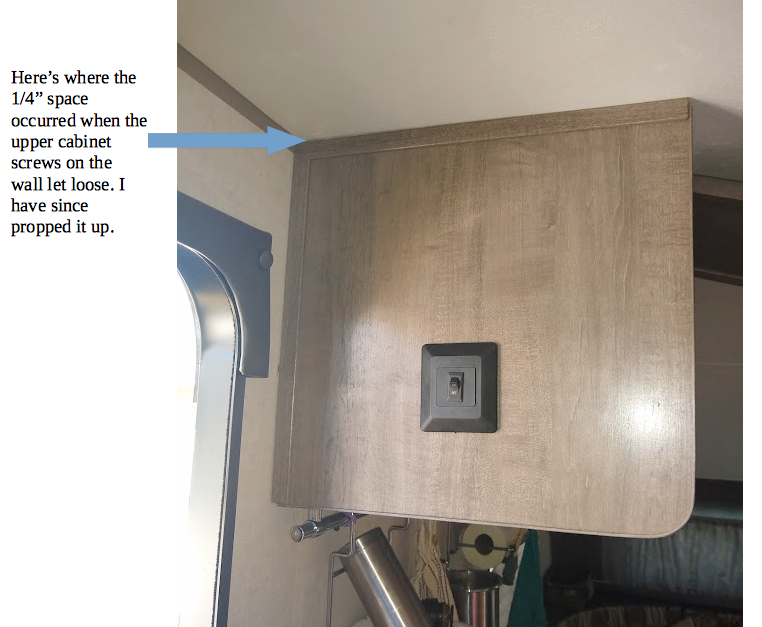 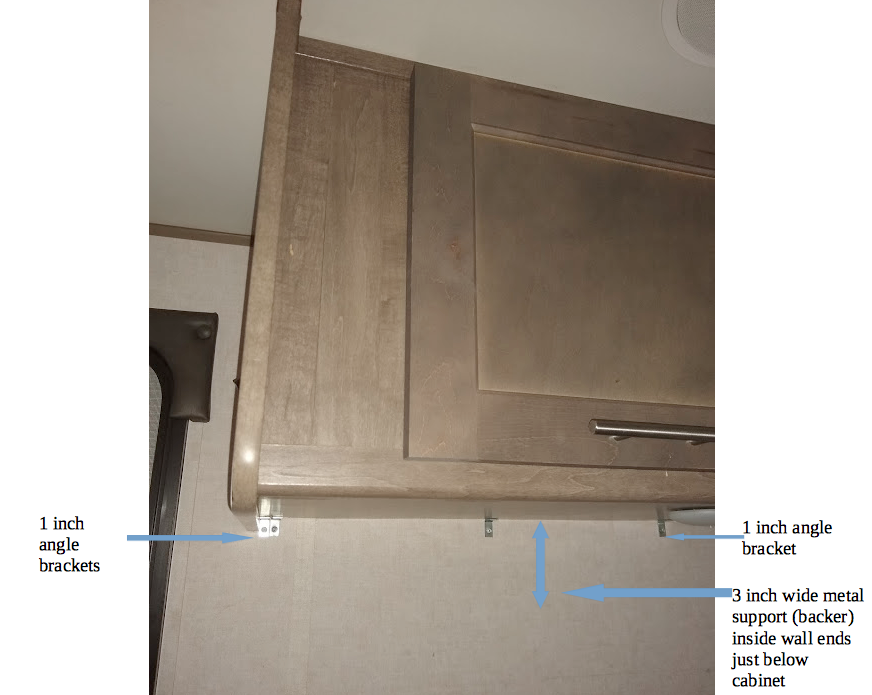 |
||
|
||
|
Post Reply
|
| Forum Jump | Forum Permissions You cannot post new topics in this forum You cannot reply to topics in this forum You cannot delete your posts in this forum You cannot edit your posts in this forum You cannot create polls in this forum You cannot vote in polls in this forum |


 Upper cabinets separating from ceiling