|
|
Post Reply 
|
| Author |
 Printable Version Printable Version Google Google Delicious Delicious Digg Digg StumbleUpon StumbleUpon Windows Live Windows Live Yahoo Bookmarks Yahoo Bookmarks reddit reddit Facebook Facebook MySpace MySpace Newsvine Newsvine Furl Furl Topic Search Topic Search  Topic Options Topic Options
|
saint urho 
Newbie 

Joined: 19 Apr 2019 Location: Alberta Online Status: Offline Posts: 9 |
 Topic: Maintaining the old 171 Topic: Maintaining the old 171Posted: 03 May 2020 at 7:19pm |
|
Dear Forum.. I never thought it would happen to me
 Last year, about this time of year, we bought an 2011 171 and had a summers worth of adventures. Now that it's looked to stop snowing up here it's time to get ready for another year of travel. Well, if we're allowed to travel; if not, this will be a good summer to renovate. This thread will be where I throw all my mods and maintenance adventure. The good news is, when I opened the trailer today it smelled a lot better than when I bought it last year. So first lesson, if a trailer smells moldy mildewy, it probably is... so trust your nose... maybe don't buy that trailer. Last fall I finished the search for the odour and found it was definitely the passenger side front storage cubby. A little destructive investigation found wet insulation on the front wall, wet floor under the vinyl, and most disturbingly, wet floor on the underside (nicely held in place by the under membrane). I removed all the wet materials (and sprayed the mildew down with some bleach / water mix) from the inside, cut open the membrane below the floor and left it all to dry over the course of our long and dry(ish) winter. So,back to today.. smells pretty good, things look pretty dry. Judge for yourself.. here's the pics. The area where the water likely got in...  With any luck I'll be able to remove the trim, add some water proofing and sealant, put the screws back in and patch the floor, I'll tackle the drivers side front corner as well to make sure this sin't occurring over there as well. |
|
 |
|
|
StephenH
podders Helping podders - pHp 

Joined: 29 Nov 2015 Location: Wake Forest, NC Online Status: Offline Posts: 6285 |
Posted: 03 May 2020 at 8:15pm |
|
I wish you well on that project. I've done a lot of mods on our 179, but I have not tackled anything like that.
|
|
|
StephenH
Happy is the man that findeth wisdom,... ouR escaPOD mods Former RPod 179 Current Cherokee Grey Wolf 24 JS |
|
|
|
|
lostagain
Senior Member

Joined: 06 Sep 2016 Location: Quaker Hill, CT Online Status: Offline Posts: 2586 |
Posted: 03 May 2020 at 9:09pm |
|
On thing you may wish to consider is using vinegar to kill the mold below the surface. We had this issue come up in the attic of a house and needed to get rid of the mold/mildew. I learned that bleach doesn't penetrate wood well so it only kills what's on the surface. Vinegar penetrates and kills it inside. After we cleaned everything with bleach, then vinegar, we made a solution of borax and saturated everything with that. It never came back. Of course, as you already pointed out, it is essential to stop the water leakage. Good luck with your project.
|
|
|
Never leave footprints behind.
Fred & Maria Kearney Sonoma 167RB Our Pod 172 2019 Ford F-150 4x4 2.7 EcoBoost |
|
|
|
|
saint urho
Newbie
Joined: 19 Apr 2019 Location: Alberta Online Status: Offline Posts: 9 |
Posted: 18 May 2020 at 11:17am |
|
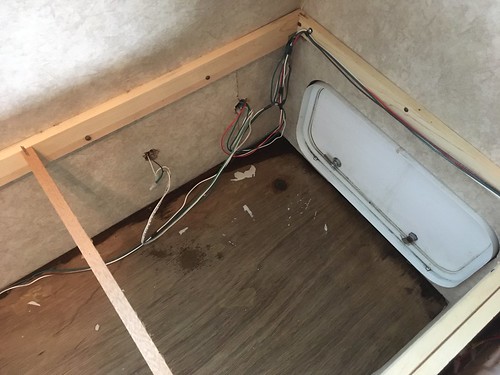
All right, it's been a few weeks of lousy weather up here, but I found a little time to be out in the R-pod and noted that the springy floor in front of the fridge should be investigated. I suspected that water was at the root of the problem, plus, the water I had found in the storage compartment last year troubled me a bit. So I removed all the rear bed platform (not vertical supports) and found the floor was springy in the area under the bed.
I decide to make an exploratory cut in the vinyl floor and my suspicions were confirmed. It's wet, all the subfloor is damp, which leads to delamination of the plywood. In an effort to find dry subfloor I have removed the vinyl floor all the way form the very back to the front entry. The subfloor is still damp but, I'm going to pause the cutting here, for reasons... My conclusion, it is poor construction practice to be so confident of your building envelope's water tightness to not allow a way for water to exit; this is part of the "soggy Condo" saga that has been prevalent in Canada for a while. Anyway, here are some pictures of the back area of RP171 with the vinyl floor removed, the plywood veneer actually looks pretty nice. Now, the reasons I alluded to earlier; how rusty are your fasteners? I pulled some staples (above) from areas that were obviously getting wet most frequently and they were very rusty; as we move further from the wet areas, the staples are only rusty in the exposed area.. the part of the staple that was in the dry(ish) hardwood is shiny. So, the screws in the photo below, show a rusty screw in the known wet area and not very rusty screw in the suspected dry area. So, go check your screws.. are they rusty? Your floor is probably wet. The vertical support nears the shower (edit, not the shower, this is power in near the sink) enclosure shows some evidence of being damp once. There is very little evidence of wet walls. I can hear y'all asking, "but Saint, how does the water get in?" It appears to me it's blowing right through the garage doors (see above). Maybe a little bit around too. The problem isn't just that water gets in, the real problem is you can't get the water out. Frustrating that $200 of aluminum flashing, and an upgrade to marine grade plywood during construction would make these floors considerably more waterproof. The adventure continues.
|
|
|
|
|
saint urho
Newbie
Joined: 19 Apr 2019 Location: Alberta Online Status: Offline Posts: 9 |
Posted: 22 May 2020 at 9:11am |
|
IT's been raining cats and dogs all day and all of the night, we've got about 50mm (2inchesish) and some of it was being driven by a 40km (26milesish) wind. I still have the breathable cover on the Rpod so it'll be all dry inside, right?
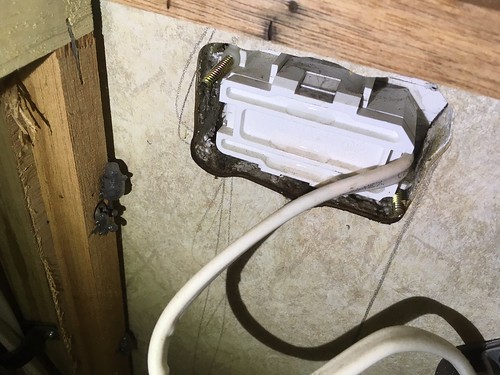
nope There's water evident around both the rear storage access doors There's condensation on the frames of these doors too, because it's colder outside of the trailer than in... all that water can't be condensation. Close look seems to prove that there is water getting through and around the doors, even on the leeward side of the trailer. Where else? Around the exterior plug, this is so poorly sealed it's essentially a funnel when towing, and all the water can drip nicely into this plumbing chase cut into the floor. And also, there's a leak from around the rear window, lower driver side only. A tiny bit of water was evident on the curtain track, removing the screws that hold the track in place showed some corrosion on the bottom driver side screws only. More to follow.
|
|
|
|
|
Post Reply
|
| Forum Jump | Forum Permissions You cannot post new topics in this forum You cannot reply to topics in this forum You cannot delete your posts in this forum You cannot edit your posts in this forum You cannot create polls in this forum You cannot vote in polls in this forum |


 Maintaining the old 171