
|
|
Post Reply 
|
| Author |
 Printable Version Printable Version Google Google Delicious Delicious Digg Digg StumbleUpon StumbleUpon Windows Live Windows Live Yahoo Bookmarks Yahoo Bookmarks reddit reddit Facebook Facebook MySpace MySpace Newsvine Newsvine Furl Furl Topic Search Topic Search  Topic Options Topic Options
|
WillThrill 
Senior Member 

Joined: 04 Jul 2014 Online Status: Offline Posts: 298 |
 Topic: External Fuel Tank Line for Yamaha 2400iSHC Topic: External Fuel Tank Line for Yamaha 2400iSHCPosted: 13 Jul 2014 at 9:39pm |
|
We recently purchased a 2014 177 and have already enjoyed it very much. I purchased a Yamaha 2400iSHC since prior reviews indicated that it could definitely run the 13.5k BTU air conditioner, which it did well. What I found, though, is that after 4-5 hours of running the AC with the compressor on about 1/3 of the time, the generator was almost out of fuel. Since I didn't want to refuel the generator in the middle of the night, I wanted to add an external fuel tank. This is not quite as easy as with Honda models as those have an onboard fuel pump. Yamahas are gravity fed, so you either must get an external fuel pump or use a gravity fed system. I opted for the latter as it is easier and cheaper.
Following the description of a very similar mod done by Budward (many thanks  ), I have completed the mod that will allow it to be easily fueled by any external fuel tank or gas can. ), I have completed the mod that will allow it to be easily fueled by any external fuel tank or gas can.
Here is what the generator looks like when the panel on the right side is removed, which involves loosening two screws at the top and carefully popping open the left and right sides. In this shot, you can see that I've cut the stock fuel line and added in a brass T connection with screw clamps with the 3/8" fuel line meets up with the stock fuel line. 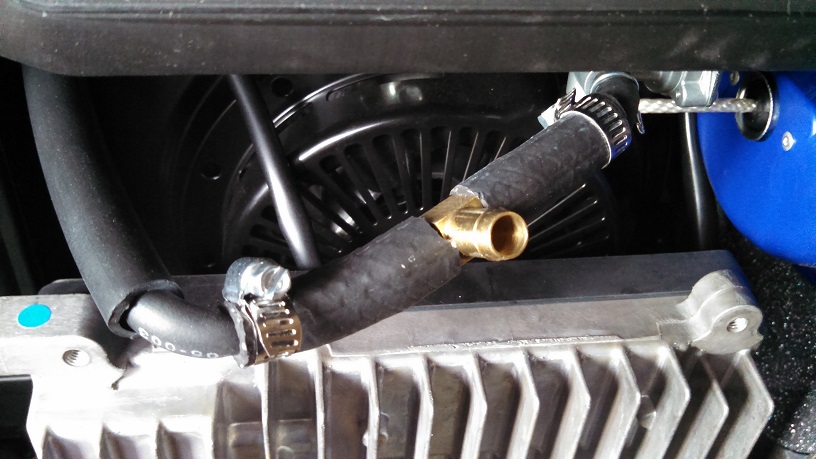
Here, I've added the fuel line that will eventually go to my external fuel tank. I pushed it through one of the cooling ports on the side panel. This never gets very hot, so it's fine. 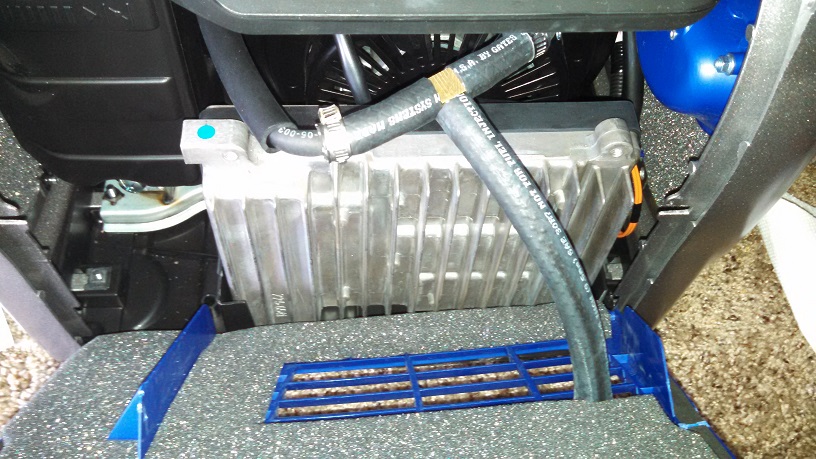
And here is what the external assembly looks like. The fuel primer bulb installs very easily; just cut the fuel line and attach the ends to the primer while making sure that you get the direction right. Here in the middle is what took a little work to get right. 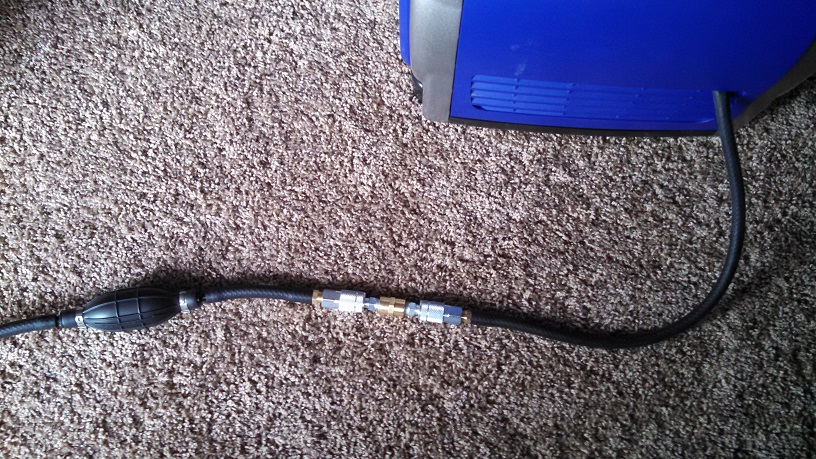
I wanted to be able to easily disconnect the external fuel line from the external fuel tank without fuel running out of either the generator or the external fuel tank. So this is what I came up with. I put both female and male quick connect adaptors on either end of the fuel line and then joined the male adaptors with the brass coupler in the middle. 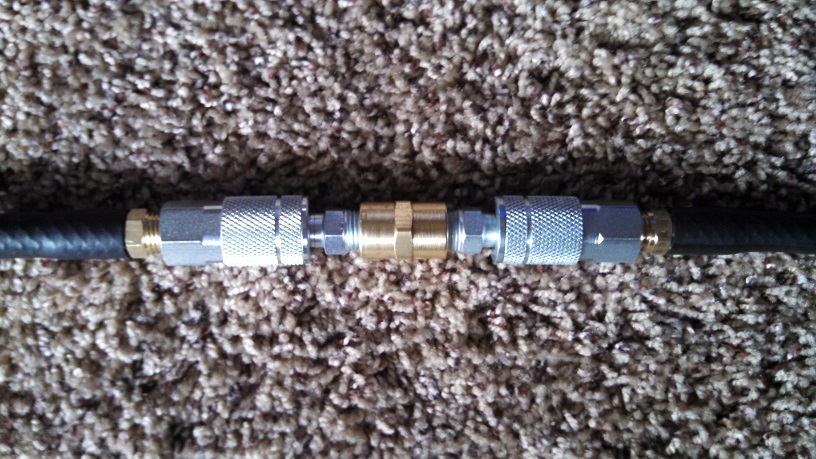
So what does this last assembly allow me to do? A lot! (1) If I want to run the generator with the stock fuel tank, I disconnect both of the female adaptors (on both the left and right side as seen in the last picture) and flip the fuel switch on the front of the generator to 'ON'. (2) If I want to run the generator with an external fuel tank, I flip the fuel switch to 'OFF' (this prevents fuel from back-flowing into the stock fuel tank), connect the two adaptors together, and squeeze the priming bulb to prime the fuel line. Obviously, the external fuel tank must be higher than the generator for this to work. (3) If I want to drain the stock fuel tank at the end of the season, I disconnect the fuel line on the left, going to the external fuel tank, but leave on the right side, going to the stock fuel tank. Now I can drain the stock fuel tank quickly and easily. The total cost of the mod was about $75, half of which was for the primer bulb. It was a bit pricey, but I wanted a really good one that I could depend on. I could've gotten one for about $12, but it wouldn't have been nearly as solidly built. I bought everything at my local NAPA auto parts store, and the mod took about 20 minutes to do. If I were to do it again, the only thing I would do differently is get a longer bit of fuel line. I did this with 6', but 8-9' would have been even better. At $2 per foot, it's not very expensive. |
|
|
"Not all those who wander are lost." Tolkien
2014 Hood River 177 2005 GMC Envoy XL |
|
 |
|
|
techntrek
Admin Group - pHp 
Joined: 29 Jul 2009 Location: MD Online Status: Offline Posts: 9059 |
Posted: 13 Jul 2014 at 11:55pm |
|
Excellent! The mod I wanted to do but never did.
|
|
|
|
|
Budward
Senior Member
Joined: 21 Apr 2014 Location: SC/NC Online Status: Offline Posts: 438 |
Posted: 14 Jul 2014 at 6:38am |
|
Cool!
I'd keep a close eye on those quick disconnects- if they are for air the seals may either turn to mush or harden when exposed to gasoline. I really recommend the Atwood marine fuel quick disconnects- http://www.attwoodmarine.com/store/product/universal-sprayless-connector Speaking of reactions to gasoline- the 3/16 fuel hose I used was apparently only rated for fuel on the inside. I made an adapter to stick it in a fuel can (pic below) and within days the external part of the hose submerged in gas became so stiff I had to replace it with something else! 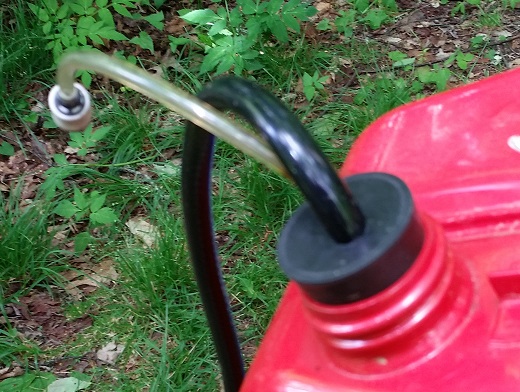 The small hose is the makeup air intake for the can- that is a ceramic chainsaw fuel filter on the hose, keeps water, dirt etc out of the can. Rather than use a primer bulb when I want to start the siphon effect of fuel to the generator, and some may not like this, I simply place my mouth around the filter, not actually touching it, lips sealing around the tubing, and blow- the low pressure air forces fuel to start flowing to the generator and of course it continues as long as the can is higher than it. Here is my internal connection- note I added a fuel filter, as otherwise there is NONE from an external can. The generator tank itself is only filtered by the screen in the filler neck. I like this add on because ALL fuel flows through it regardless of source. I had a heck of a timne finding a brass 3/16 tee- none locally, finally had to order it which cost about $10 delivered, most of which was "shipping". 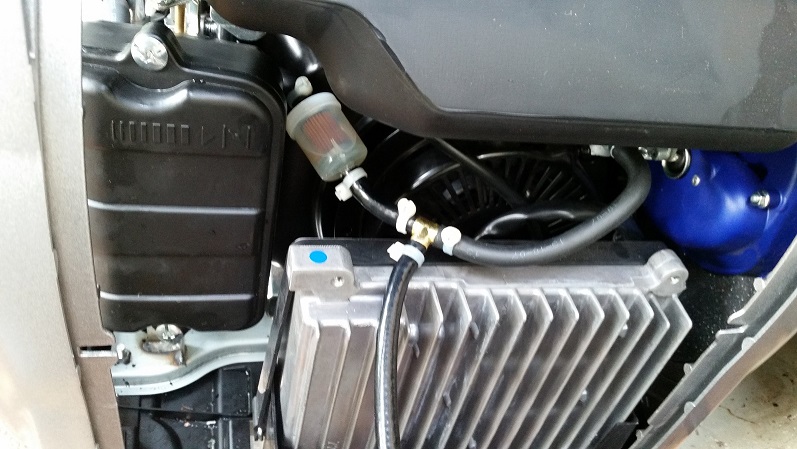 I mounted the Atwood quick connect through the panel right next to the handle to be somewhat protected from getting bumped when not in use. Pic of entire unit in operation- 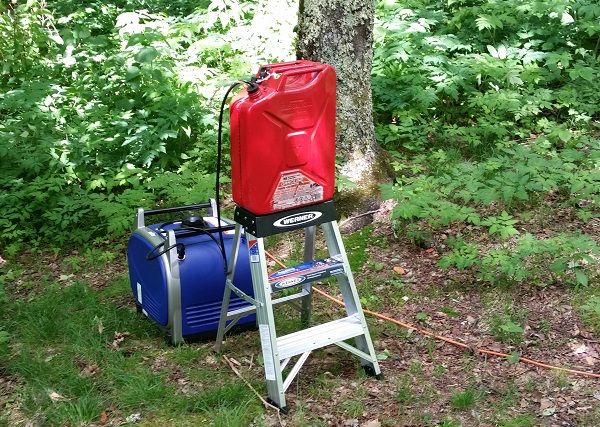 I picked up the 2ft stepladder to be able to clean debris off the top of the slideout before retracting it- turned out to have a use as fuel can stand to keep the siphon effect going... |
|
|
2014 179
Towed by a 2015 Ford Transit Diesel Supervised by a German/Aussie mix and a Labradoodle! |
|
|
|
|
Leo B
podders Helping podders - pHp

Joined: 13 Jan 2012 Location: Lyndonville, VT Online Status: Offline Posts: 4514 |
Posted: 14 Jul 2014 at 7:45am |
|
Really nice set up!!
|
|
|
Leo & Melissa Bachand
2017 Ford F150 2021 Vista Cruiser 19 csk Previously owned 2015 Rpod 179 2010 Rpod 171 |
|
|
|
|
WillThrill
Senior Member
Joined: 04 Jul 2014 Online Status: Offline Posts: 298 |
Posted: 14 Jul 2014 at 7:43pm |
|
Thanks for the tip Budward. The manager at NAPA who helped me knew what I was doing, and these were some pricey fittings, so I'm hopeful that there won't be any leaks. Obviously, there will be virtually no pressure placed on anything since it's gravity fed, but I'll keep an eye on it.
|
|
|
"Not all those who wander are lost." Tolkien
2014 Hood River 177 2005 GMC Envoy XL |
|
|
|
|
Post Reply
|
| Forum Jump | Forum Permissions You cannot post new topics in this forum You cannot reply to topics in this forum You cannot delete your posts in this forum You cannot edit your posts in this forum You cannot create polls in this forum You cannot vote in polls in this forum |


 External Fuel Tank Line for Yamaha 2400iSHC