|
|
Post Reply 
|
| Author |
 Printable Version Printable Version Google Google Delicious Delicious Digg Digg StumbleUpon StumbleUpon Windows Live Windows Live Yahoo Bookmarks Yahoo Bookmarks reddit reddit Facebook Facebook MySpace MySpace Newsvine Newsvine Furl Furl Topic Search Topic Search  Topic Options Topic Options
|
Nanc 
Newbie 
Joined: 06 Jul 2015 Location: washington Online Status: Offline Posts: 12 |
 Topic: modifications Topic: modificationsPosted: 06 Jul 2015 at 1:18pm |
|
I so appreciate your forum- as some one new to RVing in general- let alone the RPod I just bought.
a few questions: your modifications look great but how do you install shelves? how do you know where to screw? do you have to wait till after the warranty is expired to get away with this? is it really $300 plus to purchase a replacement mattress? amazon the best source cost wise for bedding? same questions for changing out the TV for a tilt holder I have a 2016 179 - has the R dome slide been worked out or do I expect to have to clamp the opening as described? it sounds like some people install a tube beneath the unit to put the septic line into= who does this and which line is less likely to trap material in its folds? there was one that macerated on line- does that one work or is it even needed? thanks all in advance Nanc |
|
|
Namaste
|
|
 |
|
|
Leo B
podders Helping podders - pHp 
Joined: 13 Jan 2012 Location: Lyndonville, VT Online Status: Offline Posts: 4517 |
Posted: 06 Jul 2015 at 1:40pm |
|
Welcome to the group!! Congrats on your 179!!
|
|
|
Leo & Melissa Bachand
2017 Ford F150 2021 Vista Cruiser 19 csk Previously owned 2015 Rpod 179 2010 Rpod 171 |
|
|
|
|
FamilyGuy
Newbie
Joined: 23 Jun 2015 Online Status: Offline Posts: 13 |
Posted: 06 Jul 2015 at 9:30pm |
|
Hi.
I'm curious what the more experienced folks will say on these points but here are a few comments: Some items that are lightly loaded (window shades) seem to be screwed directly to the foam wall. I think drywall anchors (not molly bolts) are a better choice for anything load bearing. I've heard people reference studs as well. Not sure what this means in the context of an R-POD but if there is a framing member (pine or aluminum) then that's going to be your best bet for a load bearing shelf. A stud finder might help you here. It would be interesting to see a picture of how the R-POD walls are constructed. We put a 3" memory foam mattress over the cushions in our 182g and its more comfortable than our bed at home. Worth every penny. I installed the short tube onto the tongue and cut a Rhino Flex hose in half so it would fit. This worked fine for dry camping and dumping at the service station. Recently we stayed at an RV park and found that the shorter hose would not allow us to use the sewer connection at the camp site. We have a 10 or 11 day trip planned soon and I hope to have the longer holder installed by then. So, if you plan to stay at RV parks occasionally the longer holder is probably worth the effort to install. I've seen a telescoping version that might make mounting to the R-POD frame simple. http://www.dwincorp.com/products/125/NEW-SUPER-SLIDER-Adjustable-SUPER-TUBE The Rhino Flex hose works great and seems well designed and built. I would suggest you try that for a while and see if you think anything else is needed. I don't think you will. Safe Travels |
|
|
|
|
FamilyGuy
Newbie
Joined: 23 Jun 2015 Online Status: Offline Posts: 13 |
Posted: 06 Jul 2015 at 11:02pm |
|
Here is a video that shows some aspects of the R-POD construction, it might give you some ideas about how to mount shelves etc. Note that the side walls are aluminum and ridged foam while the curved front/roof/back is pine, plywood and fiberglass insulation. https://www.youtube.com/watch?v=QXNYA73rCNE http://www.rpodnation.com/r-pod-plant-tour_topic1313_post14794.html?KW=frame#14794 |
|
|
|
|
Nanc
Newbie
Joined: 06 Jul 2015 Location: washington Online Status: Offline Posts: 12 |
Posted: 07 Jul 2015 at 10:57am |
|
WOW! helpful already
that slide show of rpod construction was very helpful and explained the shelves people were putting on the forward wall the Super Slider hose carrier looks great too thanks everyone Nanc |
|
|
Namaste
|
|
|
|
|
Mountainrev
Senior Member

Joined: 22 Jul 2014 Location: Eagle, Colorado Online Status: Offline Posts: 193 |
Posted: 07 Jul 2015 at 12:03pm |
|
As far as replacing the mattress, we went with using a memory foam topper, rather than a whole new mattress. Much, much cheaper. We bought it at Costco several years ago for our popup, but if memory serves (no pun intended), it was <$50. I'm sure a brand new deluxe (and expensive) mattress would be superior, but for us, this is an acceptable improvement. We find the bed comfortable and have no issues sleeping on it with the topper.
|
|
|
2014 177
2008 Jeep Grand Cherokee Turbodiesel "I lift my eyes to the hills." 
|
|
|
|
|
TigerPawd
Groupie 
Joined: 04 Feb 2015 Location: Corpus Christi Online Status: Offline Posts: 68 |
Posted: 08 Jul 2015 at 11:31am |
|
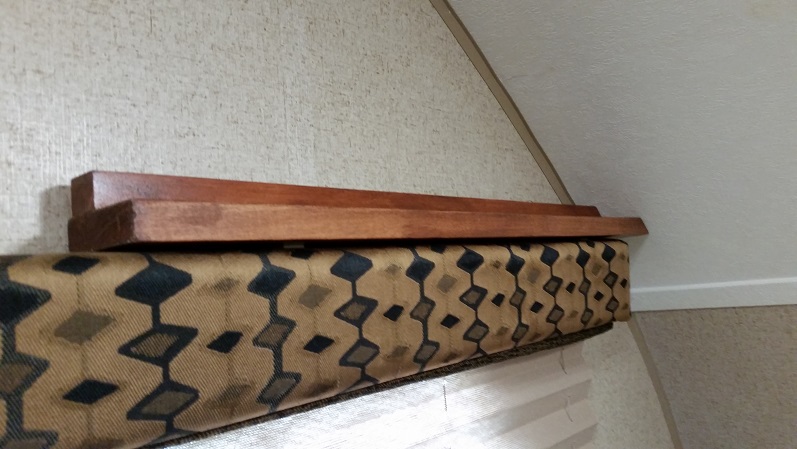
Nanc, there are probably lots of ways to install shelves in Pods. Since we also have a #179, I thought I would offer ours. The only part of any real difficulty for someone with hand tools would be cutting the 45° angles. I'll apologize now - I didn't take enough pictures in the early part - where the brackets are attached and that may be the hardest to describe. Sorry. The Pod is about 75" wide inside and we wanted to use
one of Lowe's Allen and Roth 72" shelves. We also wanted to make it so the shelf would slide
forward a bit. The idea here was to give
a little more room for when we stack things a bit higher, or if we use bigger
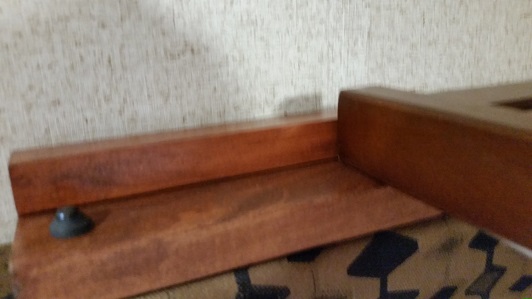
wicker baskets, but to be able to push it back when not in use. With this setup, someone lying next to the wall will still be able to view the TV set (more on that below). First, I cut a 1 x 4 down to 3" by 48". The 1" part is a long-standing lumberyard scam, as 1 x 4s have been only 3/4" thick for generations. Then I cut it to 24" long at a 45° angle. This angle matches the contour of the wall over the bed fairly well. Then I ripped two more pieces, 24" x 1" x 3/4" and then trimmed one end of each at 45° to sit on top of those 3" pieces. I fooled around with several stain combinations but finally settled on a medium walnut. Hind sight is that I should have taken some pictures here, but I didn't. Sorry again. I got four 1.5" L-shaped angle brackets to attach the wood to the wall above the padded valence thing. First step there was to attach them to what would soon be the underside, next to the top of the valence padding. I used just one screw to attach each bracket four inches from each end. OK. So those
1.5" angle braces now have about 3/4" of bracket (and one screw hole)
sticking up above the 1 x 3. I used the
screws that came with the brackets and screwed them into the Pod wall. Some weight is supported by the valences and some by the brackets. The shelf is light and we don't load with more than towels and some clothes - nothing heavy! If bouncing down the road causes the screw holes to enlarge some day, we can always convert to hollow wall anchors. Then the 1" wooden piece was attached to the 3"
piece about 3/16" in from the edge next to the wall. It effectively covers the brackets that are screwed to the wall. Matching that gap on the other support strip gives enough room for the shelf to slide. The 1" piece allows the shelf to move forward if needed - without falling while on the road. Finally, a screw through a faucet washer was
installed about 3/4" in from the forward end to keep the shelf from
scooting off the support.
Hmm. From this angle and with this lighting, the stain match isn't as good as I thought. Maybe one more coat...? Other thoughts: (1) We had a 3" foam topper from our previous camper and we moved it to the Pod. It's been all we have needed; no $300 mattress needed for us. (2) We did get a tilty arm for the TV set for use when in bed - totally unnecessary for other viewing. Most flat screen sets just don't view well from sharp angles. The arm also has a joint in the middle, which helps a little. (3) No Dome for us, so I won't comment on that. (4) On the sewer line, dump the black water tank first, then the grey water tank. The grey water will clean that "stuff" in the folds. Be sure you have plenty of grey water though. |
|
|
Joan, Jerry and the two Pugs
2015 R-Pod 179 |
|
|
|
|
Leo B
podders Helping podders - pHp
Joined: 13 Jan 2012 Location: Lyndonville, VT Online Status: Offline Posts: 4517 |
Posted: 08 Jul 2015 at 12:27pm |
|
Nice!
|
|
|
Leo & Melissa Bachand
2017 Ford F150 2021 Vista Cruiser 19 csk Previously owned 2015 Rpod 179 2010 Rpod 171 |
|
|
|
|
Nanc
Newbie
Joined: 06 Jul 2015 Location: washington Online Status: Offline Posts: 12 |
Posted: 08 Jul 2015 at 3:37pm |
|
great stuff thank you
N |
|
|
Namaste
|
|
|
|
|
Post Reply
|
| Forum Jump | Forum Permissions You cannot post new topics in this forum You cannot reply to topics in this forum You cannot delete your posts in this forum You cannot edit your posts in this forum You cannot create polls in this forum You cannot vote in polls in this forum |


 modifications