
|
|
Post Reply 
|
| Author |
 Printable Version Printable Version Google Google Delicious Delicious Digg Digg StumbleUpon StumbleUpon Windows Live Windows Live Yahoo Bookmarks Yahoo Bookmarks reddit reddit Facebook Facebook MySpace MySpace Newsvine Newsvine Furl Furl Topic Search Topic Search  Topic Options Topic Options
|
JohnBG 
Senior Member 
Joined: 14 Apr 2015 Location: Deltona, FL Online Status: Offline Posts: 190 |
 Topic: Keder rail replacement for old pod with new r-dome Topic: Keder rail replacement for old pod with new r-domePosted: 10 Aug 2015 at 11:11am |
|
Tis weekend I replaced the 9mm keder rails on my 2010 171 with new 14mm channels so I could use a newer style r-dome I recently purchased. I tried without luck to find an older 9mm keder r-dome so I bought a newer 14mm keder dome and was confronted with either changing out the rails on my pod or modifying the dome to fit the 9mm keder rails. I opted to change out the rails.
I bought the 14mm keder rail channels direct from Forest River, the only catch was I had to have them cut into 8' lengths for shipping. It would have cost a small fortune to ship 16' long sections. Total for 4 8' lengths of 14mm white keder channels was about $75 including shipping. Once I received the rails, I noticed that they didn't have any holes drilled in them for mounting. I took a tape measure and measured the 9mm rails on the pod and found the holes were about 6" apart, so I took a tape measure and marked every 6 inches on the new keder sections and drilled 5/32" holes in the center of the rail at those intervals, using a small groove in the channel as a guide. I also drilled holes about 1" from each end. Once I had all the holes drilled, I removed the 9mm keder rails from the pod. I had hoped to use the same fasteners, but some of them along the top were rusted. I made a run to the local Ace hardware and bought a box of 100 stainless steel phillips head screws that had the same style head and were just a little longer, which was the closest match I could find. There was no way that the existing keder rail holes in the pod were going to match up with the new keder rails so I filled the holes in the pod with white silicone caulk. Starting at the top in the middle of the pod, I lined up the new keder rail and drilled a small pilot hole in the pod using the keder as a guilde and them mounted the keder with one screw. Then I kept aligning the keder properly, drilled another pilot hole and installed another screw. It's handy to have two drills (one to make the pilot holes and another to drive the screws and a small folding scaffold to stand on). The tricky part is making the bends in the keder along the top at the front and back of the pod. I carefully bent the keder until it linedup with the pod, drilled a pilot hole and installed another screw and repeated the process. Bending the keder was not too hard but as you bend it, it wants to warp and twist a little. Once I got past the ends of where the old keder stopped, I trimmed off the excess channel before installing the last screw. The bottom channel was pretty easy as there are no bends. I did not run rail behind the wheel and tire like the old rail as the 2 8' sections would have met there and would require removing the wheel. I didn't see why having keder rail behind the wheel would be beneficial, so I ran it until it went just under the fender. Once all the rails were installed, I applied white silicone caulking to the rails. The whole project took about 8 hours from start to finish. Here's a few pictures of the installation. I'm looking forward to trying out the dome on our next camping trip in a few weeks.      |
|
|
2010 R-Pod RP-171
2010 Honda Ridgeline TV |
|
 |
|
|
jfouch
Newbie 
Joined: 30 Sep 2015 Location: Cold Spring, MN Online Status: Offline Posts: 8 |
Posted: 13 Jan 2016 at 9:20pm |
|
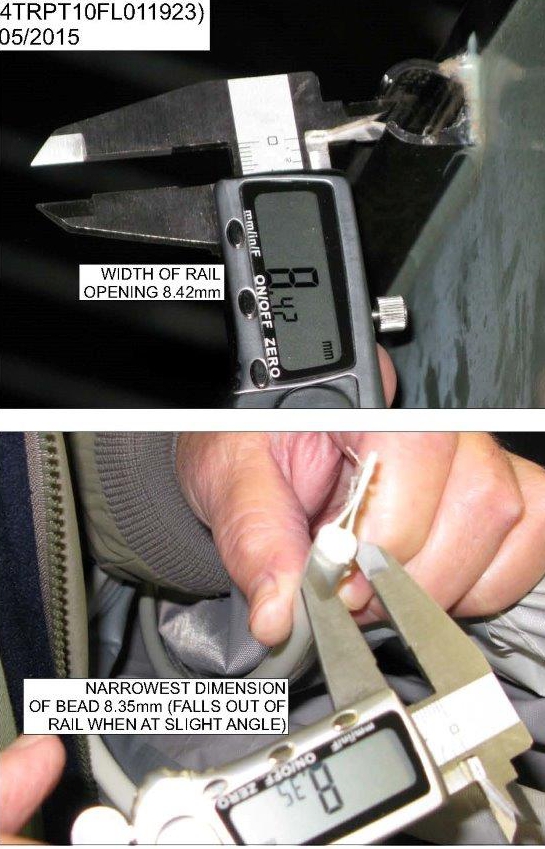
I purchased an R-Dome with my 2015 RP179. The bead on the R-dome is less than 9mm and falls out of the 14mm Keder rail when you slide it through. Have other RP179 owners experience the same problem?
Thanks. |
|
|
Jim
|
|
|
|
|
CharlieM
Senior Member
Joined: 23 Nov 2012 Location: N. Colorado Online Status: Offline Posts: 1797 |
Posted: 14 Jan 2016 at 8:01am |
|
I appears you were given the old style Rdome. It is not compatible with new Pods. If you bought from a dealer you are owed the correct dome.
|
|
|
Charlie
Northern Colorado OLD: 2013 RP-172, 2010 Honda Pilot 3.5L 4WD PRESENT: 2014 Camplite 21RBS, 2013 Supercharged Tacoma 4L V6 4WD |
|
|
|
|
jfouch
Newbie
Joined: 30 Sep 2015 Location: Cold Spring, MN Online Status: Offline Posts: 8 |
Posted: 14 Jan 2016 at 2:23pm |
|
Thanks for your reply. I compared my R-Dome to the new ones delivered to my local dealer in October, and it was exactly the same. So, I wrote FR and described the problem and sent them the pics I posted here. They agreed to send me a new one, so I thought the problem was solved. Got the new one, and the bead was exactly the same as the one I had (9.4mm at the widest, but 8.35mm diagonally). Talked with FR again and they said the one they sent was the correct one, even though the bead will not stay in the track.
If you have an R-Dome that works with the 14mm Keder rail, will you please tell me the width of the bead on yours? Thanks for the help. |
|
|
Jim
|
|
|
|
|
marwayne
Senior Member

Joined: 25 Oct 2011 Location: Edmonton AB Can Online Status: Offline Posts: 1002 |
Posted: 14 Jan 2016 at 3:51pm |
|
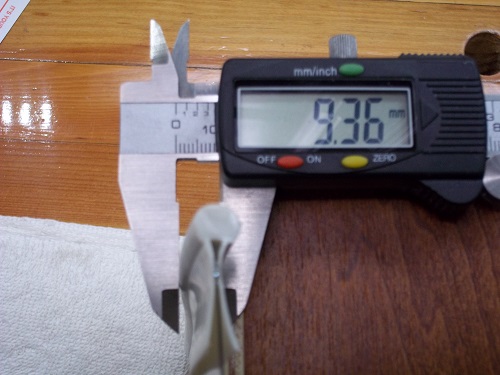
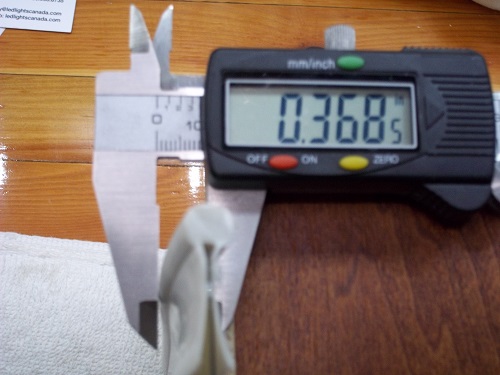
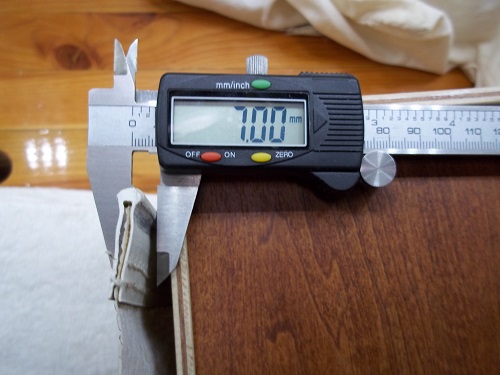
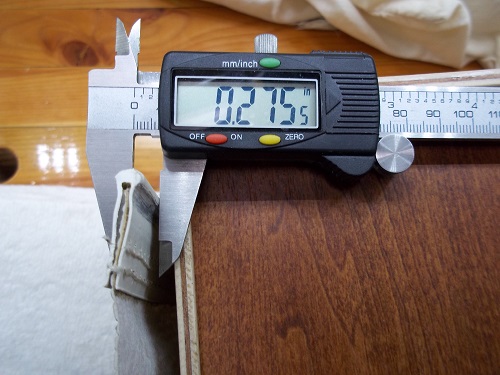
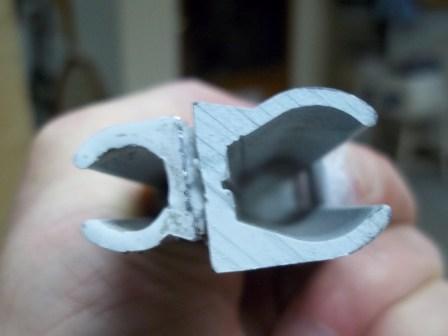
Here are the 2 different rails and keeders.
|
|
|
If you want something done right, do it yourself.
2011 RP172, 2016 Tundra 5.7 Litre, Ltd. |
|
|
|
|
jfouch
Newbie
Joined: 30 Sep 2015 Location: Cold Spring, MN Online Status: Offline Posts: 8 |
Posted: 14 Jan 2016 at 8:58pm |
|
How do you make the 9.36mm bead hold in the 14mm track, considering the smallest dimension of the oval shaped bead is less than the opening in the 14mm Keder track?
|
|
|
Jim
|
|
|
|
|
marwayne
Senior Member
Joined: 25 Oct 2011 Location: Edmonton AB Can Online Status: Offline Posts: 1002 |
Posted: 14 Jan 2016 at 9:45pm |
|
If the keder won't stay in the track, take a set of vice grips wrap some tape around the jaw so you don't damage the paint and squeeze the track together.
|
|
|
If you want something done right, do it yourself.
2011 RP172, 2016 Tundra 5.7 Litre, Ltd. |
|
|
|
|
jfouch
Newbie
Joined: 30 Sep 2015 Location: Cold Spring, MN Online Status: Offline Posts: 8 |
Posted: 14 Jan 2016 at 10:19pm |
|
Thank you, I appreciate your advice. I was hoping I wouldn't have to do it that way. I thought that since FR was installing 14mm Keder tracks, they would fabricate R-Domes with a 10mm or 11mm bead.
|
|
|
Jim
|
|
|
|
|
marwayne
Senior Member
Joined: 25 Oct 2011 Location: Edmonton AB Can Online Status: Offline Posts: 1002 |
Posted: 14 Jan 2016 at 11:21pm |
|
Don't forget if the bead was 11mm you would have hard time to push the keder 16' through the track.
|
|
|
If you want something done right, do it yourself.
2011 RP172, 2016 Tundra 5.7 Litre, Ltd. |
|
|
|
|
Post Reply
|
| Forum Jump | Forum Permissions You cannot post new topics in this forum You cannot reply to topics in this forum You cannot delete your posts in this forum You cannot edit your posts in this forum You cannot create polls in this forum You cannot vote in polls in this forum |


 Keder rail replacement for old pod with new r-dome