Winterizing no pink in hot water lines
Printed From: R-pod Owners Forum
Category: R-pod Discussion Forums
Forum Name: I need HELP!!!
Forum Discription: Perplexed/need help with a problem - ask here
URL: http://www.rpod-owners.com/forum_posts.asp?TID=14128
Printed Date: 24 Apr 2024 at 8:47pm
Software Version: Web Wiz Forums 9.64 - http://www.webwizforums.com
Topic: Winterizing no pink in hot water lines
Posted By: ampete
Subject: Winterizing no pink in hot water lines
Date Posted: 17 Oct 2020 at 11:46am
|
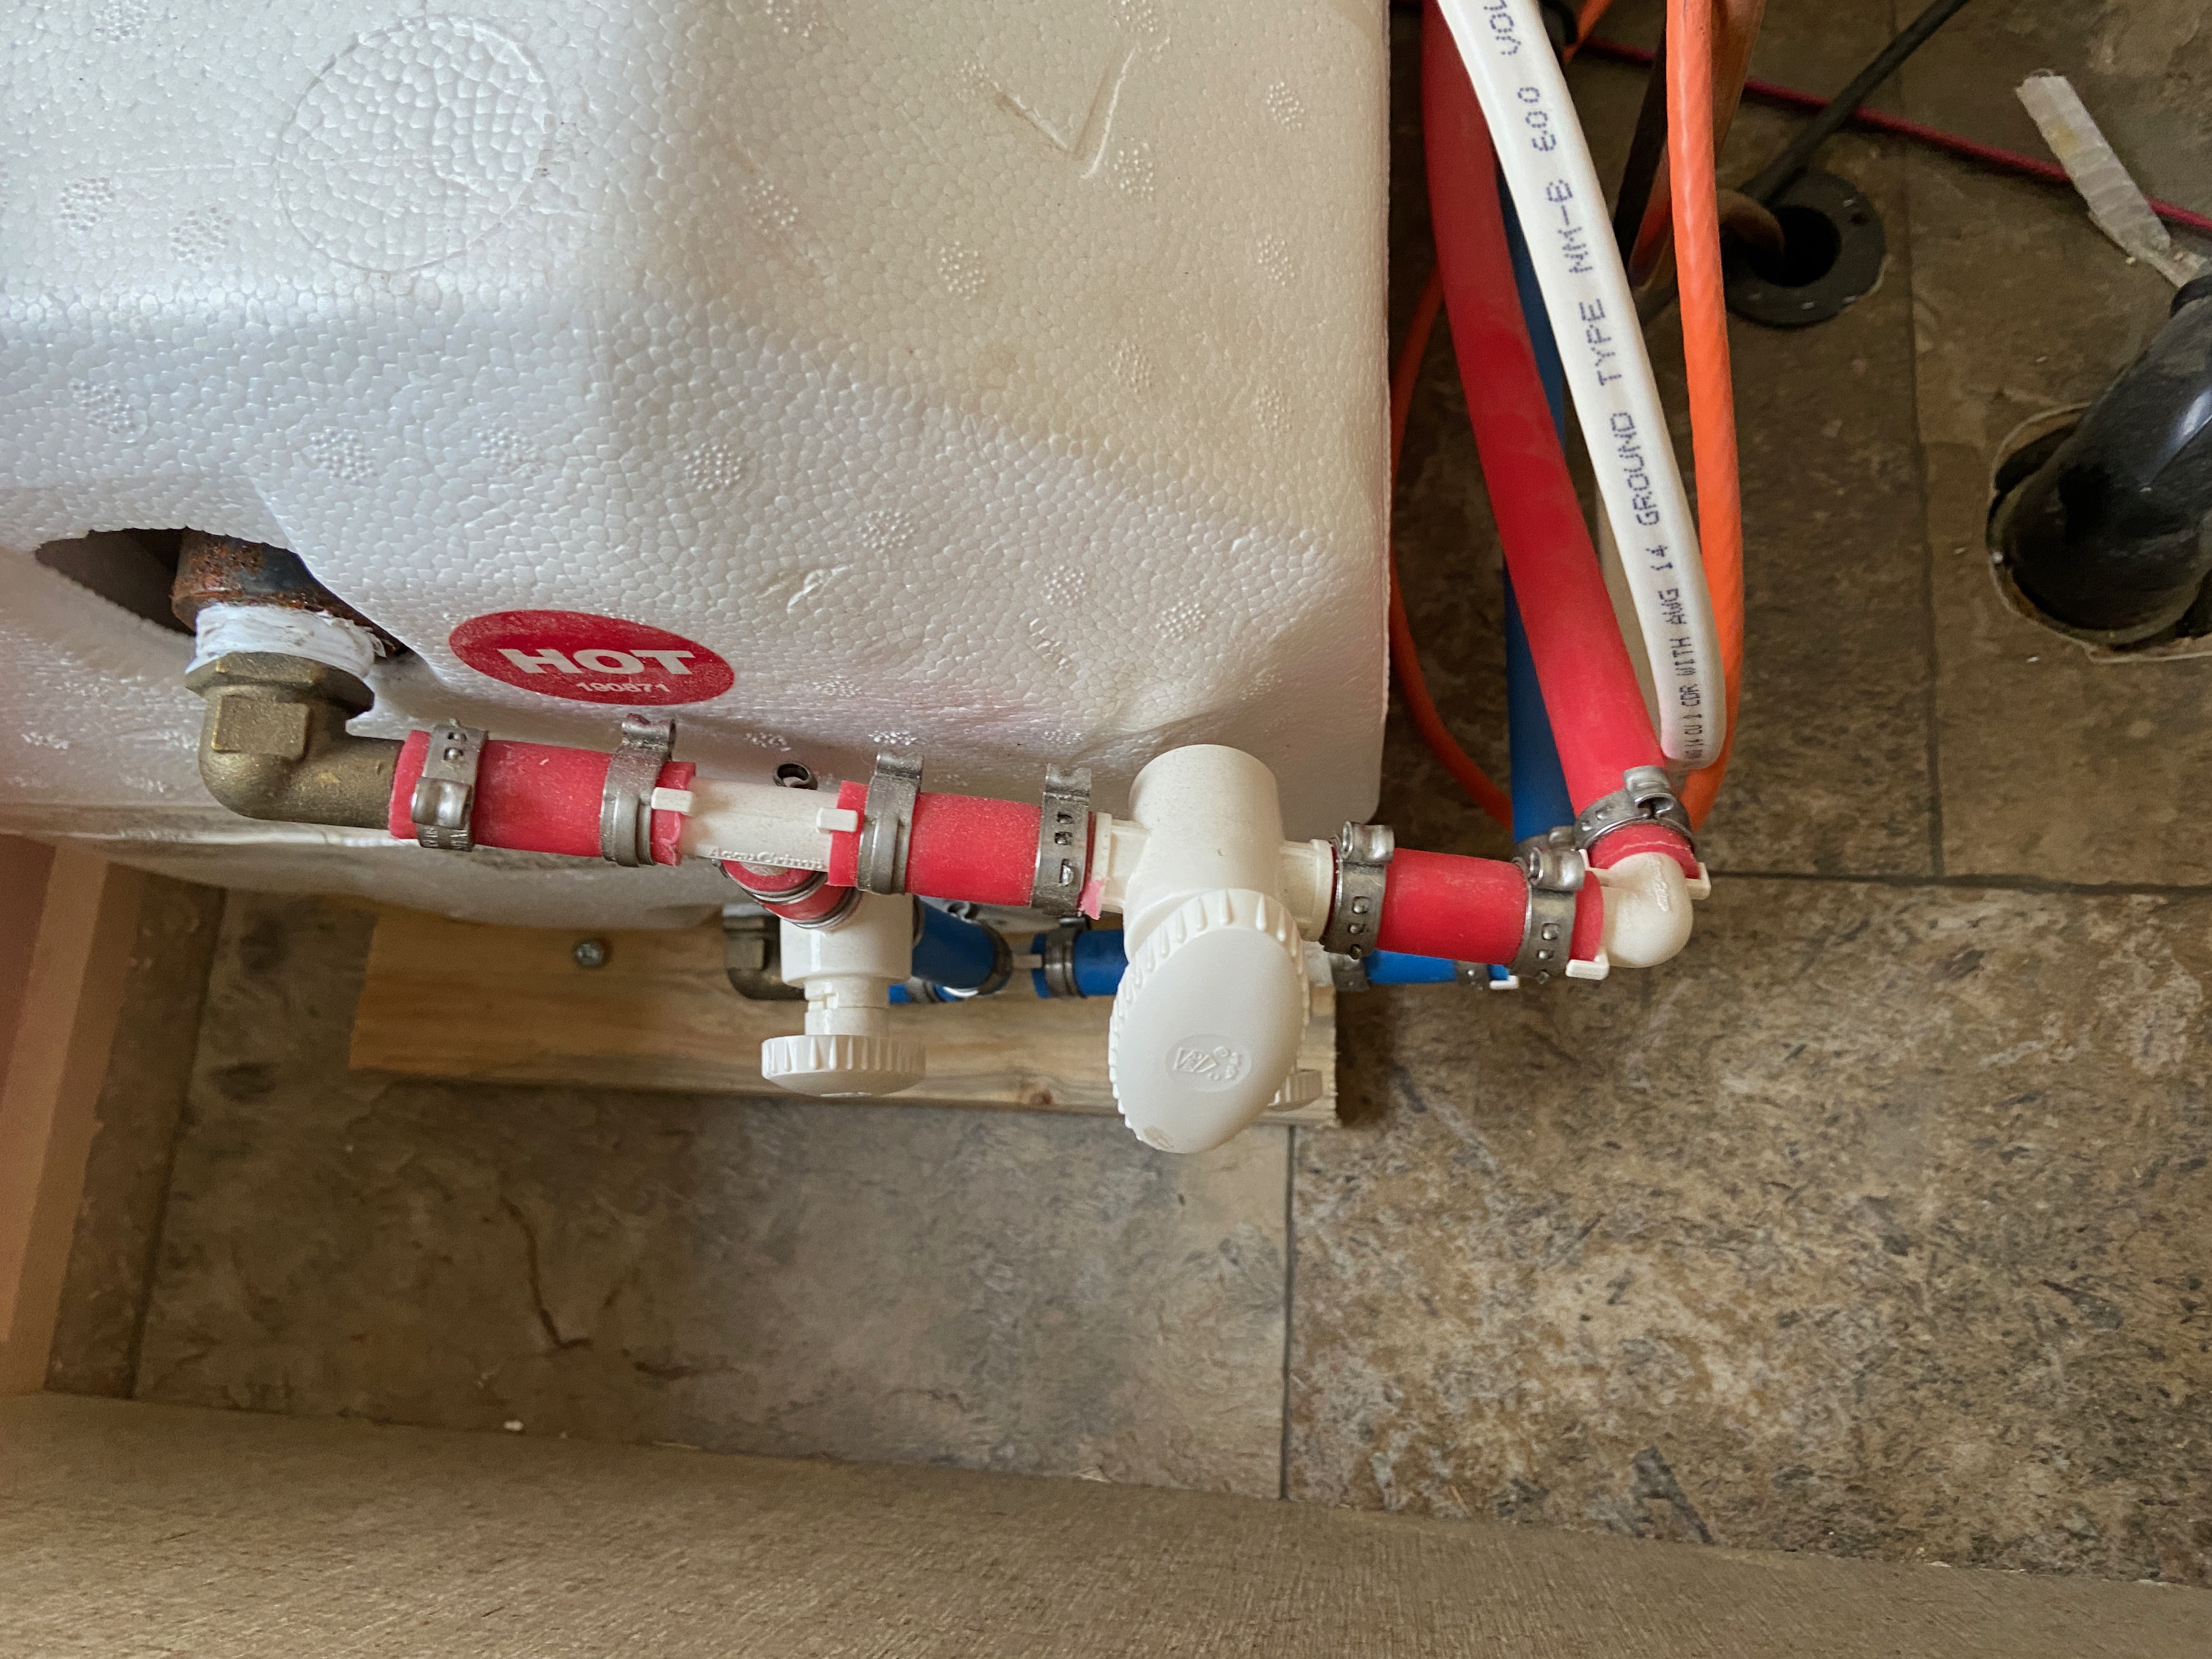
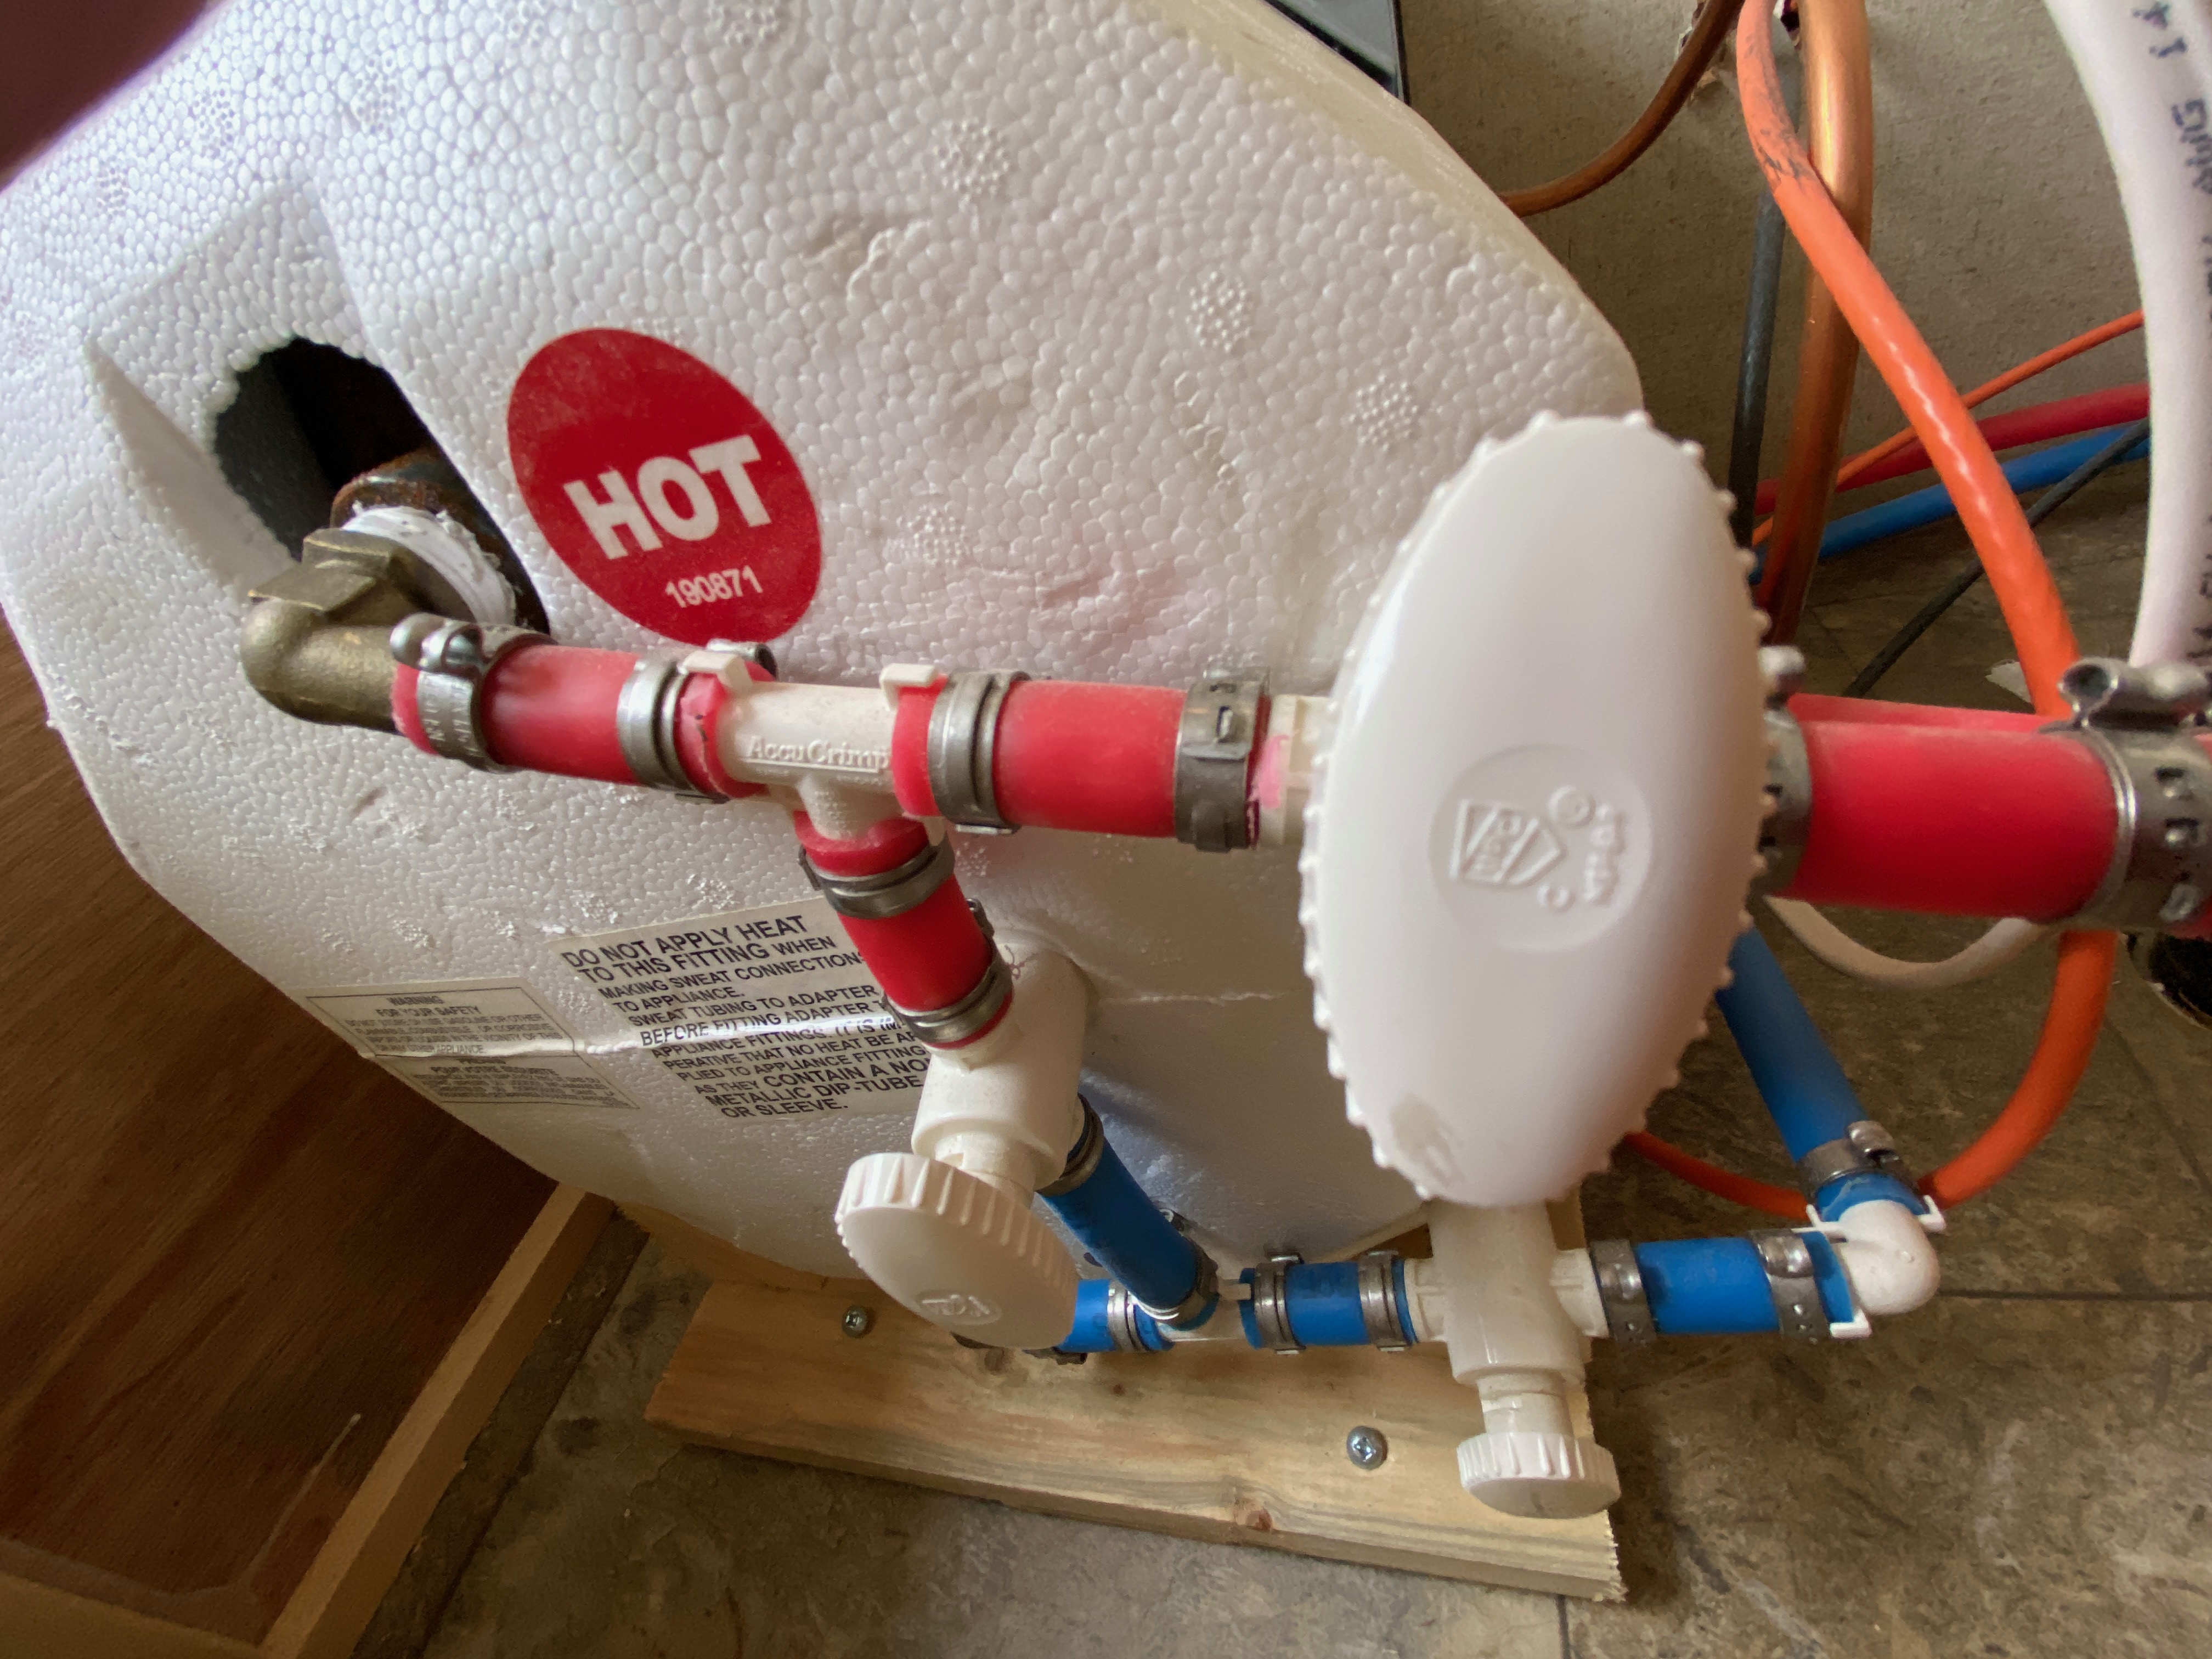
I am winterizing our 2014 171; I have followed techntrek list, watched and followed moose rv tips, and watched and followed John Marucci's video. All the tanks are empty, including the hot water and fresh water tanks. Low point drain plugs are now closed, but were opened and drained. At the stage to put anti-freeze in the lines and: The valves are as follows on the hot water tank: perpendicular (closed) for blue to blue, perpendicular (closed) for red to red, and parallel (open) on red to blue; When sucking the anti freeze via the water pump, all goes well on all cold lines and NOTHING comes out (not even air sounds) on hot water lines in either the kitchen or bath sinks. I tried with the low point drains open and closed with the same results. What am I missing? Thanks for your help |
Replies:
Posted By: JR
Date Posted: 17 Oct 2020 at 4:15pm
|
On John Marucci's video he has 3 valves one is on the pump which determines what the pump draws from the fresh water tank or the short hose (used for anti-freeze bottles). Then he has one, the second valve, on the water heater discharge hose (hot water on the top of the tank) and the third valve is on the feed side (cold water) for the water heater. In using his setup you position the valve handle in the direction you want the flow going. If the valve handle is on valves 2 & 3 are pointing toward the water heater, that is setup for using the water heater and not in the bypass mode. If both handles are pointing in the opposite direction then the flow of water is bypassing the water heater. My assumption is that on your 2014 you have a different configuration with the valves. From your description of the valves the red to blue valve should be in the open position which you have indicate that it is (that allows cold water to enter the hot water side of the system. The red to red valve should be set to allow water to flow from the red to blue valve into the hot water system and not back feed into the water heater. The blue to blue valve should be closed going to the water heater. You should even have a dedicated cold water line to the cold water system. From the results you are having I believe that your red to red valve is set incorrectly. Hope this helps but when you get ready to use the water heater just insure that it is getting water and is pressurized before turning on any heat either gas or electric. ------------- Jay 179/2019 |
Posted By: ampete
Date Posted: 17 Oct 2020 at 5:28pm
|
Thank you Jay...I will look at the red to red line. Trying to upload a photo or two. The hot water tank is located under the bed, while the water pump is located near my kitchen sink beneath a lower cupboard. The water pump functions perfectly, sucking up the pink antifreeze from the open ended hose when the cold lines are open. This past summer the hot water heater and tank worked well. The valves were set opposite of what they are now for winterizing, if that helps? I appreciate your input. Thanks
    |
Posted By: JR
Date Posted: 17 Oct 2020 at 6:51pm
|
Sorry about the thought that I had but looking at your pictures my thought was incorrect and with how the piping is plumbed I don't know just how to bypass the water heater. Just opening the red to red will not work? Sorry. ------------- Jay 179/2019 |
Posted By: ampete
Date Posted: 17 Oct 2020 at 6:56pm
| That's okay. I'm glad the photos were helpful. Thanks for trying. |
Posted By: Tars Tarkas
Date Posted: 17 Oct 2020 at 8:31pm
|
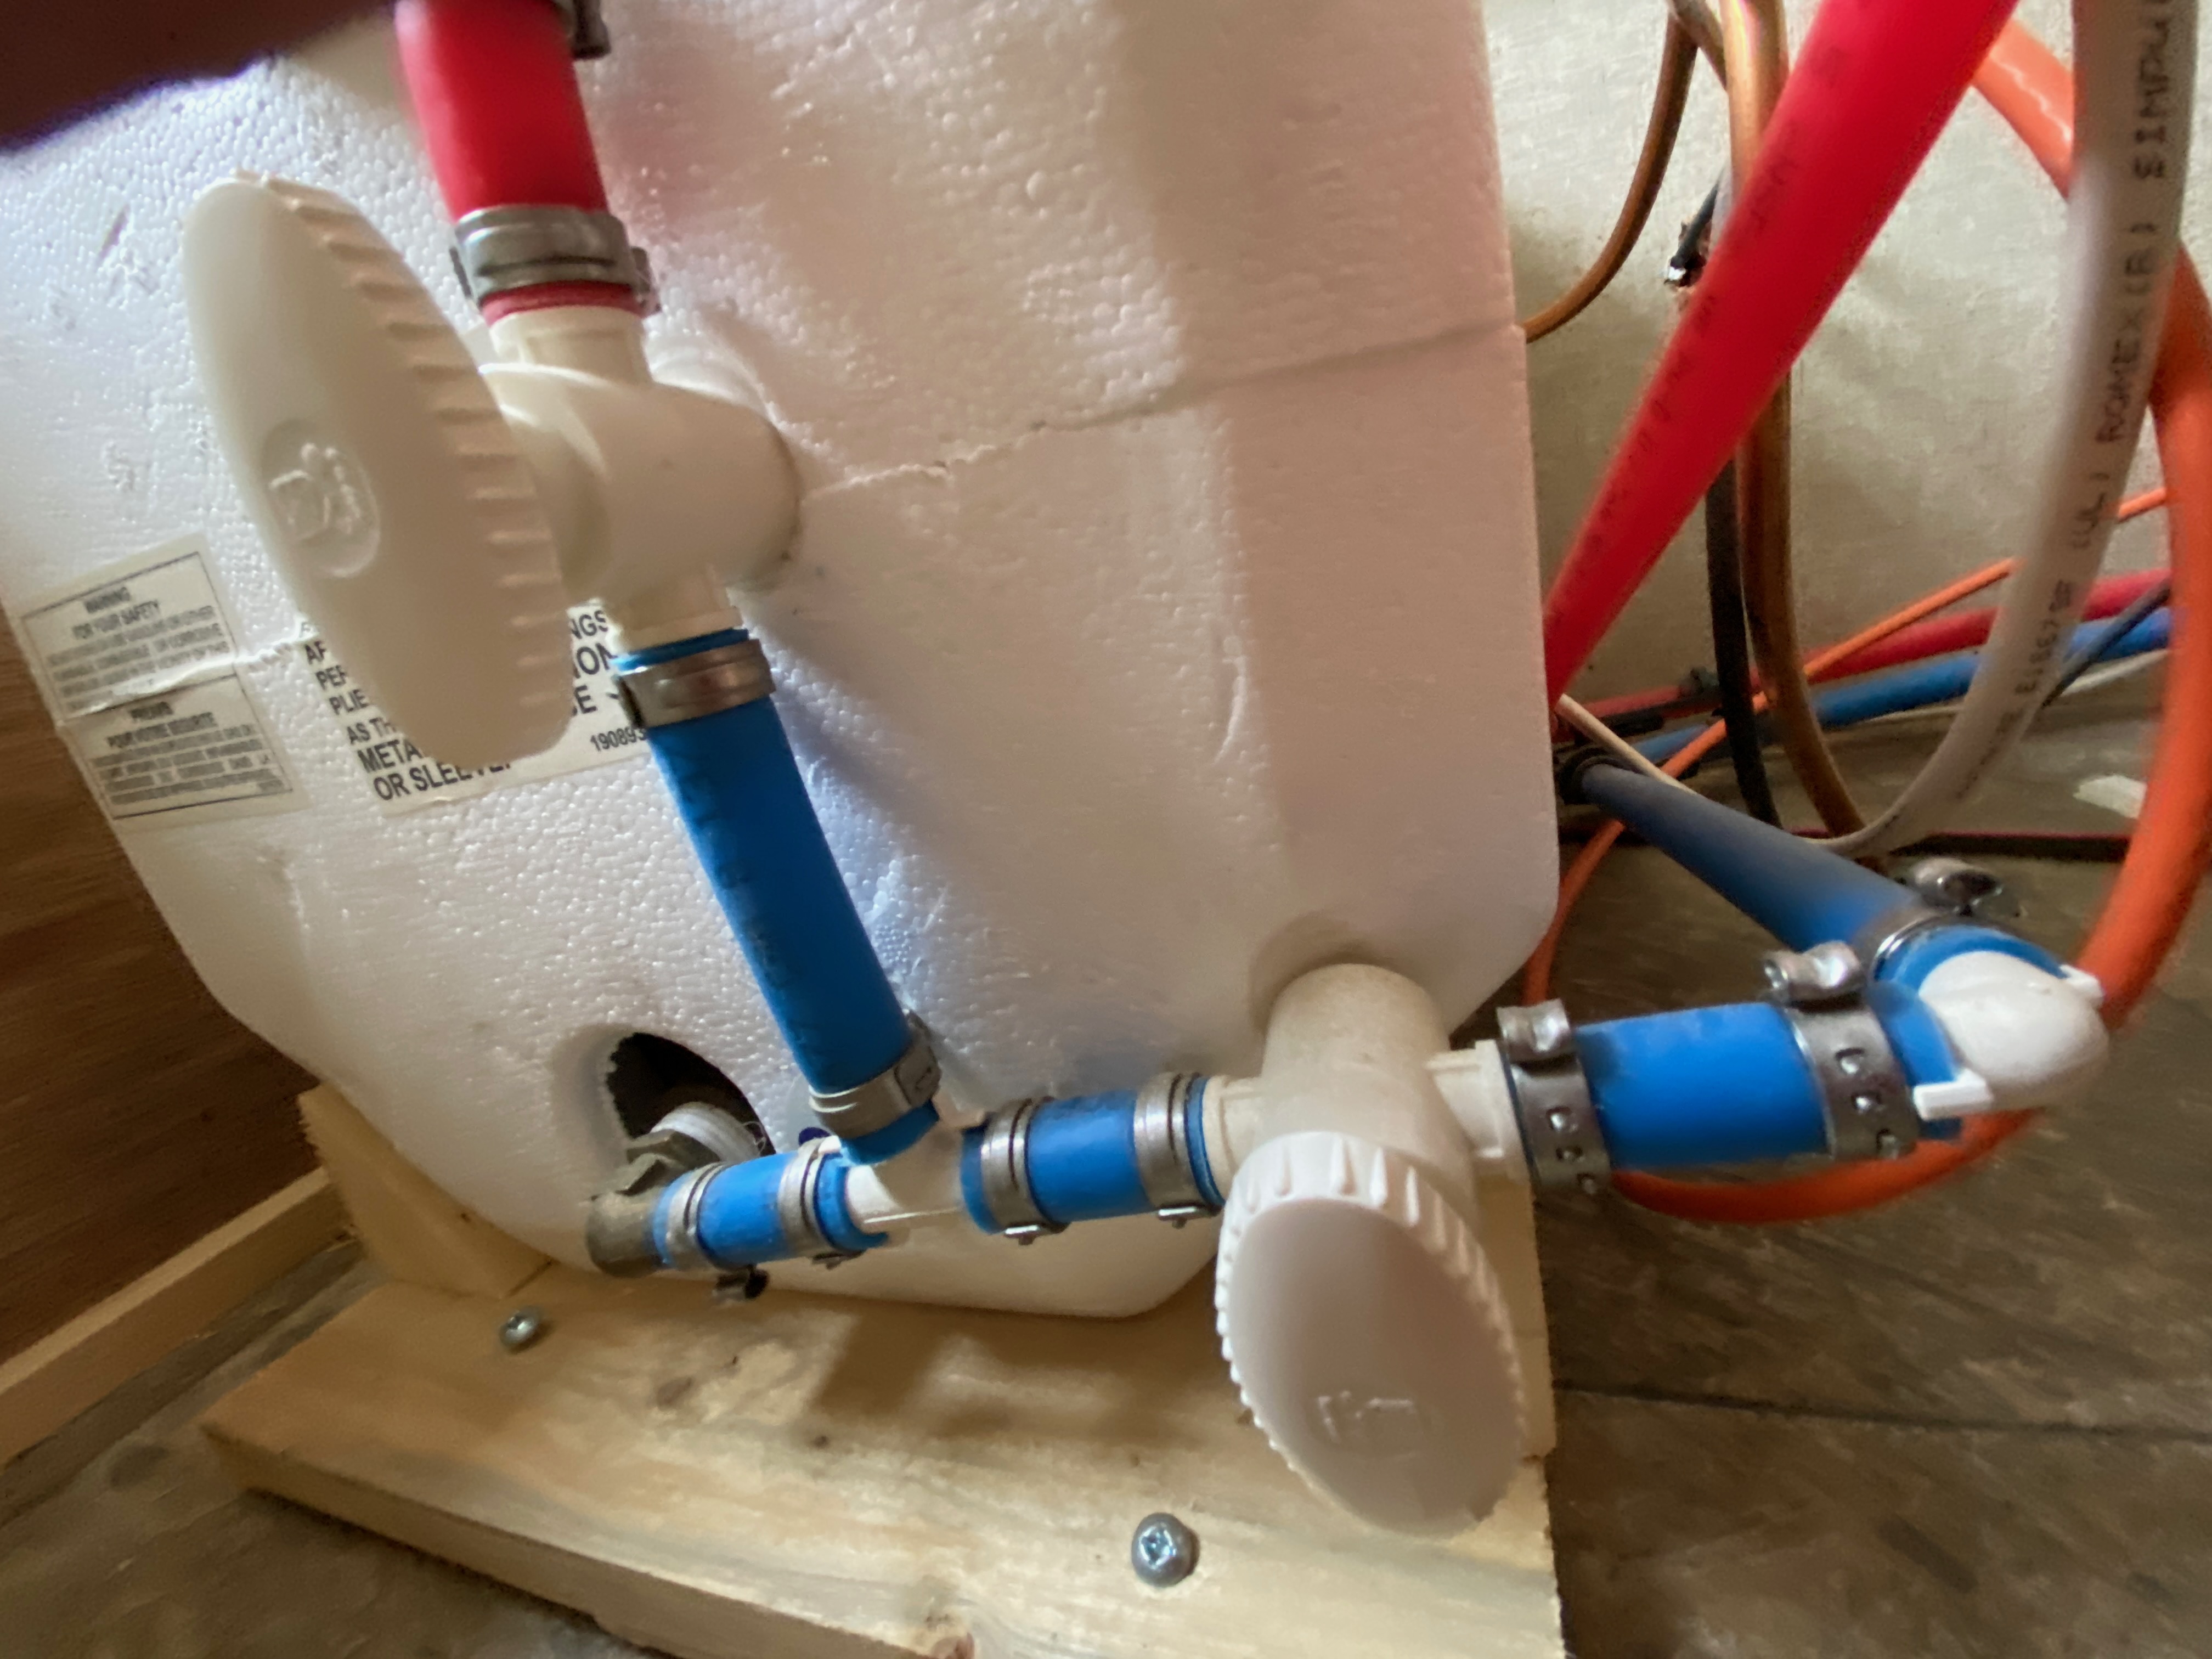
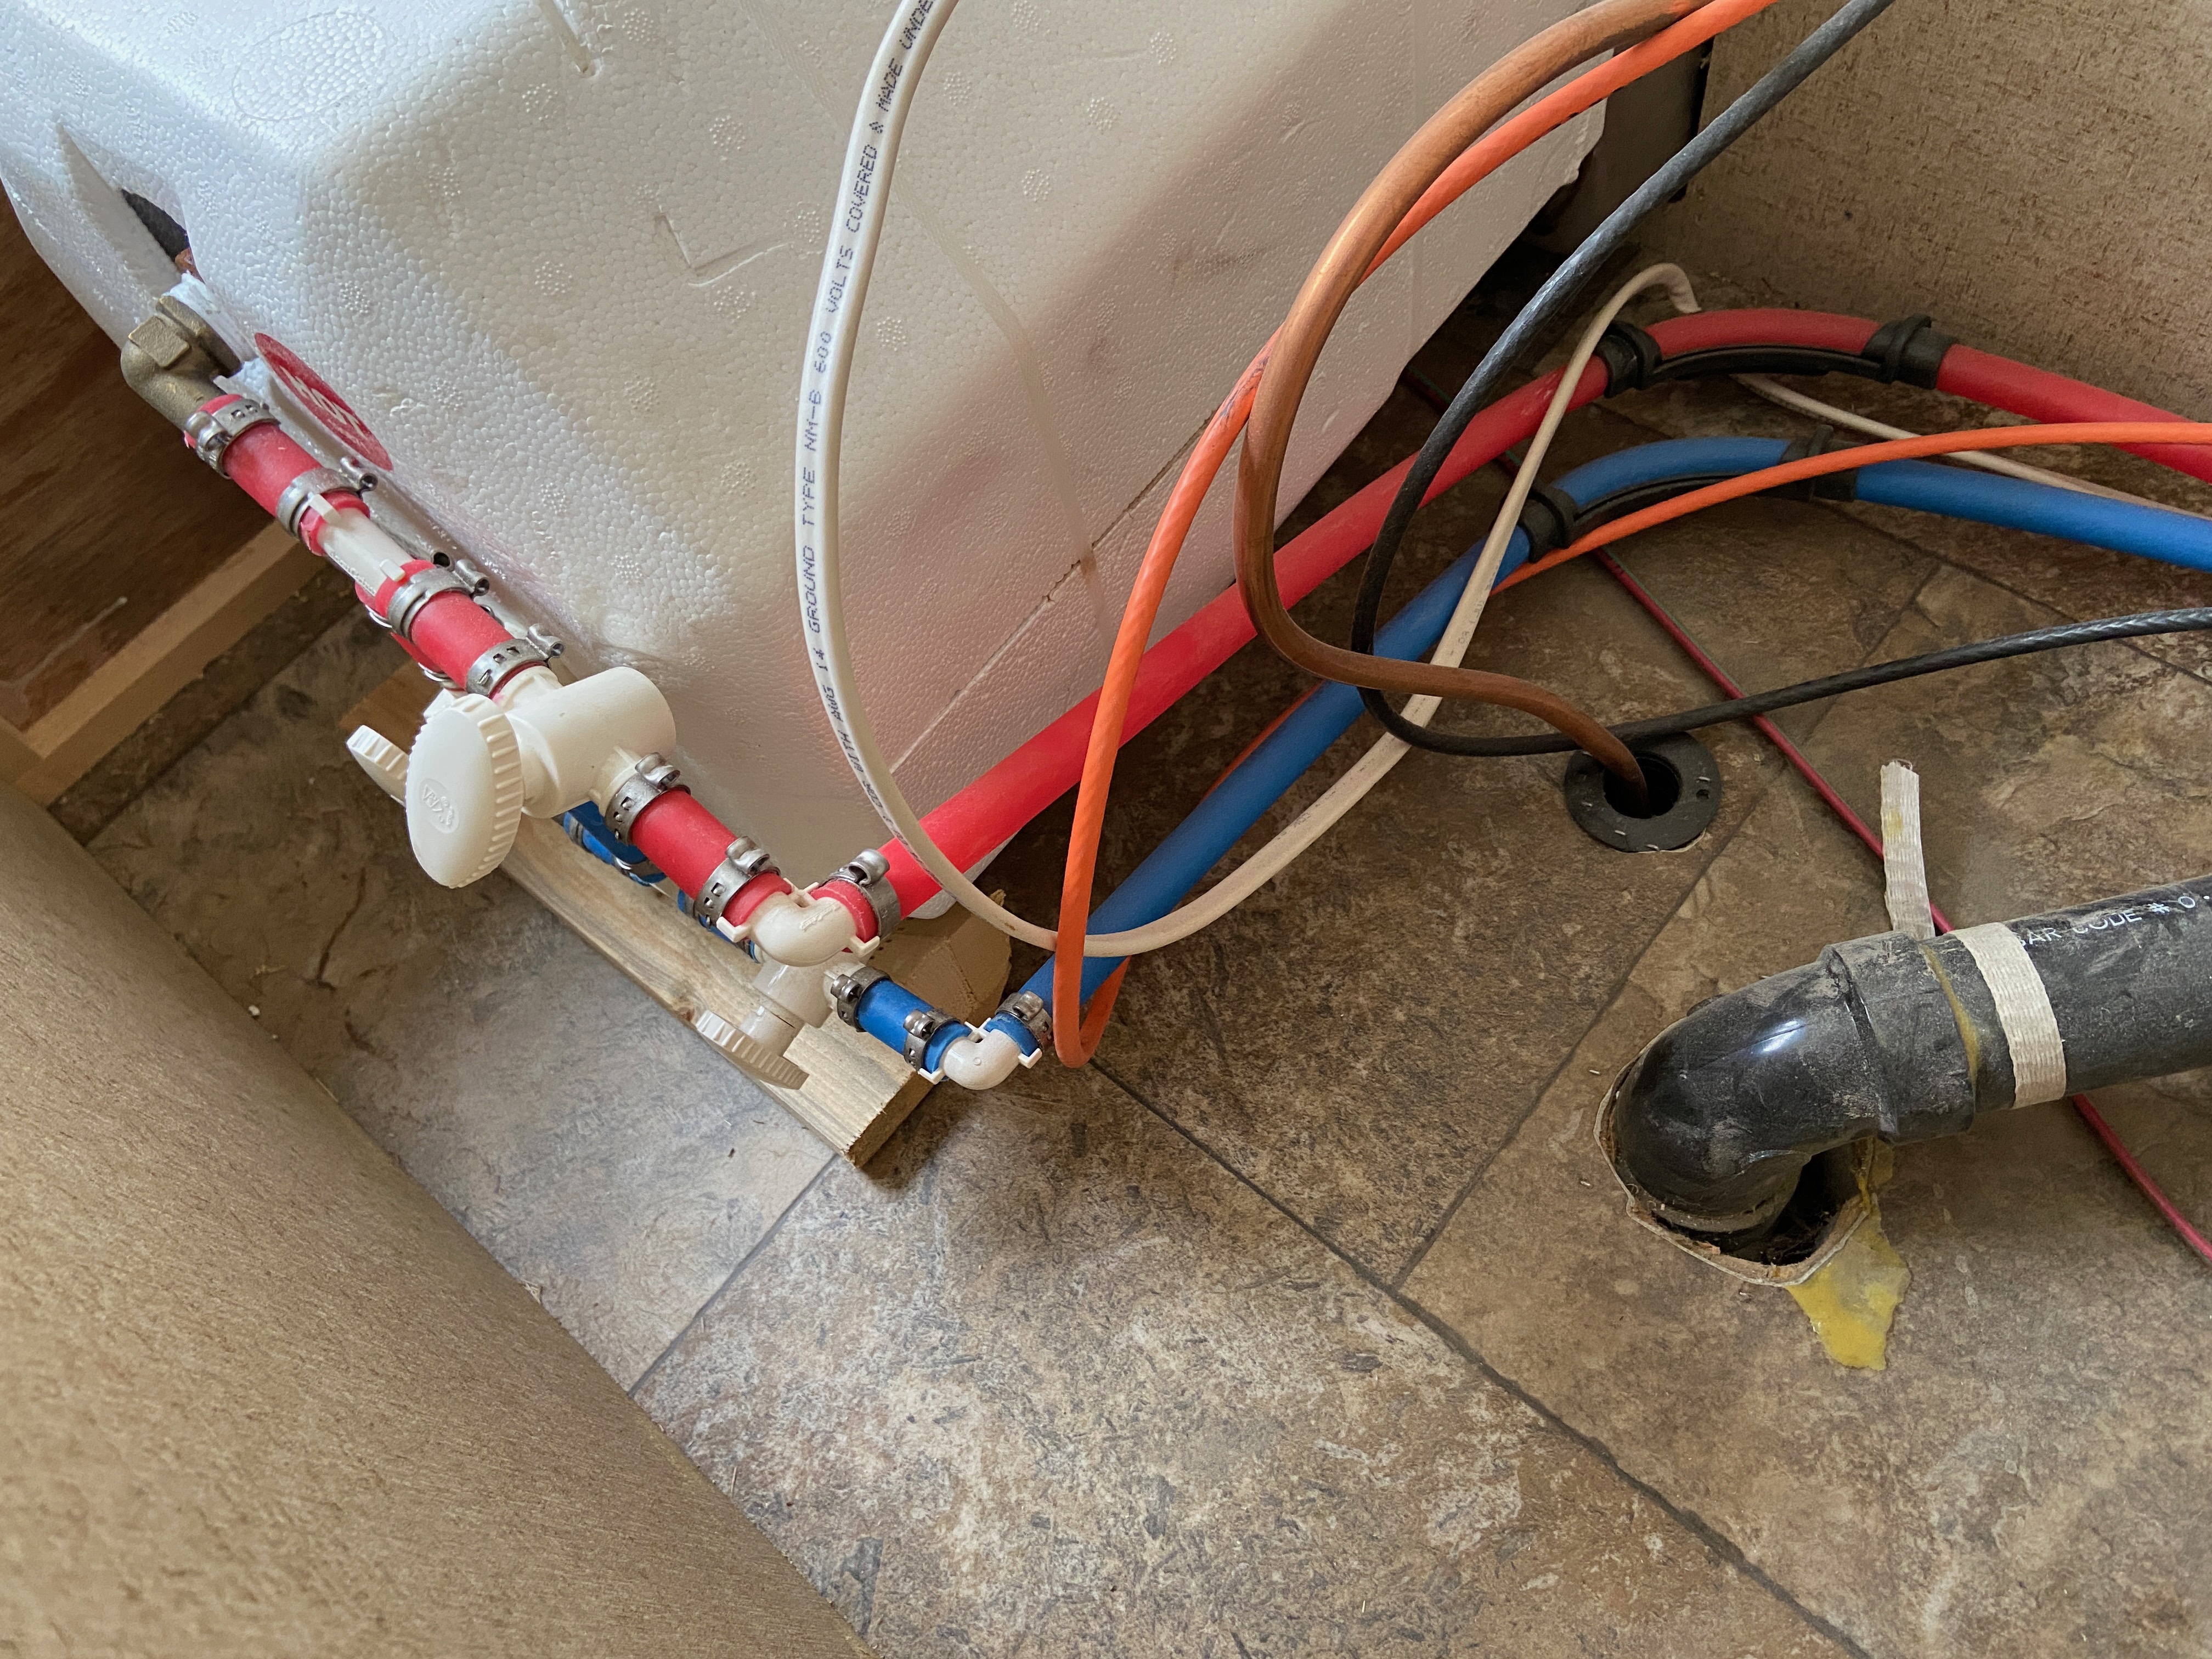
It looks to me like your valves are in the wrong place (and in the wrong orientation). In your pictures the pair of valves to the right of the valve in the middle should be to the left of the valve in the middle. Your cold water is going nowhere past the first valve on the bottom, and if it did, it would not get past the valve at the top. There's no way you're going to get water out of the hot water taps with this set up. It's not a huge deal, but you have some significant plumbing you have to do to fix this. Look for Google images of Suburban RV water heater winterizing valves. TT
------------- 2010 176 FJ Cruiser |
Posted By: ampete
Date Posted: 17 Oct 2020 at 8:42pm
|
Oh. Our water works great all summer long. We have hot water when we want it using both propane and/or shore power. Our cold water has good pressure too. Do you mean that we can't winterize correctly, but the system works ok for the summer? Thank you for your ideas.
|
Posted By: ampete
Date Posted: 17 Oct 2020 at 8:56pm
|
I just watched the "Teach Me RV, Keystone RV Center" video on hot water tank valves. I see what you are saying. The valves on the hot and cold lines should be between the hot water tank input and the "bridge". Not "follow" the bridge. Is that what you're seeing? This is a 2014. I wonder how it has been winterized all of these years. We bought used. I appreciate your ideas and your time. Thank you.
|
Posted By: Badweissenbier
Date Posted: 17 Oct 2020 at 8:56pm
| Yes the center one is supposed to pass antifreeze from the cold line into the hot line. However it is past the cold shutoff so it can’t do that. It’s on the wrong side of both valves. |
Posted By: ampete
Date Posted: 17 Oct 2020 at 10:20pm
|
I appreciate you all for pointing it out and I think I see it too now. Guess I'll stop beating myself up for not getting any pink to flow through the hot faucet lines. Thanks for looking at my trouble and for posting your observations. It's been very helpful. |
Posted By: jato
Date Posted: 18 Oct 2020 at 5:08am
|
My guess would be that the previous owners used compressed air to blow out the system. As others above have stated, there is no way to winterize this system with the conventional antifreeze method you are attempting with the shutoff valves in the location they are currently in. They must have drained the HW tank, blown out the lines, probably drained the HW tank again and blown out the lines a second time just to be safe. Curious as to why someone would have re-configured the top and bottom valve, hard to believe it would have come off the assembly line like that, but anything is possible.
------------- God's pod '11 model 177 '17 Ford F-150 4WD 3.5 Ecoboost Jim and Diane by beautiful Torch Lake "...and you will know the Truth and the Truth will set you free." |
Posted By: ampete
Date Posted: 18 Oct 2020 at 9:11am
|
Thanks for your thoughts. So, now what?
I already have pulled the pink into the cold water lines and drained everything. Can I use an air compressor through the city water connection and ONLY open the hot water lines in the kitchen, bath and low end drain? Is that asking for trouble? Or, do I de-winterize by filling everything with water, and then re-winterize the whole system from start to finish using air? Pros/Cons? THX |
Posted By: CharlieM
Date Posted: 18 Oct 2020 at 9:32am
|
I have often observed the Forest River motto to be: "Let no two Pods be built the same", but this is a new one. Looks like you have some re-plumbing to do. Compressed air through the city water connection will work even with the bypass valves plumbed as shown. It just takes more air because you will have to fill the empty WH with air each time but you don't have to fuss with the bypass valves. Just leave them in the summertime position. That's the way I do it each year. As far as what to do now, I would open all three valves and flush the entire system with water. Then close the crossover valve (blue to red), drain via low points and blow out the entire system with air. Be sure to blow out the outside shower port if you have one.
------------- Charlie Northern Colorado OLD: 2013 RP-172, 2010 Honda Pilot 3.5L 4WD PRESENT: 2014 Camplite 21RBS, 2013 Supercharged Tacoma 4L V6 4WD |
Posted By: offgrid
Date Posted: 18 Oct 2020 at 9:54am
|
In looking at the pictures I was surprised to see that the bypass fittings are secured with PEX crimps, not PEX clamps. You can tell they are crimps because of the small protrusion on each metal fitting. Clamps, like what my rpod has, are smooth rings. Generally high volume work is done with clamps because they are cheaper, while homeowners like me tend to use crimps because the crimp tool works with several tube sizes. The clamp tools are only good for one size, but thats not an issue for FR since its all half inch. Are the other fittings and connections in the trailer using crimps too? Anyone else have crimps? ------------- 1994 Chinook Concourse 1995 RV6A Experimental Aircraft 2015 Rpod 179 - sold |
Posted By: ampete
Date Posted: 18 Oct 2020 at 10:04am
|
Many thanks Charlie. I will add water back into the system and give it a go as you describe. I appreciate your detailed advice. I'm a greenhorn at this, having this forum is a lifesaver! Thanks for your help! |
Posted By: ampete
Date Posted: 18 Oct 2020 at 10:08am
|
OFFGRID, I have no history to say if it came from FR like this or not. I know I didn't change it haha. I'm curious, could it be re-plumbed so that a new "bypass" blue to red with a valve in the center was added to the right of the other valves, leaving the current bypass (which is incorrectly to the left of the other valves) there but in a permanently closed position? I will contact an RV dealer for a spring appointment to fix the issue, but I'm afraid it might be extensive and expensive to remedy. |
Posted By: ampete
Date Posted: 18 Oct 2020 at 10:12am
| I will look for crimps vs clamps and post in a little bit. |
Posted By: ampete
Date Posted: 18 Oct 2020 at 10:16am
|
CharlieM Should I use pink antifreeze only in the p-traps, toilet, shower drain; skip the rest of any antifreeze processes? I don't have an outside shower, but thanks for the other reminders.
|
Posted By: offgrid
Date Posted: 18 Oct 2020 at 11:00am
I'm not suggesting anything at this point about when and why the bypass was improperly done, just found it curious about the crimps vs clamps. Re difficulty and expense to remedy, not at all. You can do it yourself in a few minutes. Pex is easy to work with and the fittings almost never leak. Lots of how to videos.i would just leave the existing bypass there and put a new one in around the corner on the other side of the two shutoff valves where you have room to work. You need a pex tube cutter, two pex tees, and a shutoff valve, a 10 pack of crimps, a short piece of pex, and the crimp tool. Might be 50 $ at your big box, after which you'll be set up for future plumbing chores.
------------- 1994 Chinook Concourse 1995 RV6A Experimental Aircraft 2015 Rpod 179 - sold |
Posted By: ampete
Date Posted: 18 Oct 2020 at 11:05am
|
OFFGRID---thank you for the encouragement! I will look at doing this in the spring and very much appreciate your specifics and list of parts/pieces. No worries, I have no idea how long it's been like this, but I am so grateful to everyone here that has given me some peace of mind. I could NOT figure out what I was missing/doing wrong! Now I see it!
|
Posted By: Tars Tarkas
Date Posted: 18 Oct 2020 at 12:49pm
To fix this I recommend neither crimps or clamps. SharkBite, or similar is the way to go! No tools to buy. Absurdly simple and secure. The fittings are more expensive, so if you're going in the business of doing PEX fittings all day every day, buy the tools and the cheap fittings, but just for this, you'll come out way ahead with SharkBite and the ease with which they work is almost stupifying. TT ------------- 2010 176 FJ Cruiser |
Posted By: offgrid
Date Posted: 18 Oct 2020 at 1:18pm
|
We will just have to disagree on the Sharkbite stuff, although we do agree Pex is easy.
You are greatly exaggerating the breakeven point when buying the tool. The crimp tool is only about $20. You don’t need to install more than 2 or 3 fittings for that to pay for itself, you don’t need to work with pex all day everyday. Sharkbite fittings are way overpriced. I’d much rather invest in a tool I can use for the rest of my life than a brand name fitting I only use once. I bought my crimp tool originally to do a small job but have since used it many times. Wound up replumbing a whole house because it was so easy, it’s paid for itself many times over. ------------- 1994 Chinook Concourse 1995 RV6A Experimental Aircraft 2015 Rpod 179 - sold |
Posted By: Tars Tarkas
Date Posted: 18 Oct 2020 at 1:45pm
|
I may be exaggerating the breakeven point of the cost, but for small jobs, by people who aren't tool collectors like us (I have the tools too), Sharkbite-type fittings are a frigging blessing. Even if they are more expensive they are so easy and fast, maybe you can't forget about the cost, but you can come pretty durn close. I wonder how the math would work if you had to hire a plumber? I have no idea what a plumber costs per hour, and I'm sure there are minimums involved, but, anyway, if you're paying for time, SharkBite fittings would probably come close to paying for themselves versus an hourly labor rate. Again, for someone not at ease with plumbing jobs, they are so simple!!! A kid who can stack blocks can plumb like a pro with SharkBite fittings. And another thing: crimping tools can be a pain in the butt in tight places (like plumbing around an RV water heater). No tools with SharkBite. I don't have a vested interest in SharkBite.... but I may be talking myself into buying some of their stock.  TT ------------- 2010 176 FJ Cruiser |
Posted By: jato
Date Posted: 18 Oct 2020 at 2:59pm
|
This spring I made a decision to purchase the hi-rise Thetford toilet giving an additional 4.5" rise; making my DW very happy with her artificial knee. To the point - the only thing needed to do to make the change was to increase the length of the supply line by 4.5 inches. SharkBite to the rescue! No muss, no fuss. Press on - done. I like that. After doing a lot of plumbing jobs using copper and solder, or at the golf course plastic and cement - that was a piece of cake. Wish they had that years ago. ------------- God's pod '11 model 177 '17 Ford F-150 4WD 3.5 Ecoboost Jim and Diane by beautiful Torch Lake "...and you will know the Truth and the Truth will set you free." |
Posted By: offgrid
Date Posted: 18 Oct 2020 at 3:01pm
|
Have you used both methods? I have. They are both very very easy, I wouldn't put the push on ones as significantly easier. And the crimp tool won't release until you get it tight enough, so there is no skill involved in getting a good crimp. PEX has truly "democratized" (small d) plumbing, anyone can do it. When I have used the push on ones it was for exactly the reason you suggested, couldn't get access with the crimper. That is certainly a valid reason, but its uncommon. We both saw the photos, the crimper can easily get to where it needs to in this case. Anyhow, to me any company that relies on their brand name to command an exorbitant price for their products is vulnerable to disruption from new market entrants. There are other alternative push on options to Sharkbite now. I think it would be a risky investment. Just like Monster Cable a few years ago. Charging 10x so you don't lose any signal on a DIGITAL cable, stupid business model.  Anyhow, this is a silly thing to debate, either way will work just fine in this case, and I think ampete has sufficient info to decide for himself. ------------- 1994 Chinook Concourse 1995 RV6A Experimental Aircraft 2015 Rpod 179 - sold |
Posted By: jato
Date Posted: 18 Oct 2020 at 3:17pm
|
Yes I have, and as you have wisely pointed out, both are easy to work with and each have their place. I didn't have the PEX tools (although my son who lives 45 minutes away does) so going 10 minutes away to the hardware store was just a convenience thing for me, and being impetuous, didn't want to wait to get the 'free' tool to borrow from my son some time in the future. ------------- God's pod '11 model 177 '17 Ford F-150 4WD 3.5 Ecoboost Jim and Diane by beautiful Torch Lake "...and you will know the Truth and the Truth will set you free." |
Posted By: offgrid
Date Posted: 18 Oct 2020 at 3:34pm
|
I don't miss sweating copper pipe, that's for sure. The Pex lasts longer and is more freeze tolerant. Cheap too. When I re-plumbed my old 1930's house I got a Pex water manifold and ran home runs to each fixture. Like a circuit breaker box for the plumbing. No valves needed at the fixtures and no tee fittings anywhere. You bring the supply line in the bottom, cold out the top to a wall mount tankless water heater mounted above, then hot back down to the hot side of the manifold. Wow was that easy. Highly recommended. https://www.supplyhouse.com/Viega-50250-VIEGA-1-2-18-Port-PolyAlloy-Crimp-MANABLOC-8-hot-10-cold?gclid=CjwKCAjwz6_8BRBkEiwA3p02VYl1lWyDEamk8kH_zbMyxyzvIE4EXr8AOQ2wpyEtqTLg4os5na8bfRoClaoQAvD_BwE - https://www.supplyhouse.com/Viega-50250-VIEGA-1-2-18-Port-PolyAlloy-Crimp-MANABLOC-8-hot-10-cold?gclid=CjwKCAjwz6_8BRBkEiwA3p02VYl1lWyDEamk8kH_zbMyxyzvIE4EXr8AOQ2wpyEtqTLg4os5na8bfRoClaoQAvD_BwE ------------- 1994 Chinook Concourse 1995 RV6A Experimental Aircraft 2015 Rpod 179 - sold |
Posted By: ampete
Date Posted: 18 Oct 2020 at 4:24pm
|
OFFGRID, JATO, TARS Looks like I have 2 good options. I am happy to hear that it should be pretty simple to do myself without paying for an RV plumber! I'll keep you posted, although I probably won't tackle it until the spring. Thanks again for sharing your expertise.
|
Posted By: CharlieM
Date Posted: 18 Oct 2020 at 6:47pm
|
First, use pink antifreeze in the P-traps and toilet bowel. Actually, and this should start a huge argument, regular auto antifreeze is fine for drains. Just don't let it get anywhere near food surfaces. Let the discussion begin....... On Sharkbite vs Pex crimps: I've used both. Sharkebites are good but I think I trust the clamp rings a bit more in the vibration environment. I used a pair of Sharkbites in one location under the kitchen sink where I just couldn't get the clamp tool. The clamp tool I borrowed had long handles that really limited access. I have no experience using the Pex crimps. That said, the Sharkbites have not leaked over several years and many thousands of miles. They are easy to use.
------------- Charlie Northern Colorado OLD: 2013 RP-172, 2010 Honda Pilot 3.5L 4WD PRESENT: 2014 Camplite 21RBS, 2013 Supercharged Tacoma 4L V6 4WD |
Posted By: Tars Tarkas
Date Posted: 18 Oct 2020 at 7:04pm
|
I have used both methods, and I have the tools to crimp, along with a pretty good supply crimps. I'll use them without hesitation if and when... I mostly spoke of SharkBite-type fittings, and was kidding about buying stock. It's probably way to late for that. I've sweated copper, threaded steel, done old black plastic pipe with screw clamps, and PEX. SharkBite fittings are over-priced but they are hands down, the easiest thing to use by far. Especially for beginners with no tools, in tight places. I still kinda like sweating copper, but maybe except in rare cases, its time has pretty much come and gone.... TT
------------- 2010 176 FJ Cruiser |
Posted By: ampete
Date Posted: 18 Oct 2020 at 7:07pm
|
CharlieM Thanks for your earlier post. I will follow your advice to get the pod winterized. I think I'll wait to tackle the new bypass valve until spring. Thanks for your input on Sharkbites and PEX. I have no experience with either, so I appreciate everyone's personal preferences. Good to have options. :) Thanks for taking the time to respond. I appreciate it. |
Posted By: ampete
Date Posted: 18 Oct 2020 at 7:12pm
|
Thanks Tars. I pretty much fit the description of the beginner with no specialized tools (although I'm always happy to buy the right tool for the job) working in a tight space. Appreciate your input. Thanks for taking the time to give specifics. |
Posted By: offgrid
Date Posted: 19 Oct 2020 at 7:31am
|
The objection to auto antifreeze for plumbing is that it attracts animals and is toxic and bactericidal. So, don't put it on food surfaces but also don't put it on the ground or in a septic system. So where do you drain it safely? It also costs more than RV antifreeze so why use it for a purpose for which it isn't intended? I used to actually like sweating copper and using Wonder bread to dry out the pipes and all that. But that's kinda like enjoying driving an antique vehicle without a synchro tranny or programming a first gen PC because there was no software available for them. You enjoy the satisfaction coming from mastering a skill but you wouldn't want to return to the days when those were the only choices.  ------------- 1994 Chinook Concourse 1995 RV6A Experimental Aircraft 2015 Rpod 179 - sold |
Posted By: CharlieM
Date Posted: 19 Oct 2020 at 8:14am
Noted. Thanks. ------------- Charlie Northern Colorado OLD: 2013 RP-172, 2010 Honda Pilot 3.5L 4WD PRESENT: 2014 Camplite 21RBS, 2013 Supercharged Tacoma 4L V6 4WD |
Posted By: ampete
Date Posted: 19 Oct 2020 at 9:21am
|
I'm rethinking postponing the plumbing project till spring. If I were to do it now, can I tackle it after the steps of draining the fresh water, hot water and low drains? Good time to work on the new bypass?
|
Posted By: offgrid
Date Posted: 19 Oct 2020 at 9:38am
Yes, its a good time, either now or in the spring before de-winterizing. Your choice. If you do it now, leave the existing bypass open for the winter so it drains once you have the new one installed. Then close it in the spring for the season. ------------- 1994 Chinook Concourse 1995 RV6A Experimental Aircraft 2015 Rpod 179 - sold |
Posted By: ampete
Date Posted: 19 Oct 2020 at 10:58am
|
Offgrid |
Posted By: mhfnet
Date Posted: 20 Oct 2020 at 11:59am
| I just winterized and had the same problem with the anti-freeze not coming through the lines to the sink and the problem was I forgot to put one of the two sets of low point drain caps on and it all got pumped out and fast, and felt like a fool! I assume the same will happen when another tap is left open. Lucky the stuff is only a couple bucks a gallon at walmart! |
Posted By: ampete
Date Posted: 21 Oct 2020 at 4:58pm
|
CharlieM Tars Offgrid MANY THANKS! DONE! I went with SharkBite as the local store did not have the crimping tool available to use the PEX crimps/clamps. I added the new bypass around the corner, a bit further from the regular shutoffs to cold/hot than ideal, but had no choice based on space needed. After draining all of the water, and blowing out the lines with air, I added in the new bypass. She passed the pink test! Pink out of both low point drains, closed 'em up; pink out of both cold and hot individually in the kitchen and bathroom. Thanks again for all of your support! Winterized and confident :) One last question: Do I now leave the original (useless) bypass closed permanently, regardless of the season? THANK YOU 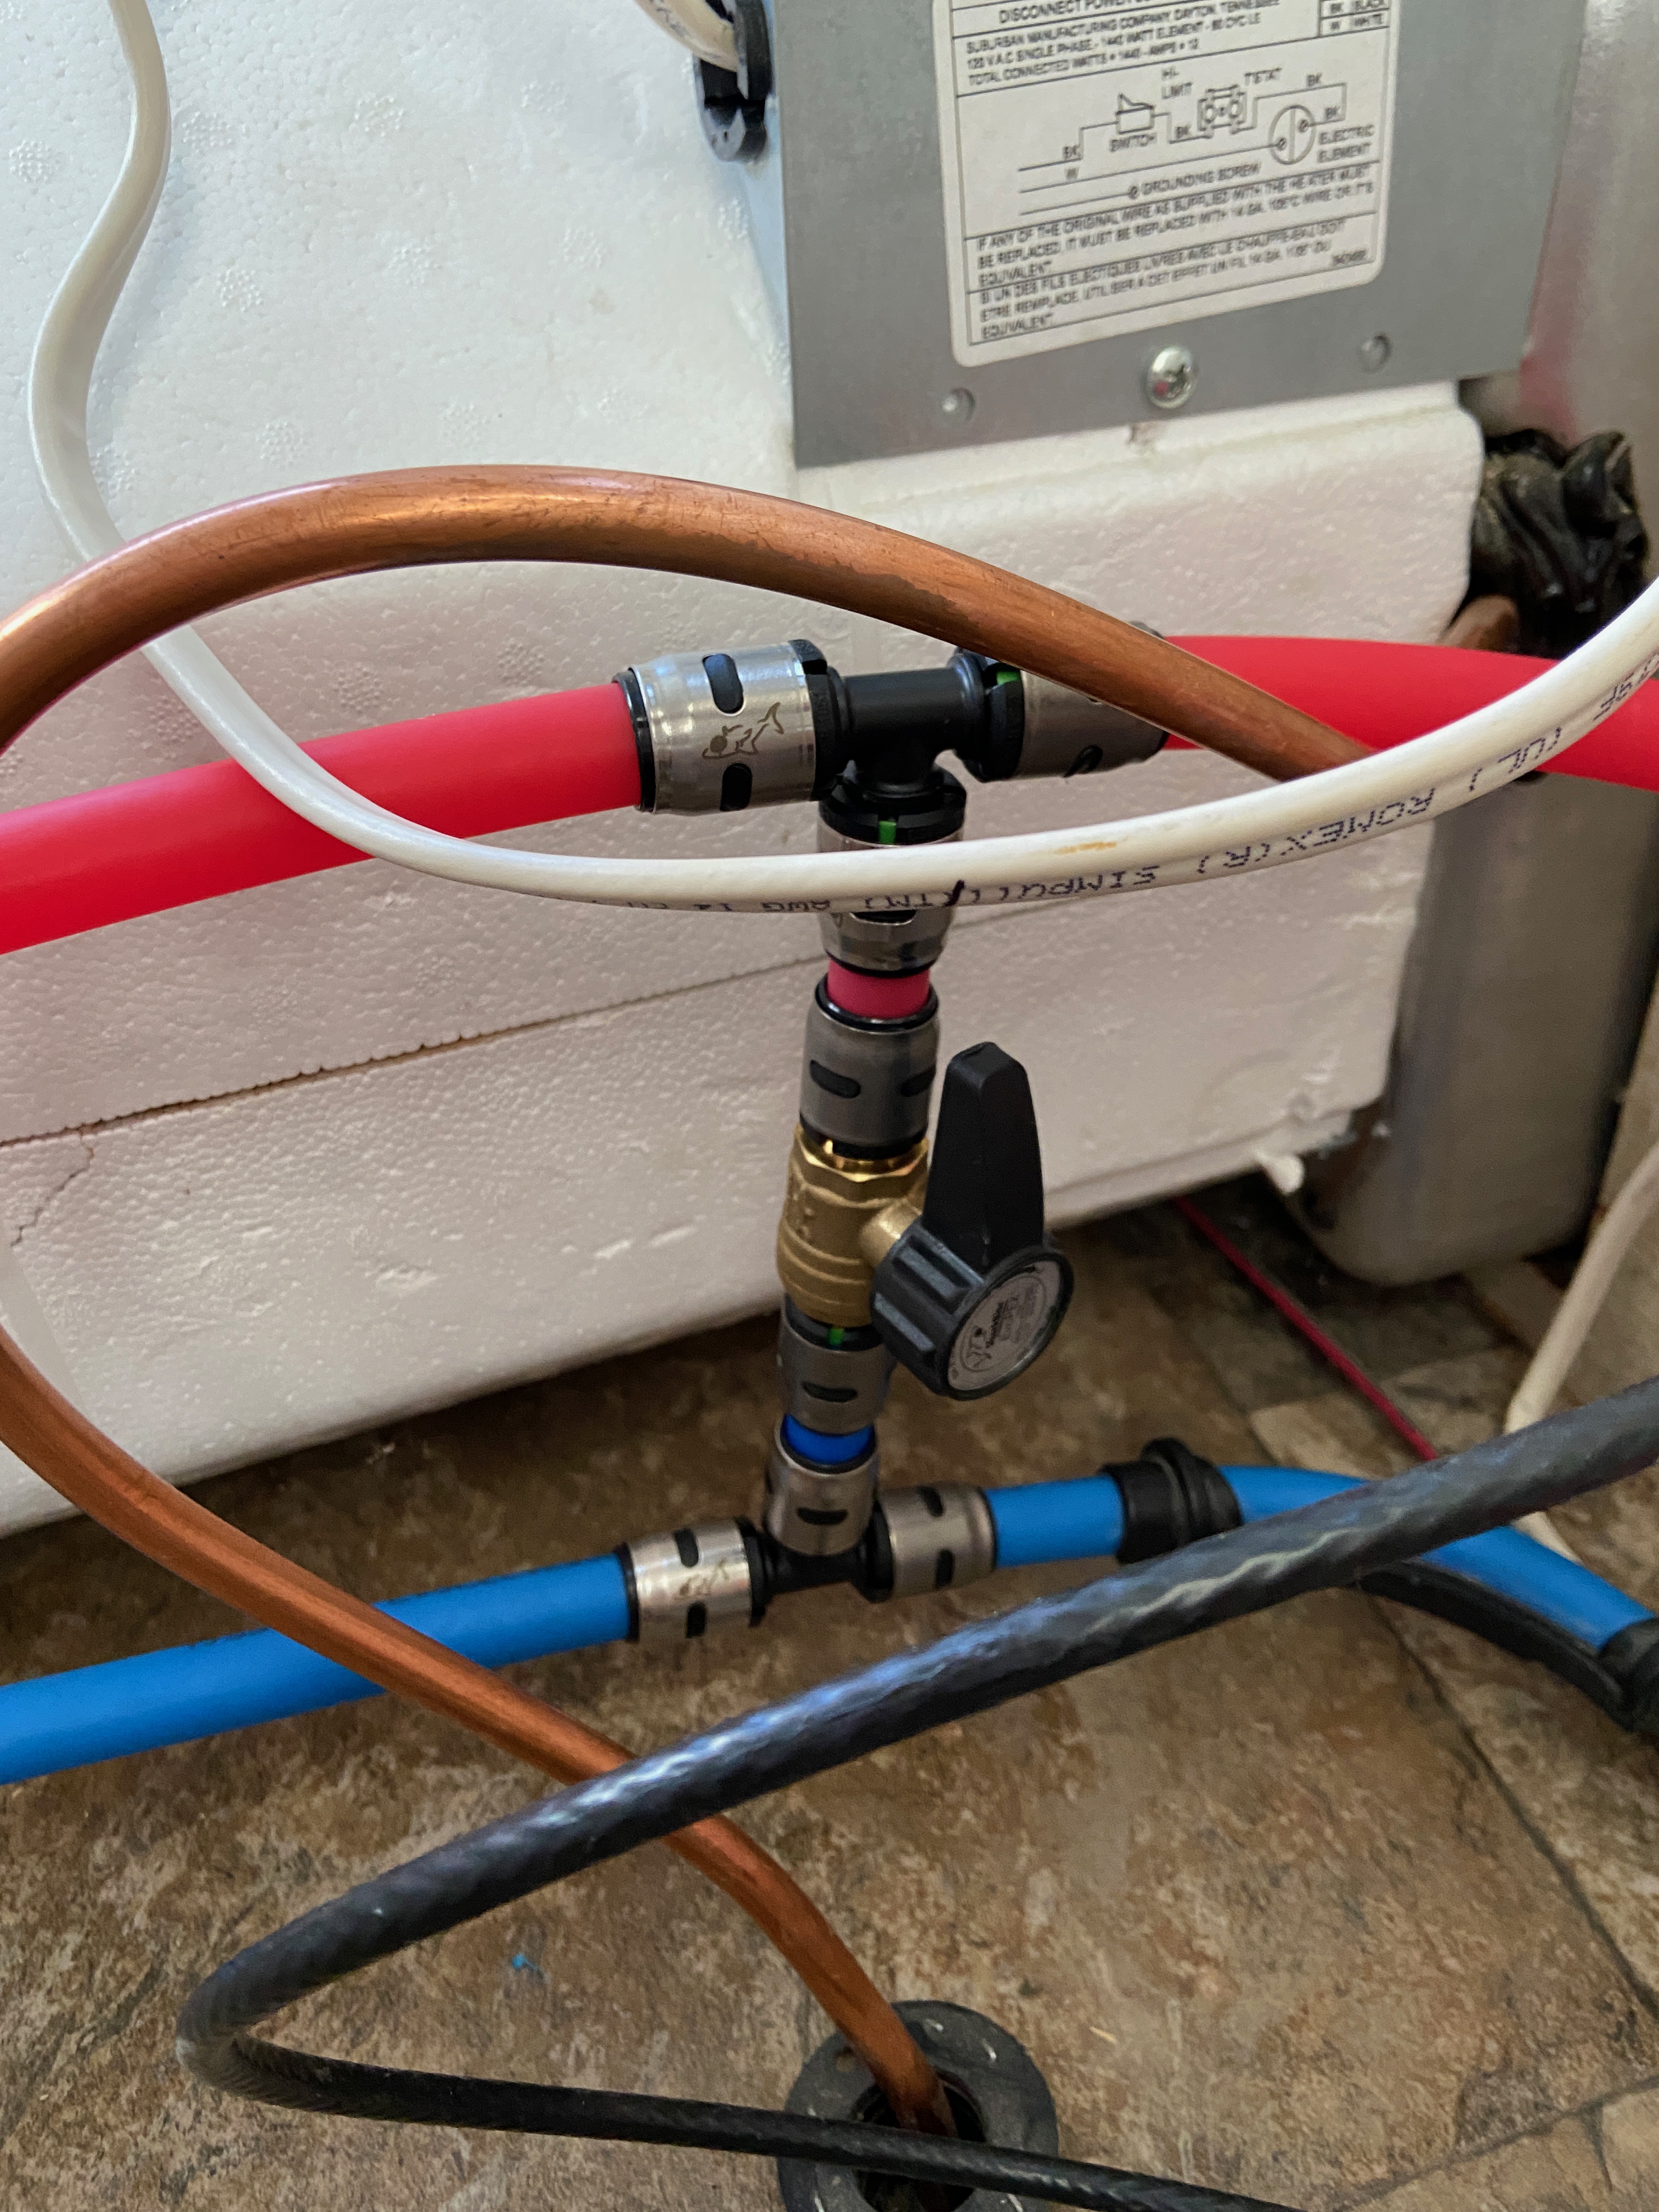 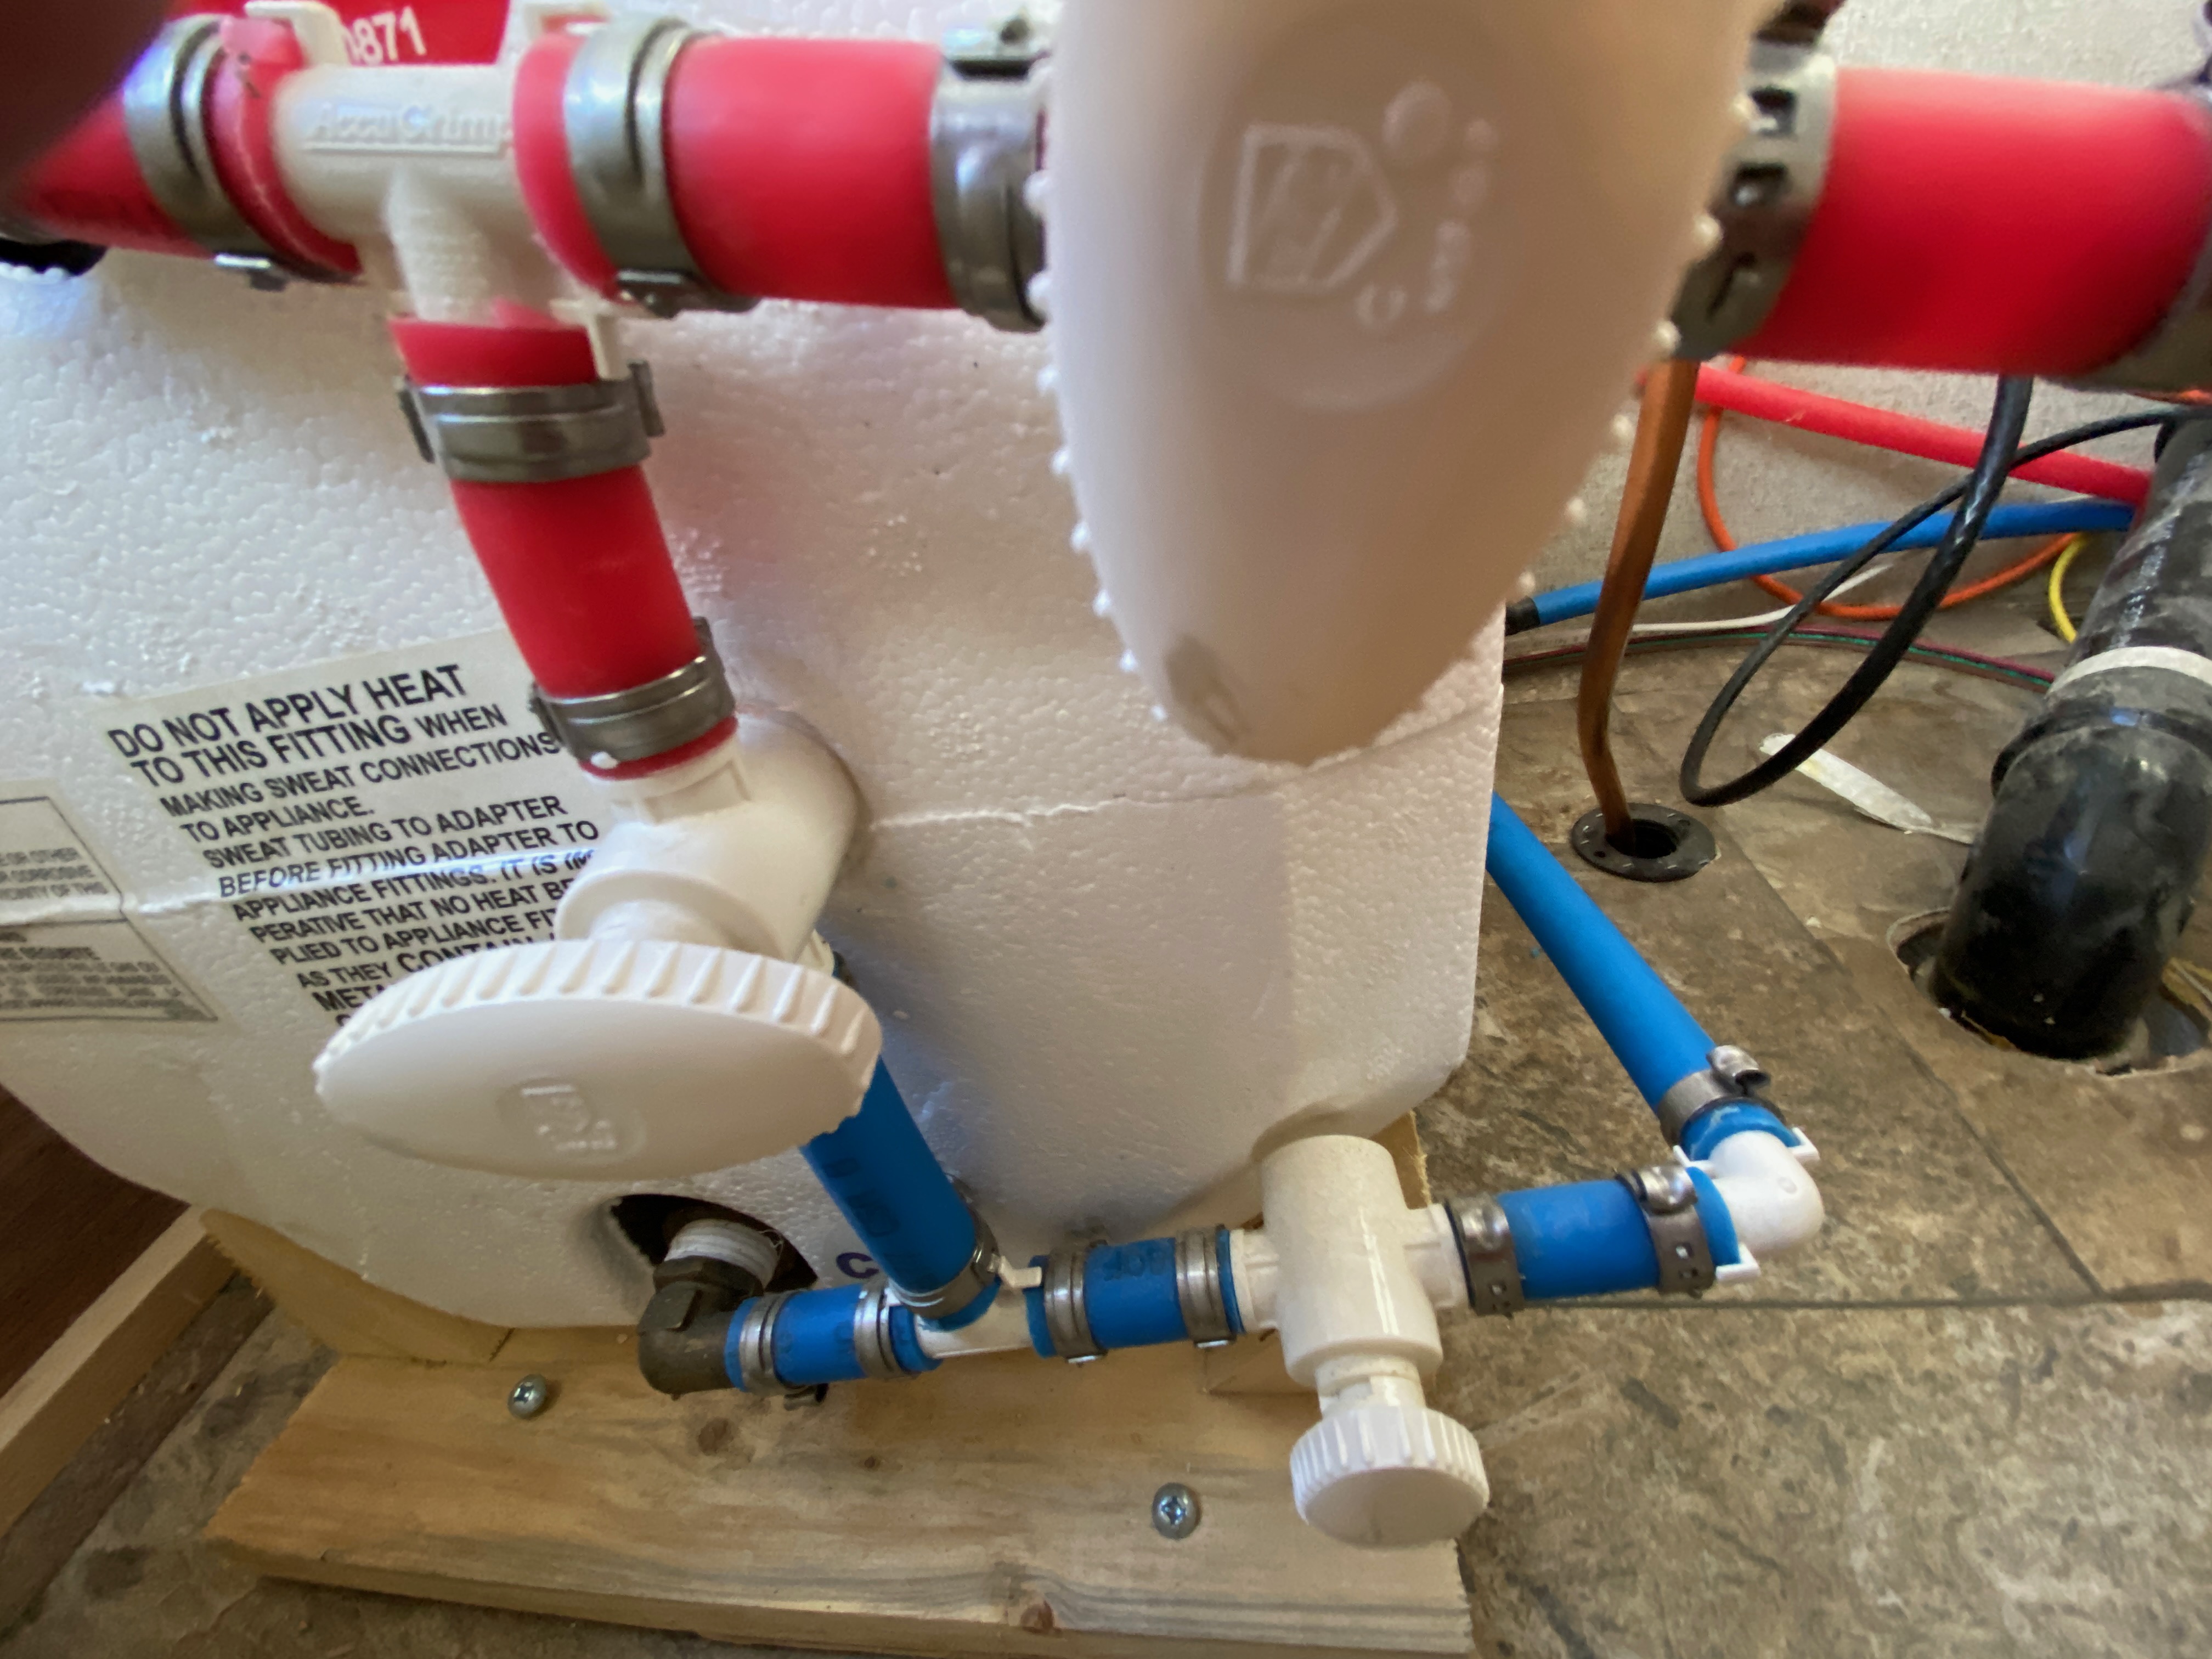 |
Posted By: offgrid
Date Posted: 21 Oct 2020 at 5:08pm
|
Glad it’s worked out for you.
I would leave the old bypass open in winter just to be sure any condensation that might get collected in it drains into the water heater tank. In summer close it so it doesn’t create a hot to cold “short circuit”. ------------- 1994 Chinook Concourse 1995 RV6A Experimental Aircraft 2015 Rpod 179 - sold |
Posted By: ampete
Date Posted: 21 Oct 2020 at 7:48pm
Thanks again! Will Do!
|
Posted By: Mirado
Date Posted: 23 Oct 2020 at 10:52am
|
In answer to Offgrid - all my plumbing was done with the cheaper crimps. I recently had a leak under my sink, and used a combination of sharkbites and the clamp rings to fix it, along with some new Tees. Two of the connections were not accessible with the borrowed crimping tool, so I had to use the sharkbites instead. ------------- Miriam and Doug 2015 Rpod 181G Silverado 1500 |
Posted By: foadman
Date Posted: 23 Mar 2021 at 2:02pm
|
What is your RPOD model and what model tehford toilet did you purchase? Need same fis for my DW ------------- bmiller |