Diary of a Madmodder
Printed From: R-pod Owners Forum
Category: R-pod Discussion Forums
Forum Name: Podmods, Maintenance, Tips and Tricks
Forum Discription: Ask maintenance questions, share your podmods (modifications) and helpful tips
URL: http://www.rpod-owners.com/forum_posts.asp?TID=7641
Printed Date: 27 Apr 2024 at 9:31pm
Software Version: Web Wiz Forums 9.64 - http://www.webwizforums.com
Topic: Diary of a Madmodder
Posted By: Retroactive
Subject: Diary of a Madmodder
Date Posted: 26 Mar 2016 at 9:16pm
| I am going to be doing quite a few mods on my new 171 this summer. I like to take photos to document my projects, because it is in my nature as an engineer. So I though I would start a thread. So here we go... |
Replies:
Posted By: Leo B
Date Posted: 26 Mar 2016 at 9:28pm
|
Sounds like it will be an adventure!
------------- Leo & Melissa Bachand 2017 Ford F150 2021 Vista Cruiser 19 csk Previously owned 2015 Rpod 179 2010 Rpod 171 |
Posted By: Retroactive
Date Posted: 26 Mar 2016 at 9:33pm
|
First Mod - Most Important Mod (aka make the wife happy): Letter the name on the pod. Tools: Straight Edge Level, Measuring Tape, Pencil Materials: Boat quality stick on letters. Skill: Novice Time: 1 hour 1) Get some boat ID letters. "Stiffie" brand seems to have an endless variety of fonts and colors. 2) Pick the height you want. Too high, and the roof might slope making the text hard to read. Too low and it might get blocked if you have the bike rack on etc. Make a small mark with pencil. 3) Find the center of the pod with a measuring tape. Mark with pencil. 4) If pod is already level, you can use a level to make a faint line with the pencil. If not you can measure up from the bottom of the pod to make a parallel line. 5) Make sure area is clean. 6) Cut out the letters you need first, and lay them on a table. So you can get a rough idea of spacing, and which letter you want to be in the center - so you can place that one first and work out from there to get an even look. 7) Apply the labels carefully as to not overstretch them, and not to create air bubbles. 8) Carefully "burnish" the labels to set them, applying moderate force while smoothing them with your fingers. 9) Wife says thumbs up!  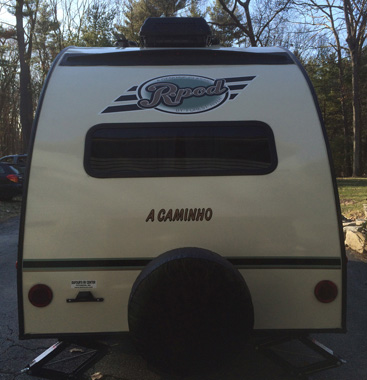 ------------- |
Posted By: Leo B
Date Posted: 26 Mar 2016 at 9:37pm
 a happy wife is a must! a happy wife is a must!
------------- Leo & Melissa Bachand 2017 Ford F150 2021 Vista Cruiser 19 csk Previously owned 2015 Rpod 179 2010 Rpod 171 |
Posted By: Retroactive
Date Posted: 26 Mar 2016 at 9:55pm
It's always better to start ANY adventure that way.  ------------- |
Posted By: Retroactive
Date Posted: 27 Mar 2016 at 9:55am
|
Privacy Curtain Mod Tools: Measuring Tape, Pencil, Scissors. Materials: Curtain Panel, Tension Rod, Command Hook, Command Strips, Velcro “One Wrap”. Skill: Novice Time: 1-2 hours 1) Pick a height for the rod. I recommend at least 3” higher than the tallest person, YMMV. Mark the height on both sides of the hallway, making sure to mark the corners of the wall - as this is the strongest point, see Fig1. 2) Cut command strips to approx size of the rod end caps. Place on wall at height marks, making sure to only place them on the corner…see Fig1 again! 3) Expand tension rod to width of hallway at height marked in step 1, and make a pencil mark at the rod joint. Now make another mark by extendeding the rod ½” longer, align and hold the joint in place and tighten screw. See Fig2. 4) Peel off paper off the mounted command strips. 5) Slide Curtain onto rod. 6) Compress rod and carefully install it so the ends contact the command strips. Note: this will take good hand and upper body strength, to get it placed correct the first time. 7) Pick a spot for the command hook. I put it fairly high so I don’t catch it with my shoulder, but I think this would definitely come down to personal choice. See Fig3. 8) Cut Velcro “one wrap” strips to length, to secure curtain as desired. An important thing to keep in mind, when deciding on the location of the wraps, is not to block the thermostat with the curtain - otherwise it will not sense the actual cabin temp. Three strips seemed to be a good compromise, and allows it to be pulled away from the thermostat. see Fig4. 9) Yay!… see Fig 5. 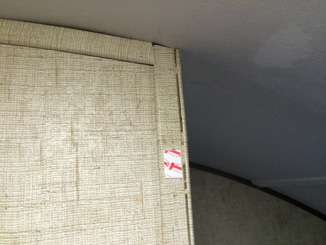 L L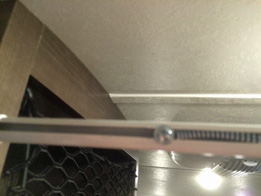 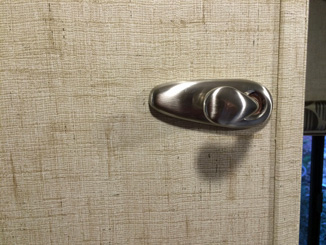 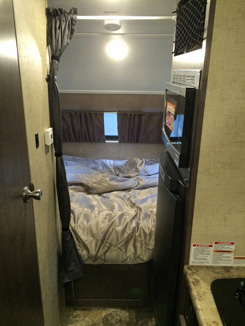 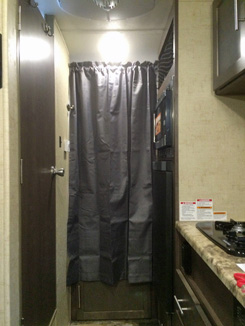 ------------- |
Posted By: Q7-retired
Date Posted: 27 Mar 2016 at 6:55pm
|
Boa viagem!
------------- Best regards, Jim 2015-RP178 TV 2015 Audi Q7 TDI and 2017 Ford F150 At home in "Our Pod" |
Posted By: Retroactive
Date Posted: 27 Mar 2016 at 7:52pm
|
Obrigado! Hopefully we can get some grilled fresh sardinhas at one the festas when we're down the coast, it's all about the timing! ------------- |
Posted By: Patriot Dave
Date Posted: 28 Mar 2016 at 8:46pm
I am a newbie and just made a down payment on a 179 tonight. Thanks for the info regarding placing the name on the rear. I will be using your directions. Thank You ------------- Dave & Joyce Never Forget, In God We Trust; This Our National Motto. Member; Patriot Guard Riders, Michigan Chapter Retired; So Every Day is Saturday.... Except Sunday |
Posted By: Retroactive
Date Posted: 28 Mar 2016 at 10:03pm
|
No problem. I am happy to document all this to share, one of the great things about the Rpod is that it lends itself to so many mod possibilites. I don't know how long the stickers will last, but they are used for small freshwater boat reg ID so they have to be relativley durable. The hardest part for me is getting it centered, it still came out about 1" left of center. Tomorrows mod is upgrading the inside speakers to some sweet JBL 6" units! ------------- |
Posted By: Patriot Dave
Date Posted: 29 Mar 2016 at 3:52am
LOL, that sounds great.....new speakers......please give details when you are done. ------------- Dave & Joyce Never Forget, In God We Trust; This Our National Motto. Member; Patriot Guard Riders, Michigan Chapter Retired; So Every Day is Saturday.... Except Sunday |
Posted By: Retroactive
Date Posted: 29 Mar 2016 at 10:54pm
|
Interior Speaker Upgrade Tools: Drill & Bits, Screwdriver, Pencil. Materials: The most expensive speakers you can afford, that also come with a grill and mounting clips. Skill: Novice Time: 1-2 hours 1) Remove screws from old speaker. 2) Carefully lift the speaker out of the hole. 3) Write down which wire goes to the "+" terminal, it should be the striped wire. Remove wires. 4) Use the template included with the speaker to mark the holes. Be careful to make sure to center the template around the old cutout, so none of the new marks are too close to the edge. 5) Drill a hole a with a bit the same diameter as the screws included with the speaker. 6) Attach the clips included with the speaker, making sure it is centered over the drilled hole. 7) Attach speakers, making sure each screw engages with the hole/clip. The sound was a night & day difference! Even the wife noticed the huge improvement. 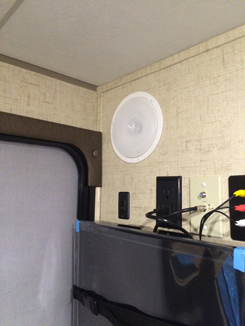 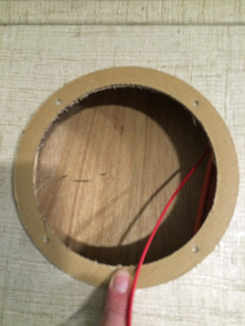 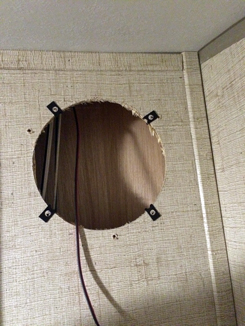 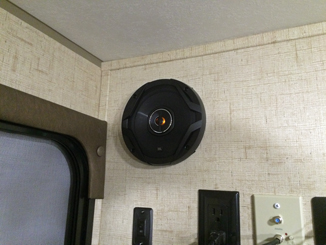 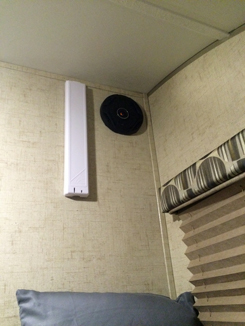 ------------- |
Posted By: Patriot Dave
Date Posted: 30 Mar 2016 at 6:36am
|
Awesome......definitely on the To Do List. ------------- Dave & Joyce Never Forget, In God We Trust; This Our National Motto. Member; Patriot Guard Riders, Michigan Chapter Retired; So Every Day is Saturday.... Except Sunday |
Posted By: Retroactive
Date Posted: 30 Mar 2016 at 7:43am
|
Thanks! The last pic shows the queen bed compartment. ------------- |
Posted By: Patriot Dave
Date Posted: 30 Mar 2016 at 8:10am
Oh Boy, I'll be watching for your post. ------------- Dave & Joyce Never Forget, In God We Trust; This Our National Motto. Member; Patriot Guard Riders, Michigan Chapter Retired; So Every Day is Saturday.... Except Sunday |
Posted By: Retroactive
Date Posted: 30 Mar 2016 at 1:49pm
|
Quick lunchtime sorta-pod mod: Stabilizing Receiver Pin The ball assy rattling around inside the receiver was making me crazy, my Tahoe is otherwise very quiet. I happened to be at wallyworld, and saw the stabilizing pin for $13. It took me all of 5 minutes to install. It totally stopped any movement horizontally, and I had to use all of my weight to move it vertically. I'll know for sure tonight, I have about 80 miles of driving to do later on so it will get quite a workout - we only have two seasons in MA "Winter, and Roadwork".  ------------- |
Posted By: StephenH
Date Posted: 30 Mar 2016 at 2:32pm
|
This is what I used to cinch down the hitch. It does not move vertically or horizontally when this is tightened down. http://www.amazon.com/StowAway-Cargo-Carriers-20-6-Tightener/dp/B0001CMUV4?ie=UTF8&psc=1&redirect=true&ref_=oh_aui_detailpage_o06_s00 - http://www.amazon.com/StowAway-Cargo-Carriers-20-6-Tightener/dp/B0001CMUV4?ie=UTF8&psc=1&redirect=true&ref_=oh_aui_detailpage_o06_s00 ------------- StephenH Happy is the man that findeth wisdom,... http://www.rpod-owners.com/forum_posts.asp?TID=7712 - ouR escaPOD mods Former RPod 179 Current Cherokee Grey Wolf 24 JS |
Posted By: Retroactive
Date Posted: 30 Mar 2016 at 2:46pm
|
I didn't bother to put the lock on. I figure if they want to spend time stealing a $13 pin, and have the right wrench, good luck to them. ------------- |
Posted By: Retroactive
Date Posted: 31 Mar 2016 at 1:30pm
|
dupe ------------- |
Posted By: techntrek
Date Posted: 01 Apr 2016 at 8:51pm
It isn't about stealing the pin, it is about stealing the expensive WDH hitch the pin is in.... ------------- Doug ~ '10 171 (2009-2015) ~ 2008 Salem ~ http://www.rpod-owners.com/forum_posts.asp?TID=1723 - Pod instruction manual 
|
Posted By: Retroactive
Date Posted: 02 Apr 2016 at 10:01am
------------- |
Posted By: StephenH
Date Posted: 02 Apr 2016 at 12:04pm
|
The Sway/WDH doesn't. The Stowaway hitch tightener does help eliminate some of that type noise as it locks the shank into the hitch receiver very tightly. I don't think the "clacking" is the ball and receiver as much as it is the shank and the receiver. The WDH certainly would, because of the tension the bars exert, keep the ball and hitch tight. The tongue weight also comes into play here. That is why the recommendation I have read is that tongue weight should be 10% of the trailer weight. If the trailer weighs 3500 lbs, then tongue weight should be 350 lbs. I have not been anywhere near a scale to weigh my setup. However, I am pretty sure I have at least 10% of the weight on the tongue. The 179 with full fresh water and empty gray and black water pretty much makes that a given. ------------- StephenH Happy is the man that findeth wisdom,... http://www.rpod-owners.com/forum_posts.asp?TID=7712 - ouR escaPOD mods Former RPod 179 Current Cherokee Grey Wolf 24 JS |
Posted By: Retroactive
Date Posted: 03 Apr 2016 at 12:55pm
Mystery Mod: What primer is this?  So I am painting the kitchenette wall for the wife. Right now I am applying several coats of special primer. This primer will create "functionality" after the real paint is on. What do you think the primer is? The winner gets the awful stock 6" speakers I swapped out the other day... 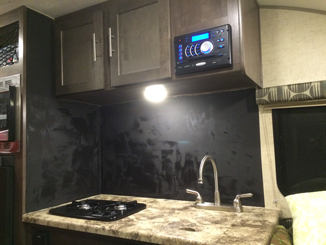 ------------- |
Posted By: Patriot Dave
Date Posted: 04 Apr 2016 at 7:15pm
How about barbecue grill black? ------------- Dave & Joyce Never Forget, In God We Trust; This Our National Motto. Member; Patriot Guard Riders, Michigan Chapter Retired; So Every Day is Saturday.... Except Sunday |
Posted By: Retroactive
Date Posted: 04 Apr 2016 at 9:47pm
|
That's a good guess Dave. It does have metallic material in it, and could reflect a little nice even heat, but it's not that special black BBQ finish. I was going to wait until I had the color top coats on, but I had to put six coats of that primer on (manufacturer said three coats of the primer, I had to buy a second can, LIES!). The first top coat went on today, but it's all streaky because of the black showing through. Hopefully finish it tomorrow, I didn't want to wait 4 hours for it to cure enough for a second coat. Good thing the heater kicks ass in the little 171, it's gets up to ideal 77F curing temp within minutes - and today we are having a freak 22F weather...a mere 30F below normal. The key clue to this real function is the ferrous material infused paint. ------------- |
Posted By: StephenH
Date Posted: 05 Apr 2016 at 9:39am
|
Ferrous material sounds like the black base coat I used in a project for kitchen counters. The project used Giani Countertop Paint, White Diamond. http://www.amazon.com/Giani-Countertop-Paint-White-Diamond/dp/B00BMU9QMK?ie=UTF8&keywords=kitchen%20counter%20granite%20paint&qid=1459863417&ref_=sr_1_2&sr=8-2 - http://www.amazon.com/Giani-Countertop-Paint-White-Diamond/dp/B00BMU9QMK?ie=UTF8&keywords=kitchen%20counter%20granite%20paint&qid=1459863417&ref_=sr_1_2&sr=8-2 I would not have thought about using it for a backsplash, but I don't see why it would not work. ------------- StephenH Happy is the man that findeth wisdom,... http://www.rpod-owners.com/forum_posts.asp?TID=7712 - ouR escaPOD mods Former RPod 179 Current Cherokee Grey Wolf 24 JS |
Posted By: Retroactive
Date Posted: 05 Apr 2016 at 10:07am
|
That's another really good guess. That part of the kitchenette would look great with something like that. But we are putting regular interior semigloss paint over the primer. Maybe I will have final pics tonight, assuming the propane doesn't run out; we are having a freak cold snap, and I have had to keep the pod at 55F for the last 3 days 24/7 so the primer and paint cures. I have to say the little 171 really holds in the heat pretty well this time of year, it was 20F and I had a window on both ends open a crack for ventilation, and with the heat set at 70F the furnace only kicked on three times for very short periods over the 90 minutes or so I was in there. ------------- |
Posted By: StephenH
Date Posted: 05 Apr 2016 at 11:37am
|
Since you are talking about curing, my second guess would be some sort of epoxy coating.
------------- StephenH Happy is the man that findeth wisdom,... http://www.rpod-owners.com/forum_posts.asp?TID=7712 - ouR escaPOD mods Former RPod 179 Current Cherokee Grey Wolf 24 JS |
Posted By: Retroactive
Date Posted: 05 Apr 2016 at 1:55pm
|
Again a very good guess. I probably shouldn't have used the word "cure" about the topcoat which is regular paint, only the primer needs to cure. In this case, my primer being ferrous is the key. This primer was "one part" type stuff, but even with the vent fan blowing and the door cracked, whatever volatile they used to keep it liquid made me incredibly lightheaded. The primer allows the top coat to do something that would appear "magic" to some remote Amazon forest tribesman, which would either get me elected chief...or possibly eaten to steal my power. ------------- |
Posted By: furpod
Date Posted: 05 Apr 2016 at 2:07pm
|
I have never been happy with the magnetic or chalk board paints. And really not happy with the ones that are supposed to do both..
------------- |
Posted By: StephenH
Date Posted: 05 Apr 2016 at 2:15pm
|
I'm looking forward to seeing pictures of it when you are finished.
------------- StephenH Happy is the man that findeth wisdom,... http://www.rpod-owners.com/forum_posts.asp?TID=7712 - ouR escaPOD mods Former RPod 179 Current Cherokee Grey Wolf 24 JS |
Posted By: Retroactive
Date Posted: 05 Apr 2016 at 2:33pm
Close enough! The primer is magnetic.
------------- |
Posted By: StephenH
Date Posted: 05 Apr 2016 at 2:49pm
I've had a few projects that have not turned out as I thought they would either. OTOH, the Giani Granite paint worked great!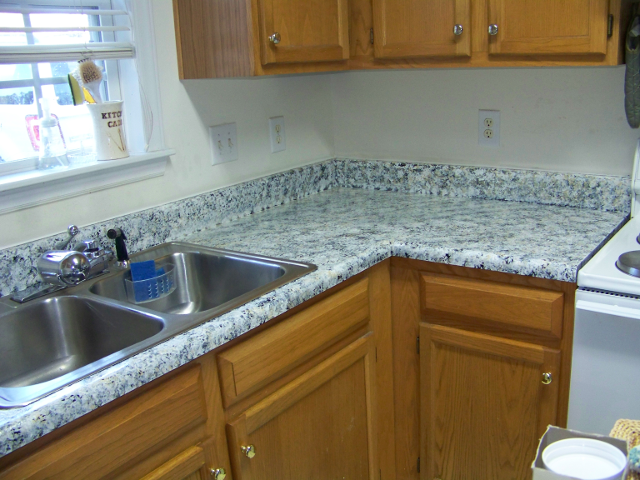 ------------- StephenH Happy is the man that findeth wisdom,... http://www.rpod-owners.com/forum_posts.asp?TID=7712 - ouR escaPOD mods Former RPod 179 Current Cherokee Grey Wolf 24 JS |
Posted By: Retroactive
Date Posted: 05 Apr 2016 at 2:54pm
|
That looks slick. Definitely and upgrade from stock laminate. ------------- |
Posted By: Retroactive
Date Posted: 07 Apr 2016 at 9:07am
|
Quickie Mod: Indoor/Outdoor Thermometer. The Dometic thermostat frustrates me, because it does not have a way of displaying the actual cabin temperature. And of course it is always nice to know the outside temp. This is a quick and easy upgrade, I got the thermometer at Lowe's for ~$16. Materials: Indoor/Outdoor Thermometer (with wireless sensor), Command Strips, Zip Ties. 1) Affix temp display unit to wall, with command strips. The thermometers all seem to have the interior temp located at the bottom. It worked out perfectly, the Dometic thermostat is mounted to low for me, I wanted to mount the new display directly above the Dometic thermostat anyhow. I highly recommend using some for of velcro type command hooks, so you can re-positioning the display if needed. I was able to trim the strips to the length of the battery cover, and I can swap them out just by firmly lifting the display up. 2) Use the command strips to mount the sensor on top of the pod's hitch frame that runs under the rear of the pod, this will allow it to be shielded from the sun and give a more accurate temp reading. It is very Important to mount it on top of the frame, to protect it from water and road debris splashing up. On my unit the battery cover came off a little to easy for my liking, so I used a small zip tie to hold the cover in place until the next time it needs batteries. 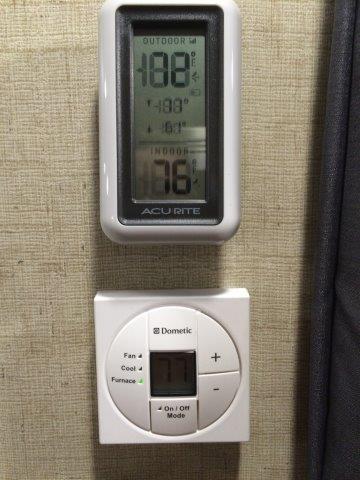 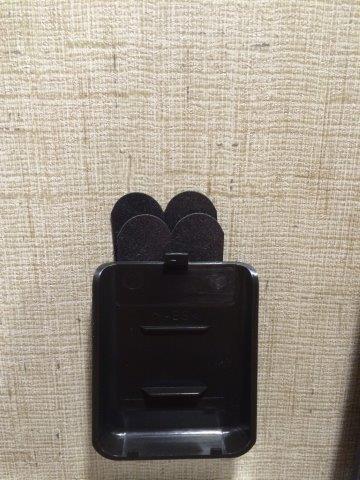 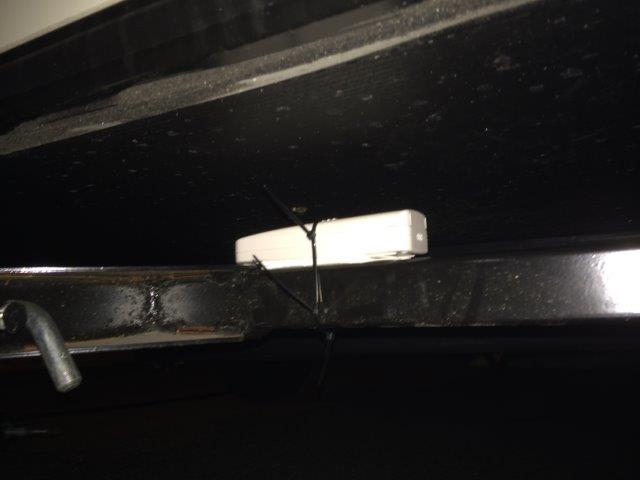  ------------- |
Posted By: StephenH
Date Posted: 07 Apr 2016 at 9:49am
|
I did something similar, but instead of using command strips on the outside sender, I used a velcro wrap strip to attach it to the spare tire on the side facing the cover. That way, it is protected from the weather, probably even better than it would be attached to the frame. The velcro strip means it can easily be removed from the tire if I should need to use it. If the velcro were to not hold, it would simply fall to the bottom and be held by the cover.
------------- StephenH Happy is the man that findeth wisdom,... http://www.rpod-owners.com/forum_posts.asp?TID=7712 - ouR escaPOD mods Former RPod 179 Current Cherokee Grey Wolf 24 JS |
Posted By: Retroactive
Date Posted: 07 Apr 2016 at 10:12am
|
That is a really good idea. I love those velcro wraps. If this sensor craps out quick, then I will definitely try your trick. ------------- |
Posted By: StephenH
Date Posted: 07 Apr 2016 at 10:26am
|
I understand. The countertop project took longer and was much more involved than the videos on the product site indicated. The hardest part was getting the clear coat on so that there would not be any roller lines or bubbles. The cure time also meant that we could not use the countertops for a couple of weeks, and then we were really careful to not let water sit on it for several more weeks. We then used hot pads and cutting boards to protect is. Since it was in a house we were renting, we wanted to make sure it was left in great shape when we left. If the new tenants have also used hot pads and cutting boards, it should still be looking as good. I did the Giani Granite paint because I had accidentally burned the countertop with a hot pot. The countertop wasn't in the greatest shape even before that. The owner was very pleased with the "granite" countertops, and we got our full deposit back.  ------------- StephenH Happy is the man that findeth wisdom,... http://www.rpod-owners.com/forum_posts.asp?TID=7712 - ouR escaPOD mods Former RPod 179 Current Cherokee Grey Wolf 24 JS |
Posted By: Retroactive
Date Posted: 07 Apr 2016 at 10:38am
|
I am going to use a "scrubbable" eggshell/flat finish, and a nappy mini roller to hide it all. Hopefully two coats should do it. Off to Lowe's at lunch once again...
------------- |
Posted By: StephenH
Date Posted: 07 Apr 2016 at 11:00am
|
Unfortunately, it is too late to go back and restart. I would think that a roller would have done a much better job with the primer. With the exception of a foam brush for corners, the base coat for the countertop was done with a roller.
------------- StephenH Happy is the man that findeth wisdom,... http://www.rpod-owners.com/forum_posts.asp?TID=7712 - ouR escaPOD mods Former RPod 179 Current Cherokee Grey Wolf 24 JS |
Posted By: Retroactive
Date Posted: 07 Apr 2016 at 1:14pm
The Valspar I picked up today looks much truer, since that is the chip's brand; I had them put a very large dab on the can this time, so I could send a pic to the wife. ------------- |
Posted By: Appocalexx
Date Posted: 11 Apr 2016 at 3:53am
|
Looks like a good build so far keep up the good work, Subdidid!! ------------- |
Posted By: Retroactive
Date Posted: 11 Apr 2016 at 9:30am
|
Thanks. Tonight or tomorrow I'm putting in some metal trim on it for bling, and then the kitchenette will look happy for the wife.
------------- |
Posted By: Retroactive
Date Posted: 15 Apr 2016 at 10:19am
Added weather stripping to the under bed storage compartment, keeps a more stable temp in the bed area.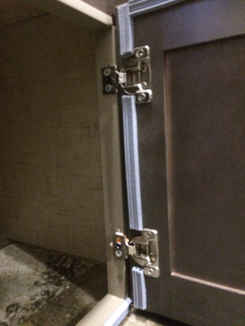 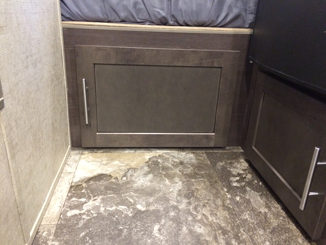 ------------- |
Posted By: Retroactive
Date Posted: 15 Apr 2016 at 11:39am
The kitchenette painting is finally done, finished it up this morning just in time for our first trip today. We made some brushed aluminum strips, and added them for detail and bling.f those little square thin magnets shown in the pic...those stick like glue!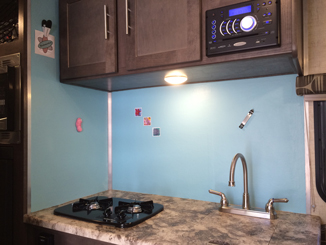 ------------- |
Posted By: Leo B
Date Posted: 15 Apr 2016 at 11:50am
|
Nice work!
------------- Leo & Melissa Bachand 2017 Ford F150 2021 Vista Cruiser 19 csk Previously owned 2015 Rpod 179 2010 Rpod 171 |
Posted By: Retroactive
Date Posted: 15 Apr 2016 at 6:39pm
|
Thanks! We just made our first trip. Been set up for about 2 hours now. Looking at the beach from the pod. I wish this site would let me post pics from my iPhone! ------------- |
Posted By: Retroactive
Date Posted: 18 Apr 2016 at 2:26pm
Ultimate Pod Mod, actually use it! Yesterday we came back from our first trip. Only 80 miles away to the coast in RI, but at least I can add another state flag now! You can see why we bought it, the profile of the inlaws' cottage is barely bigger than Rpod! . 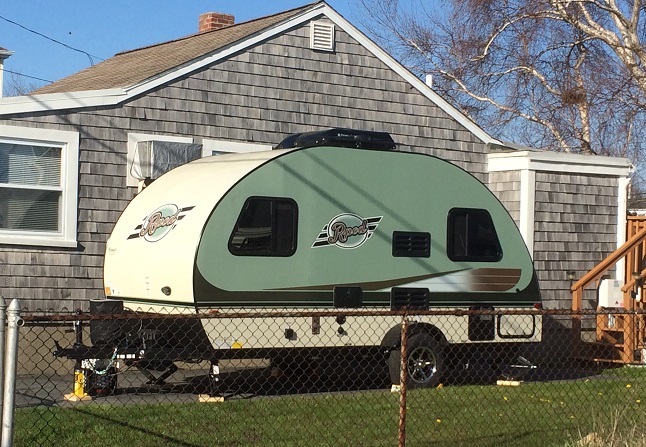 ------------- |
Posted By: StephenH
Date Posted: 18 Apr 2016 at 8:41pm
|
Your backsplash is quite attractive. It is too bad the magnetic base coat was such a pain. Did you end up getting the moving dolly to maneuver it into place, or were you able to back it in with your TV? ------------- StephenH Happy is the man that findeth wisdom,... http://www.rpod-owners.com/forum_posts.asp?TID=7712 - ouR escaPOD mods Former RPod 179 Current Cherokee Grey Wolf 24 JS |
Posted By: Retroactive
Date Posted: 18 Apr 2016 at 11:56pm
|
We somehow managed to back it in. It took a few tries, but we pulled it off. The hardest part is that the streets there are unusually narrow, I had to drive my truck onto the neighbors lawn. Of course I had two people ask me about the Rpod, once during the drive and once at the beach. ------------- |
Posted By: GLBCamper
Date Posted: 21 Apr 2016 at 1:44am
|
Back to a speaker question. Will any 6" speaker work? ------------- Old: 2014 177 HRE 2015 Tacoma V6 4x4 Double Cab New: 2016 EVO ATS 200rd 2016 F150 4x4 Sport |
Posted By: Retroactive
Date Posted: 21 Apr 2016 at 7:50am
Yes. The standard size is actually called 6.5" which is a very common automotive size. You should have no problems unless your speakers are ceiling mounted.
------------- |
Posted By: Patriot Dave
Date Posted: 24 Apr 2016 at 5:15am
I have ceiling mounted speakers in our 17................is the problem due to the lack of depth? ------------- Dave & Joyce Never Forget, In God We Trust; This Our National Motto. Member; Patriot Guard Riders, Michigan Chapter Retired; So Every Day is Saturday.... Except Sunday |
Posted By: Grandpa Hiker
Date Posted: 24 Apr 2016 at 5:45am
|
Yes the issue is the thickness of the ceiling, but you can use spacers. Here is a thread that discusses the issue. https://www.facebook.com/groups/56931970807/permalink/10153156787425808/?hc_location=ufi ------------- Rob & Becky 2014 Ford Explorer 3.5 SOHC V6 2015 R-179 Pod aka Piddle Pod "Life is not about waiting for the storms to pass, it is about learning to dance in the rain!!" |
Posted By: Retroactive
Date Posted: 24 Apr 2016 at 11:45am
|
For cheap money you can buy "speaker depth extenders". One brand is "American International". There are other brands out there, and sometimes they call them "speaker rings" etc. They are basically black plastic rings. I highly recommend going with a 6.5" if possible, the bass response will be so much better. Don't cheap out on the speakers, you will be glad you didn't. If you want to hear something in person, I highly recommend the JBL ones they sell at Best Buy - bring a CD of your favorite music and have a listen. I found them to be very good for the price point, I have thousands of dollars invested in my Home Theater and am picky when it comes to sound - so I was pleasantly surprised. ------------- |
Posted By: Patriot Dave
Date Posted: 24 Apr 2016 at 12:03pm
Hey Thank You for the info. I definitely want to improve the sound inside my Rpod. Thanks Again ------------- Dave & Joyce Never Forget, In God We Trust; This Our National Motto. Member; Patriot Guard Riders, Michigan Chapter Retired; So Every Day is Saturday.... Except Sunday |
Posted By: Retroactive
Date Posted: 24 Apr 2016 at 7:37pm
|
TV Mount Mod: "fwunder" gets the credit for inspiring this mod. I bought the same mount he used, on Amazon it is only $12.99 (link below). It worked perfectly for the TV's and locations like both of ours. http://www.amazon.com/VideoSecu-Articulating-Monitor-Extension-ML12BCE5/dp/B003O1UYHG?ie=UTF8&psc=1&redirect=true&ref_=oh_aui_detailpage_o02_s00 - http://www.amazon.com/VideoSecu-Articulating-Monitor-Extension-ML12BCE5/dp/B003O1UYHG?ie=UTF8&psc=1&redirect=true&ref_=oh_aui_detailpage_o02_s00 1) Remove everything, including cables. But do not cut off the special screw mount zip ties. 2) Observe existing bolt pattern on walls. When locating the new mount, stay within the bolt pattern boundary so that you know the screws will be going into the stud behind the paneling. 3) Mark new holes. I was able to move the axis of the new mount approx 1.5" to the right, and more importantly 1" lower...the TV in my 171 is mounted way too high IMHO. 4) The screws that come with the mount are far too large, and the old screws are too small because the new mount only allows two screws. I got two medium sized screws that I happened to find in my random hardware junk box. I strongly advise getting some new screws for this project. 5) Pre-drill holes for the screws. 6) Attach new mount to the wall. Make sure the bracket is plumb when tightening. 7) Attach TV to mount. 8) Re-attach cables to TV, and "arm" of the mount. Note how I secured the cable conduit to the underside of the arm so it doesn't get jammed between the arm and wall - letting it sit as flat as possible. You could alternatively mount it to the top side of the arm. 9) Re-attach the screw zip-ties to the wall. Re-attach all cables to the wall outlets. The mod worked perfectly and took about 90 minutes. Between the downward angle range of the new mount, and the fact I was able to move the mount 1" lower, it was absolutely perfect for viewing the TV form the Lava Lounge (aka the dinette we leave permanently as a bed). My "reward" for my hard work, was getting to test the A/V system by watching The Notebook...yay? Bonus points for knowing what I also mounted, on the upper right side of the wall. 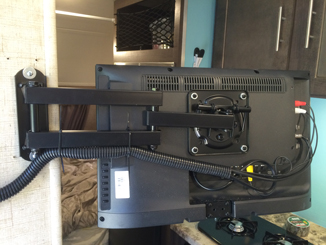 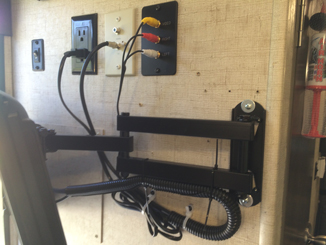  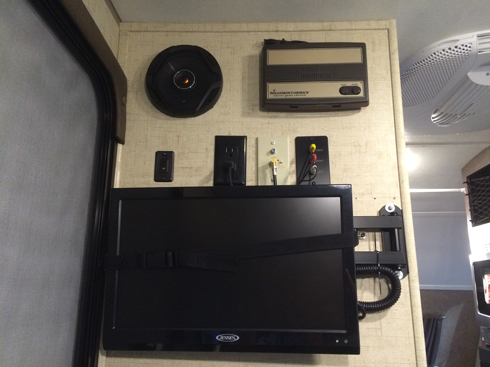 ------------- |
Posted By: Retroactive
Date Posted: 25 Apr 2016 at 12:55pm
|
Ergonomic Mod: Entry/Exit Handle for bed compartment. One downside to the 171 is how tight it is to get out of the bed compartment. I sleep on the backside under the rear window, so I have to crawl over my wife to get out of bed. I decided to add a handle to help me spiderman over her. I bought one of the Moen bathroom stability handles, they are available in a variety of finishes and lengths. I'm not going into detail on this one, to do this mod right you need to be able to locate structural members behind the wall. The top mount catches the corner stud as well as the horizontal member that supports the shelf in back. The bottom mount only catches the corner stud. The other three holes I used expanding wall anchors. I was surprised at how solid it came out, no wiggle and no creaking, I put quite a bit of side-side and up-down stress on it to test it out. This is going to be a lifesaver in the dark when I don't have my glasses on! 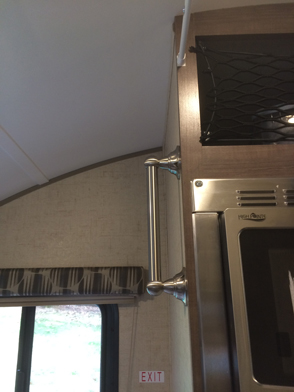 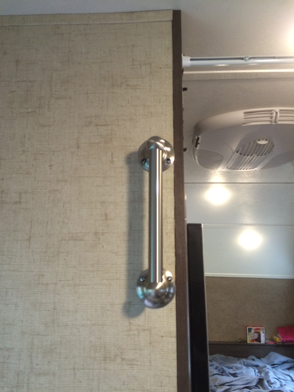 ------------- |
Posted By: Retroactive
Date Posted: 25 Apr 2016 at 9:41pm
Gotta have art! We needed to make the pod a little more homey and wanted to add some art. This was a classic collaboration between the wife and I, she comes up with the initial concept and I work out the execution. What kind of art do you put in a camper? Camper Art!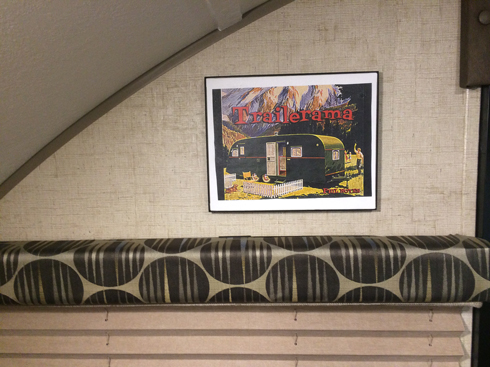 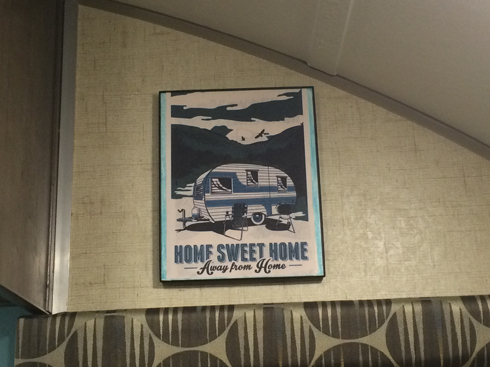 ------------- |
Posted By: larbear
Date Posted: 28 May 2016 at 6:13pm
|
Wil...You are really inspiring! We ended up getting a 2010 171 Escape Pod in excellent shape...getting "necessary stuff"...trying to spray wax between rainstorms...going to do the water purifying when I can (even tho dealer said it was all set) charging the new battery up (the case had a good 3-4 inches of rain in bottom- should I drill some holes to drain? Brought home last week and found I need to get risers so just got them from forest river for $150 plus tax and shipping. Now waiting to hear from my local car mechanic to see if he'll put them on. The directions were horrible but I found a great step by step on this site! I wish I could do it myself but no level yard or driveway at home. We're babysitting grandson til schools out then looking forward to a maiden voyage. Don't know how to tag yet Lar & Nan 2010 RP-171 "Escape Pod" 2012 Ram 1500 Quad 5.7L
|
Posted By: Retroactive
Date Posted: 30 May 2016 at 12:50pm
Congratulations! Best of luck with the 171. Once you get used to the small hallway, then it doesn't really feel as cramped as one might think. That being said, I am definitely going to try to reclaim and/or re-purpose areas to maximize storage. I think you will like the simplicity, it is a good way to start. Bon Voyage!
------------- |
Posted By: larbear
Date Posted: 30 May 2016 at 2:45pm
|
Thanks...for another "heads up" tip....we're loving our pod even tho it has yet to leave home! I ended up drilling 4 corner bottom 1/4" holes in bottom of case to avoid the floods. |
Posted By: StephenH
Date Posted: 30 May 2016 at 2:59pm
|
I ended up drilling drain holes in my battery boxes as well after seeing them accumulate water. The lids are not sealed, so any water thrown up by the TV tires can get into the areas of the lid through which the wires are fed. If these batteries were down in the bilge of a boat, then the object would be to keep bilge water out, but here, there needs to be a way to drain water that gets in through the lid.
------------- StephenH Happy is the man that findeth wisdom,... http://www.rpod-owners.com/forum_posts.asp?TID=7712 - ouR escaPOD mods Former RPod 179 Current Cherokee Grey Wolf 24 JS |
Posted By: Retroactive
Date Posted: 30 May 2016 at 3:00pm
|
Good to know. I have not towed in the rain yet. ------------- |
Posted By: techntrek
Date Posted: 30 May 2016 at 8:37pm
|
Yup, must drill those holes. Water *will* get into the box. ------------- Doug ~ '10 171 (2009-2015) ~ 2008 Salem ~ http://www.rpod-owners.com/forum_posts.asp?TID=1723 - Pod instruction manual
|
Posted By: Retroactive
Date Posted: 21 Jul 2016 at 11:36pm
|
My next mod is turning the dinette into a permanent Daybed type situation. When inside the camper we prefer to lounge in the area in general, it is central to the TV and everything else. Plus we never use the dinette in the 171, it borders on impractical. The seat cushions as a mattress are simply unacceptable, so an upgrade was necessary. The other upgrade in this mod is turning the space under the table into open storage, now the both of us can put our luggage under there. We got the Twin size mattress in a box from wallyworld, it is almost perfect because it is only 2" less in width than the benches (FR says it is 42" but it is actually 41"), and the new Twin mattress is 39". We put a Full size foam topper on, and stuffed the extra width into the 2" space between the mattress and back wall (fills the gap perfectly). The nice thing about the mattress is that it folds very easily, allowing access to the storage spaces under the benches. The mod is very basic, and you can see all of it in the first pic. 1) Remove leg mechanism from table top, by removing the wood screws. 2) Add a few long screws to the two boards that support the table, by screwing them into the stud inside the bench. 3) Use at least one bracket on each side, to keep the table top from sliding back and forth. 4) Add mattress and bedding of choice. 5) "The Lava Lounge" is fully operational! 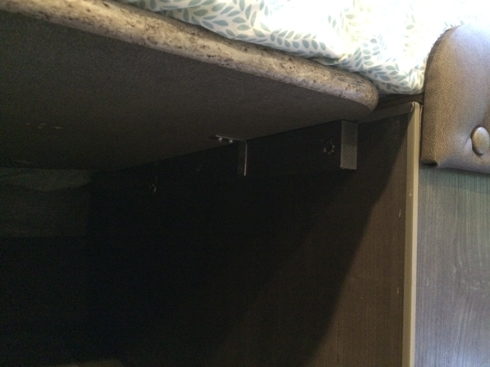 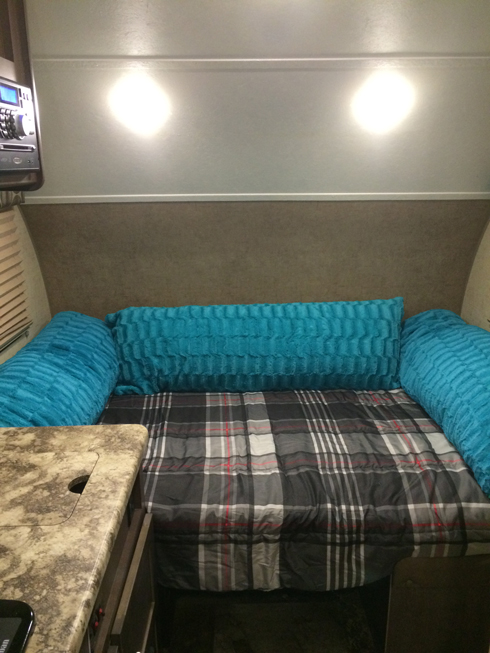 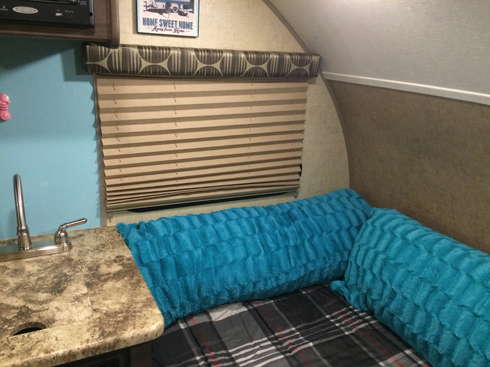 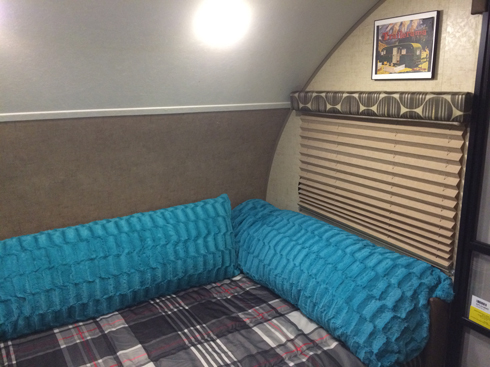 ------------- |
Posted By: StephenH
Date Posted: 22 Jul 2016 at 9:24am
|
Looks nice and appears to be quite practical.
------------- StephenH Happy is the man that findeth wisdom,... http://www.rpod-owners.com/forum_posts.asp?TID=7712 - ouR escaPOD mods Former RPod 179 Current Cherokee Grey Wolf 24 JS |