List Your Mods:
Printed From: R-pod Owners Forum
Category: R-pod Discussion Forums
Forum Name: Podmods, Maintenance, Tips and Tricks
Forum Discription: Ask maintenance questions, share your podmods (modifications) and helpful tips
URL: http://www.rpod-owners.com/forum_posts.asp?TID=842
Printed Date: 25 Apr 2024 at 3:45am
Software Version: Web Wiz Forums 9.64 - http://www.webwizforums.com
Topic: List Your Mods:
Posted By: TerryM
Subject: List Your Mods:
Date Posted: 17 Nov 2009 at 4:58pm
|
If you have come up with any kind of modification for your Pod please list it here. Lets keep the mods in one place. Terry EDIT: A description of how you did your mod would be helpful to. Or people could just send a message and ask about it. ------------- RP-175 W/Lift Kit 2011 Ford F-150 4X4 Saint Augustine, FL: The first permanent European settlement in the USA: 1565 |
Replies:
Posted By: yizit
Date Posted: 18 Nov 2009 at 10:35pm
Here's our current mods. More to come in the spring after it comes out of winter storage.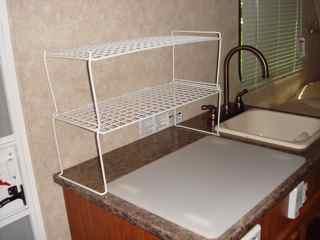 Added wire racks from Wal-mart for extra storage. Removed the gas burner stove and covered open area with a cutting board. We prefer outdoor cooking and using electric hot plates for cooking indoors. 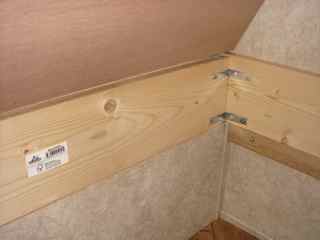  Added 6" height to lower bunk by using 1x6 boards and using contact paper to cover the boards. This gave us additional storage and raised the height of the bunk to comfortably have a place to sit to tie shoes or waiting for the bathroom  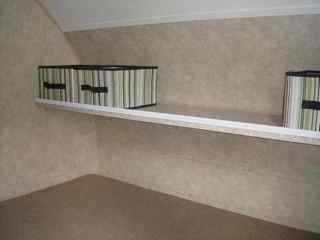 We ordered the 172 with the top bunk loose and replaced it a shelf. This allowed us to be able to sit on the lower bunk without hitting our head on the top bunk. We use the lower bunk for our clothes that we store in plastic containers with rollers on the bottom. The upper shelf is for those odds and ends that you just don't know where to put them. 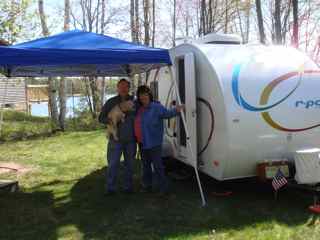 We opted out of the R-Dome and decided the EZ-UP was more for us. It is fast to set up, less then 60 sec's to set up, and is move able to whereever we want to put it. You can get an optional screen too. ------------- 
Former owner of 2009 172 Darlene & Jim, Ewok our Lhasa Roada our 2004 Roadtrek C190Popular |
Posted By: TerryM
Date Posted: 05 Dec 2009 at 12:21am
------------- RP-175 W/Lift Kit 2011 Ford F-150 4X4 Saint Augustine, FL: The first permanent European settlement in the USA: 1565 |
Posted By: rpodcamper.com
Date Posted: 14 Dec 2009 at 12:35am
|
Under Bed Storage use laundry baskets and a tub. To talk about this mod or to ask questions please go to http://www.rpod-owners.com/forum_posts.asp?TID=956&PID=8564#8564 - http://www.rpod-owners.com/forum_posts.asp?TID=956&PID=8564#8564 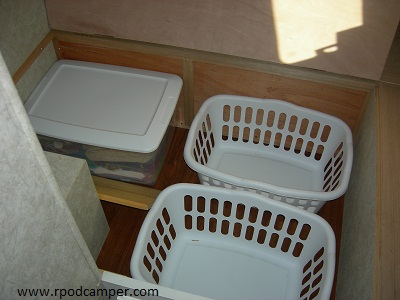 |
Posted By: rpodcamper.com
Date Posted: 14 Dec 2009 at 12:45am
|
Replaced the mattress to a futon. Sleeps so much better To talk about this mod or to ask questions please go to http://www.rpod-owners.com/forum_posts.asp?TID=957&PID=8567#8567 - http://www.rpod-owners.com/forum_posts.asp?TID=957&PID=8567#8567 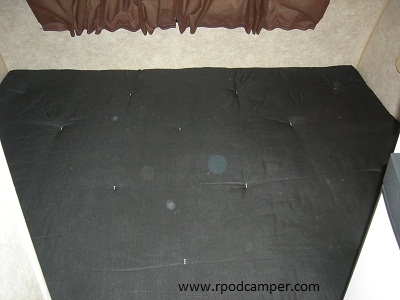 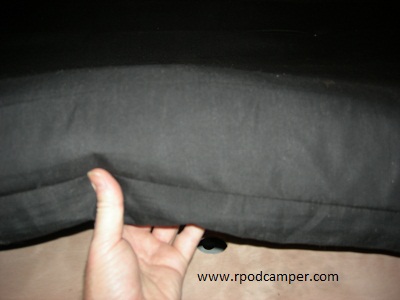 |
Posted By: rpodcamper.com
Date Posted: 14 Dec 2009 at 2:43am
|
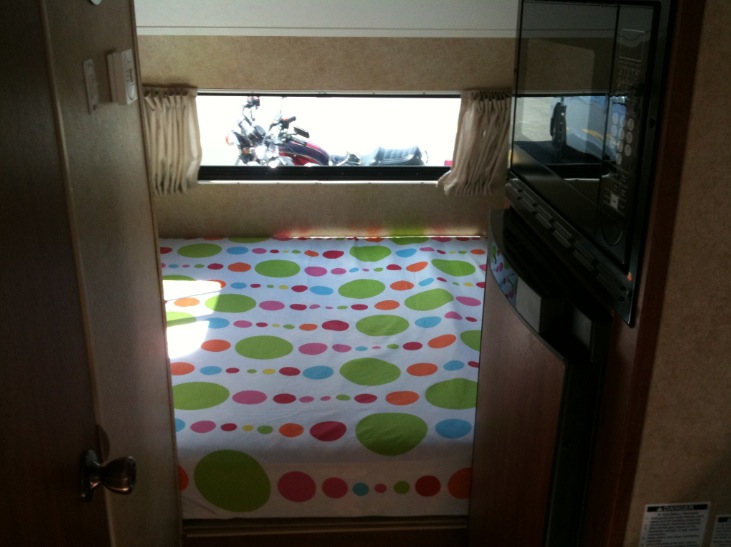
Pulled out the Blinds and installed Curtains To talk about this mod or to ask questions please go to http://www.rpod-owners.com/forum_posts.asp?TID=958&PID=8570#8570 - http://www.rpod-owners.com/forum_posts.asp?TID=958&PID=8570#8570 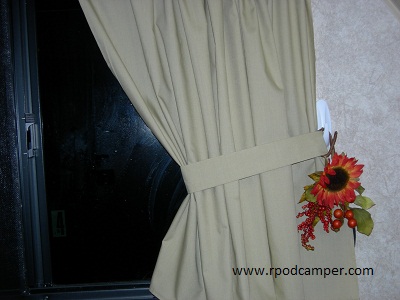 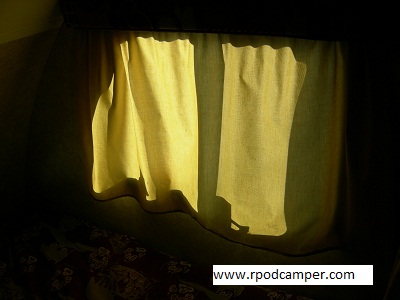  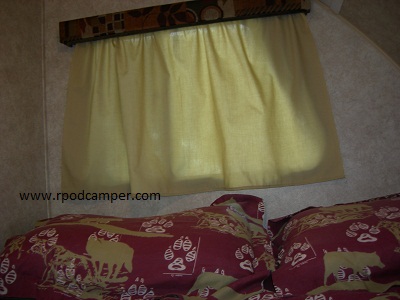 |
Posted By: rpodcamper.com
Date Posted: 14 Dec 2009 at 3:02am
|
The very first time I opened the door of my camper the shower access
panel just jumped out at me. I hated it! The edges were unfinished
wood and gave me splinters several times reaching in to turn on the
light. Managed to get another pocket like what is back in the bed and
hung the pocket. Looks way nicer now!
To talk about this mod or to ask questions please go to http://www.rpod-owners.com/forum_posts.asp?TID=959&PID=8572#8572 - http://www.rpod-owners.com/forum_posts.asp?TID=959&PID=8572#8572 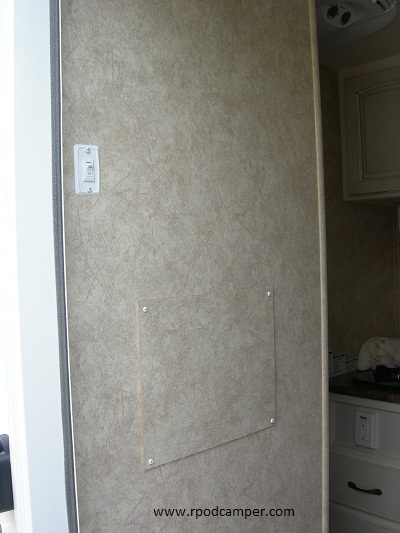 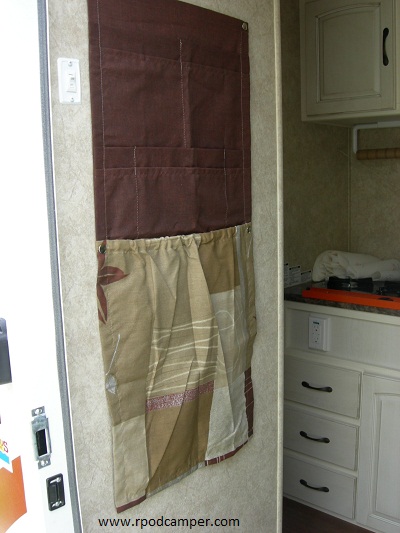 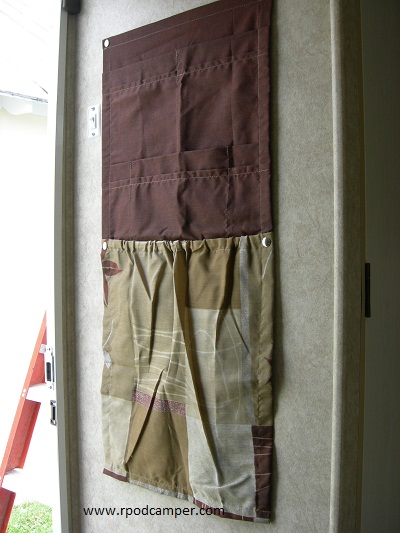 |
Posted By: rpodcamper.com
Date Posted: 14 Dec 2009 at 3:25am
|
When we ordered our r-pod the first thing I had the dealer do was to
remove the single tank holder and install the Dual Tank Holder. We
also changed over the gas regulator so both tanks are fastened at all
times. I went with a manual switch over regulator so I know when the
one tank is empty and needs to be refilled. To talk about this mod or to ask questions please go to http://www.rpod-owners.com/forum_posts.asp?TID=960&PID=8574#8574 - http://www.rpod-owners.com/forum_posts.asp?TID=960&PID=8574#8574  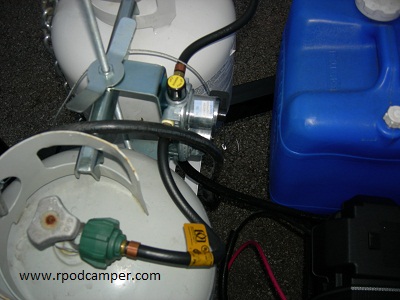 |
Posted By: rpodcamper.com
Date Posted: 15 Dec 2009 at 10:35pm
|
 Before Install
 Before
 Before
 Before
 After
After After
AfterPosted By: VenturaDi
Date Posted: 11 Jan 2010 at 7:49pm
Among other things, installed a safety handle in the BR to make it easier to get up off the toi! ------------- Diane 177 owner |
Posted By: GrandPod
Date Posted: 20 Jan 2010 at 6:15am
|
I have done the following Mods to our Model 177
1. Replace front jack with a folding one with that has a wheel
2. Added cabinet stay to the door of the cabinet which is over the stove and sink.
3. cut finger hole in lid of dinette seat storage compartment and added cabinet stay so that the lid will stay open by itself.
4. Moved the legs of dinette table back 71/2 " so that it will fit closer to wall.
5. added hinge to lid of dinette seat where converter is located and added divider to seperate
wiring from storage side also cut finger hole in lid.
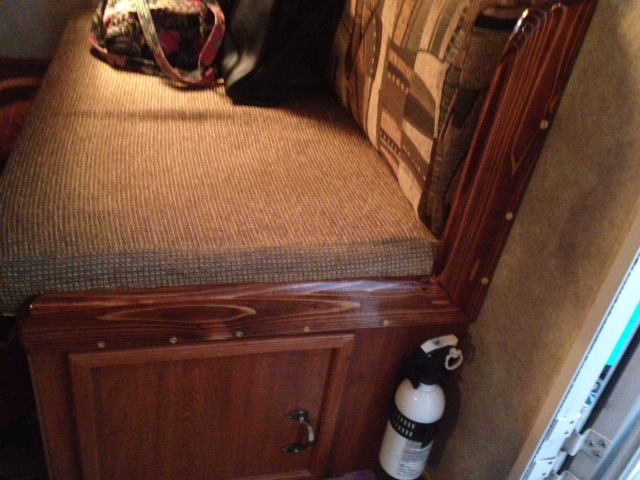
6. Added 3" memory foam topper to bed.
7. Added stand alone 2 step enterance step.
8. Added 2 type 24 12Vdc batteries in parallel
------------- Tom and Linda R-Pod 177 Southwest Florida |
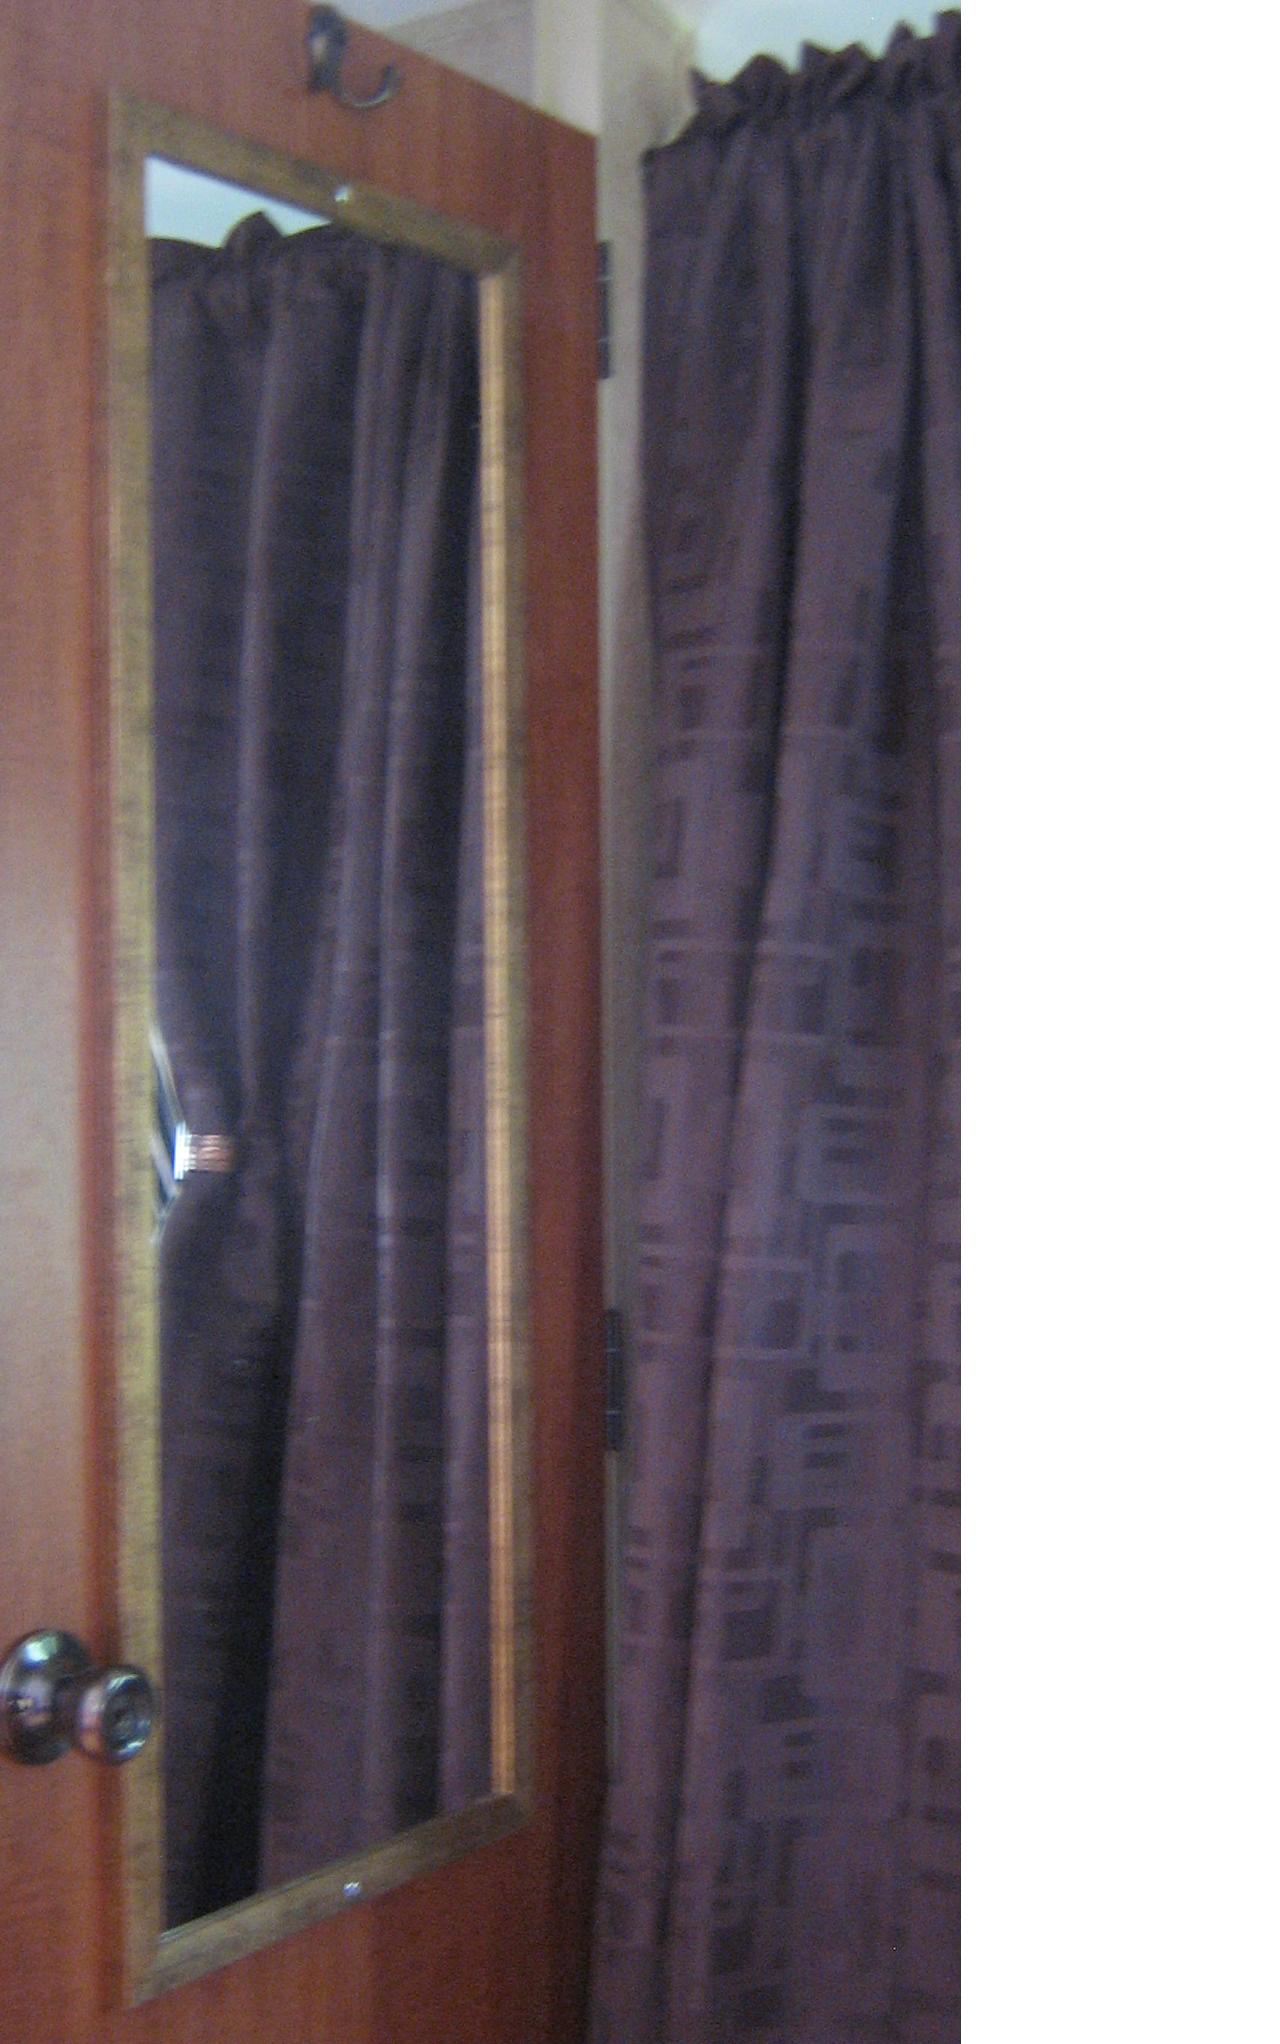
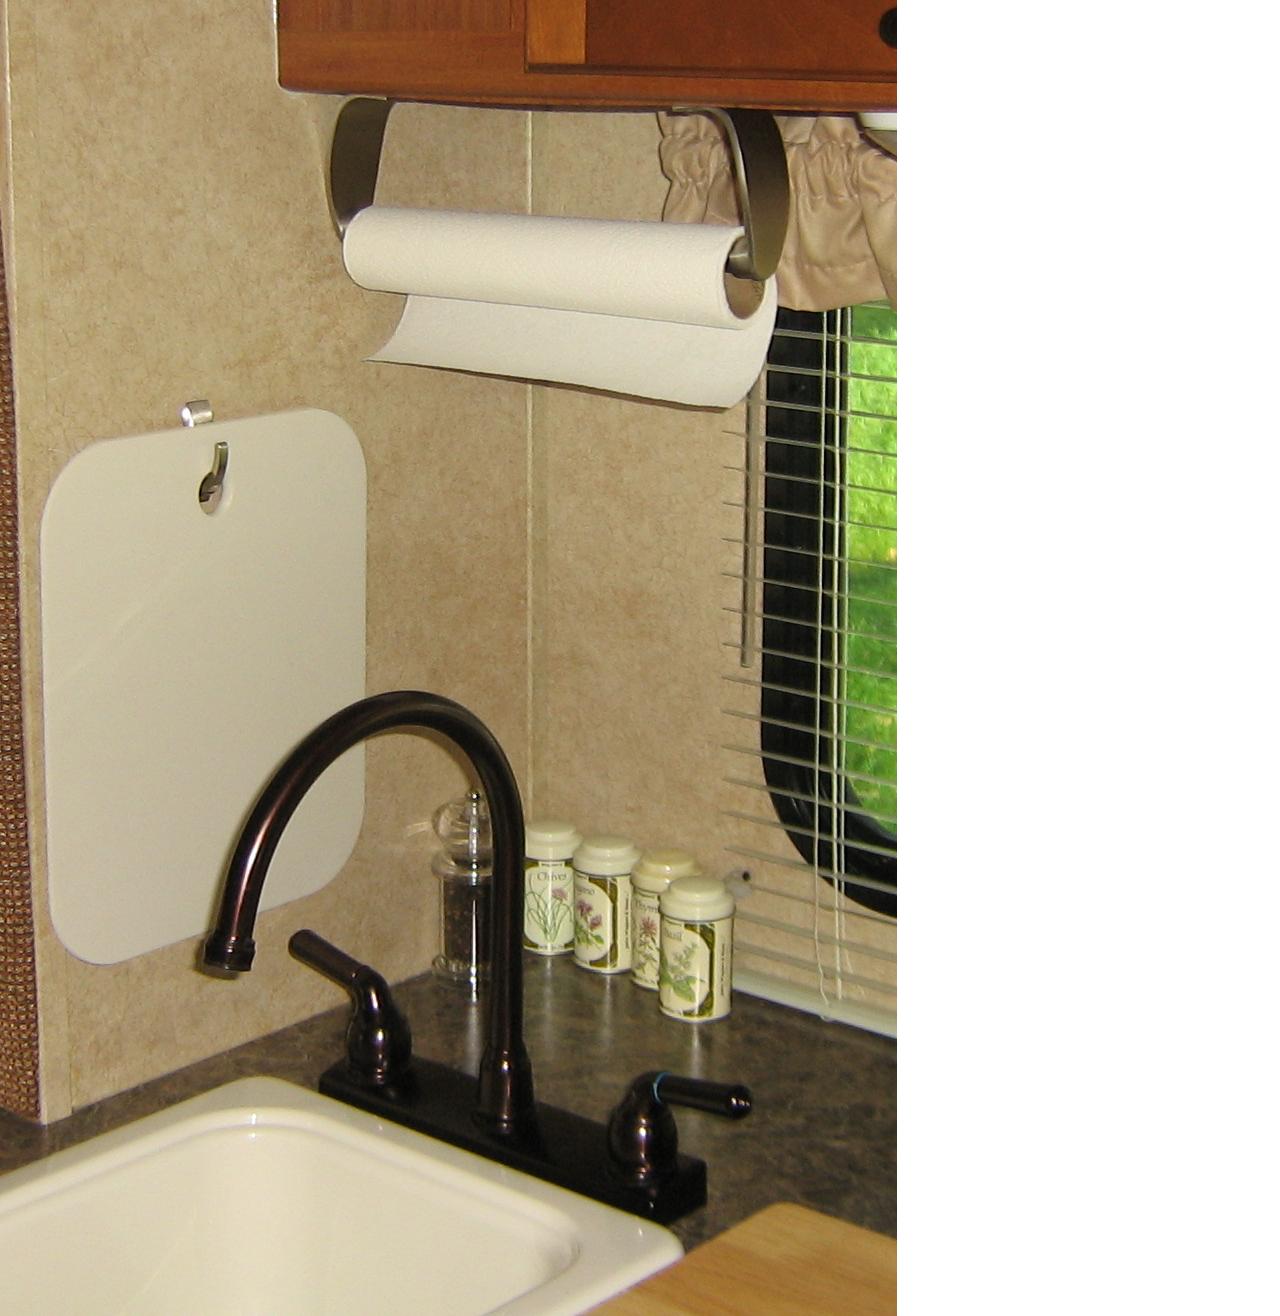
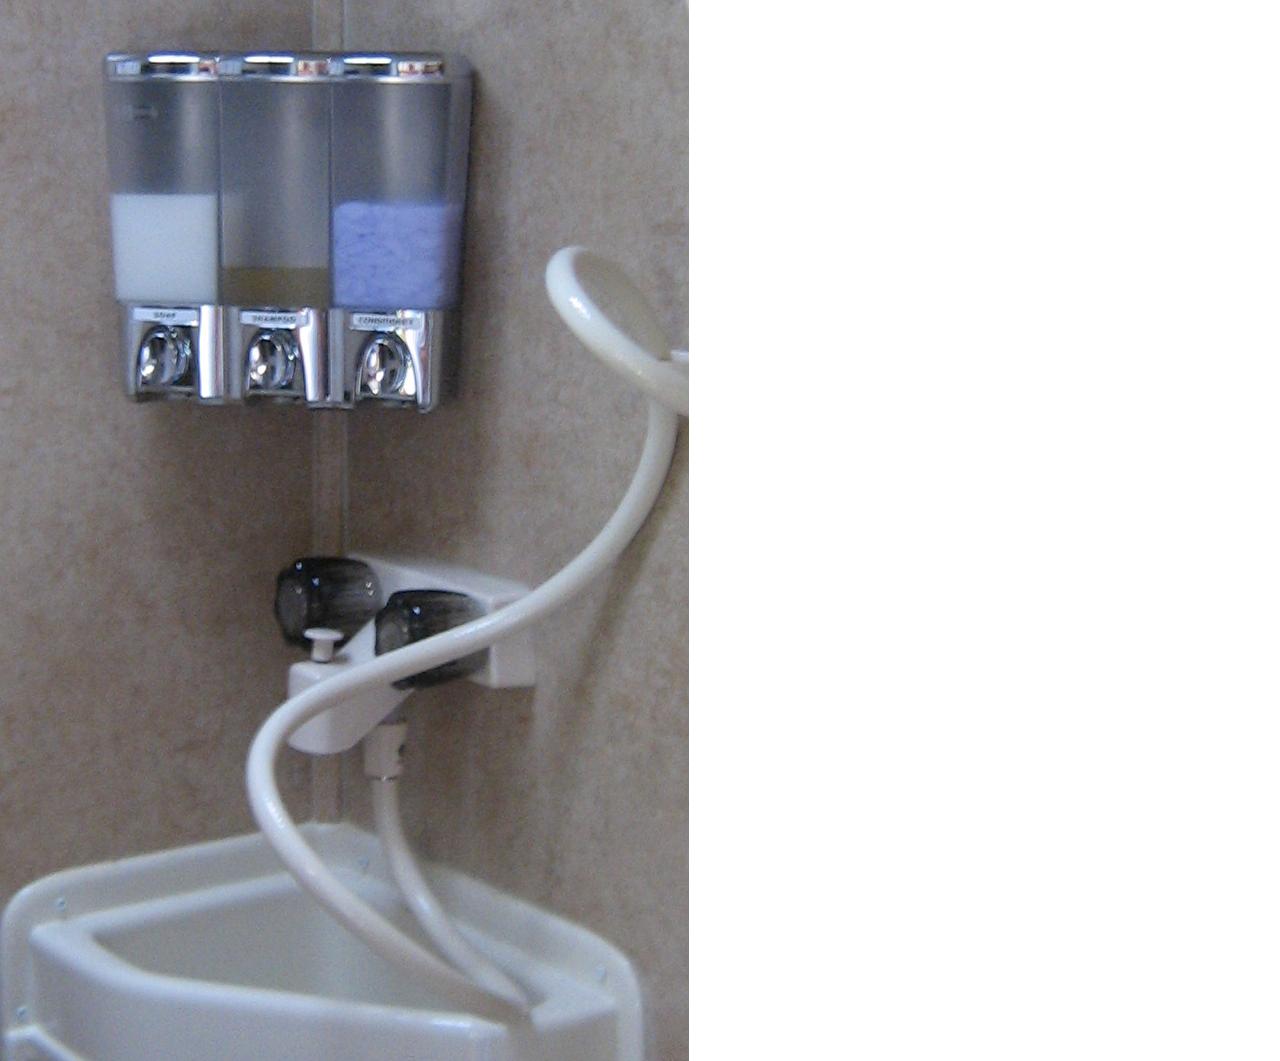
Posted By: Snowbound
Date Posted: 25 May 2011 at 1:01am
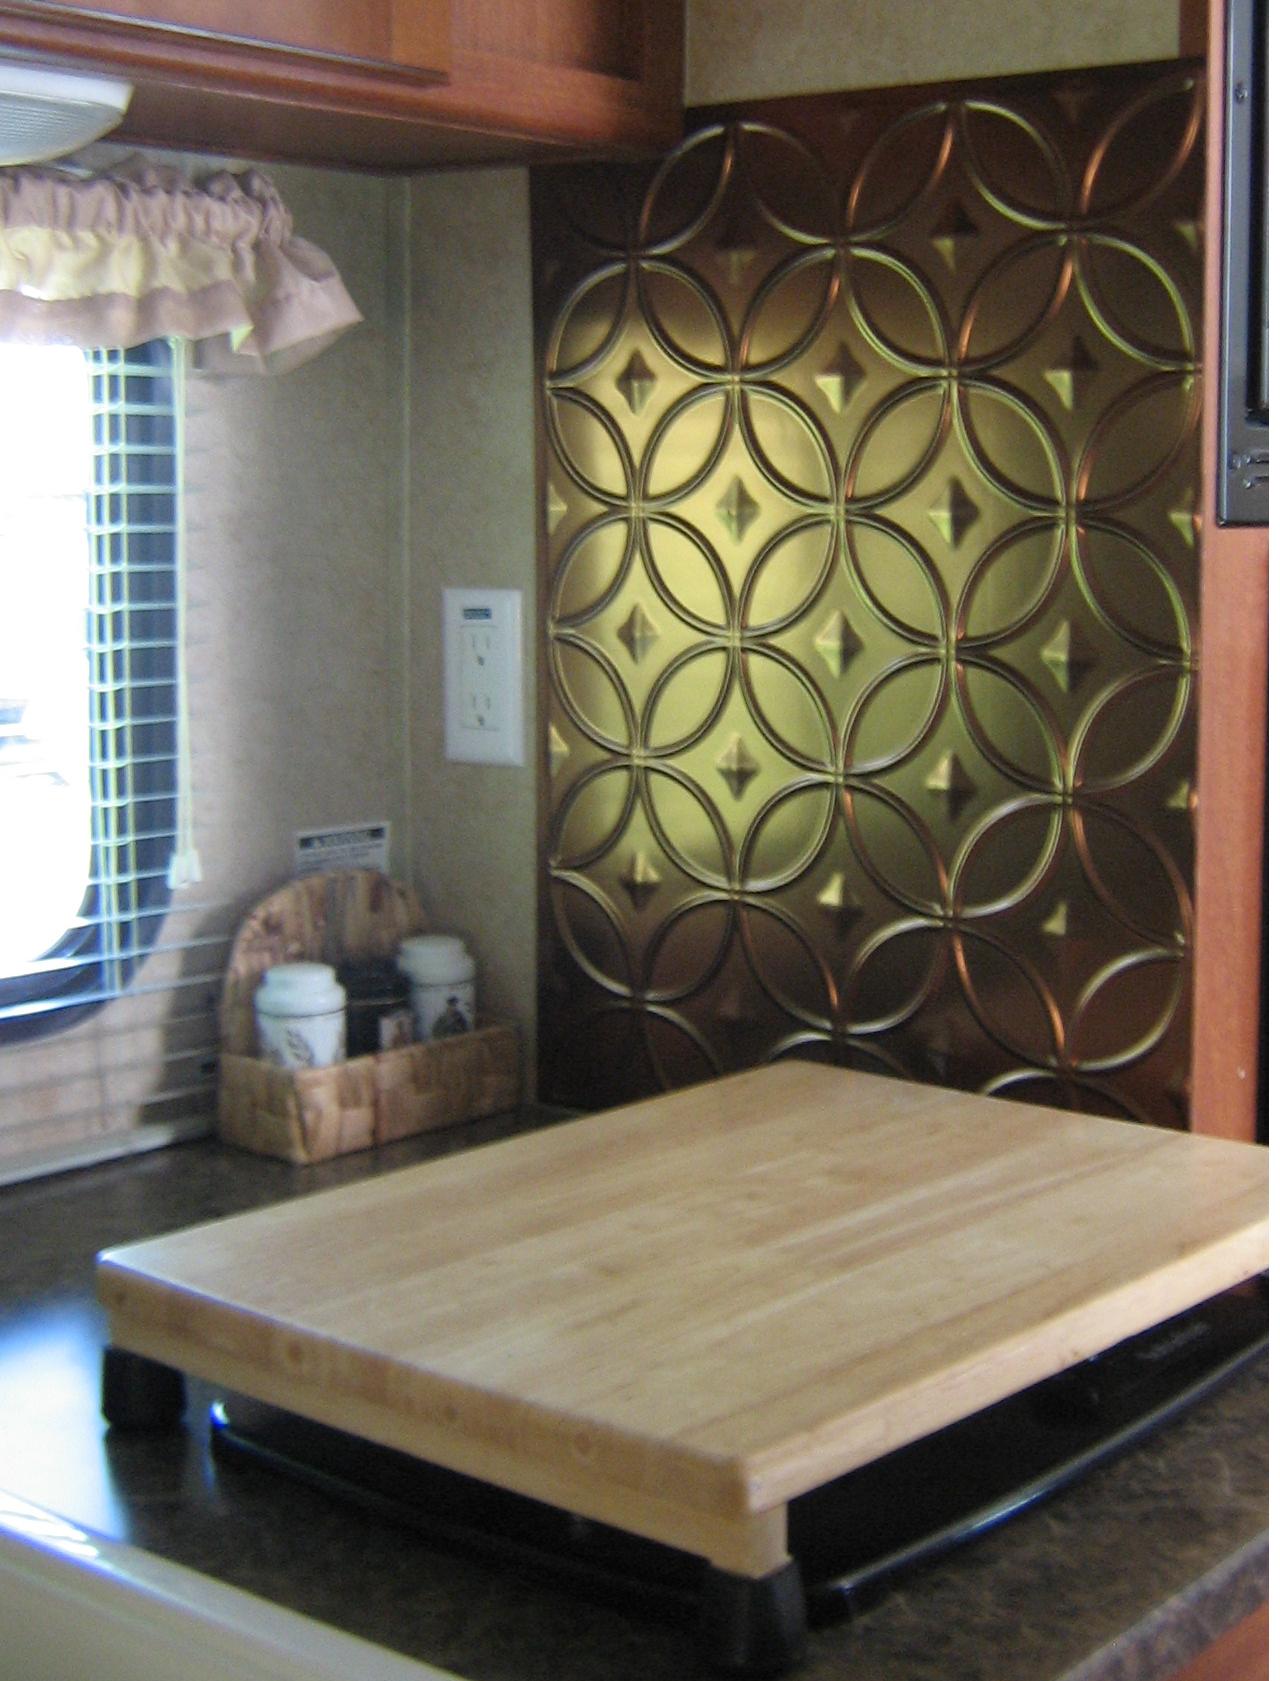
Plastic back splash beside the stove
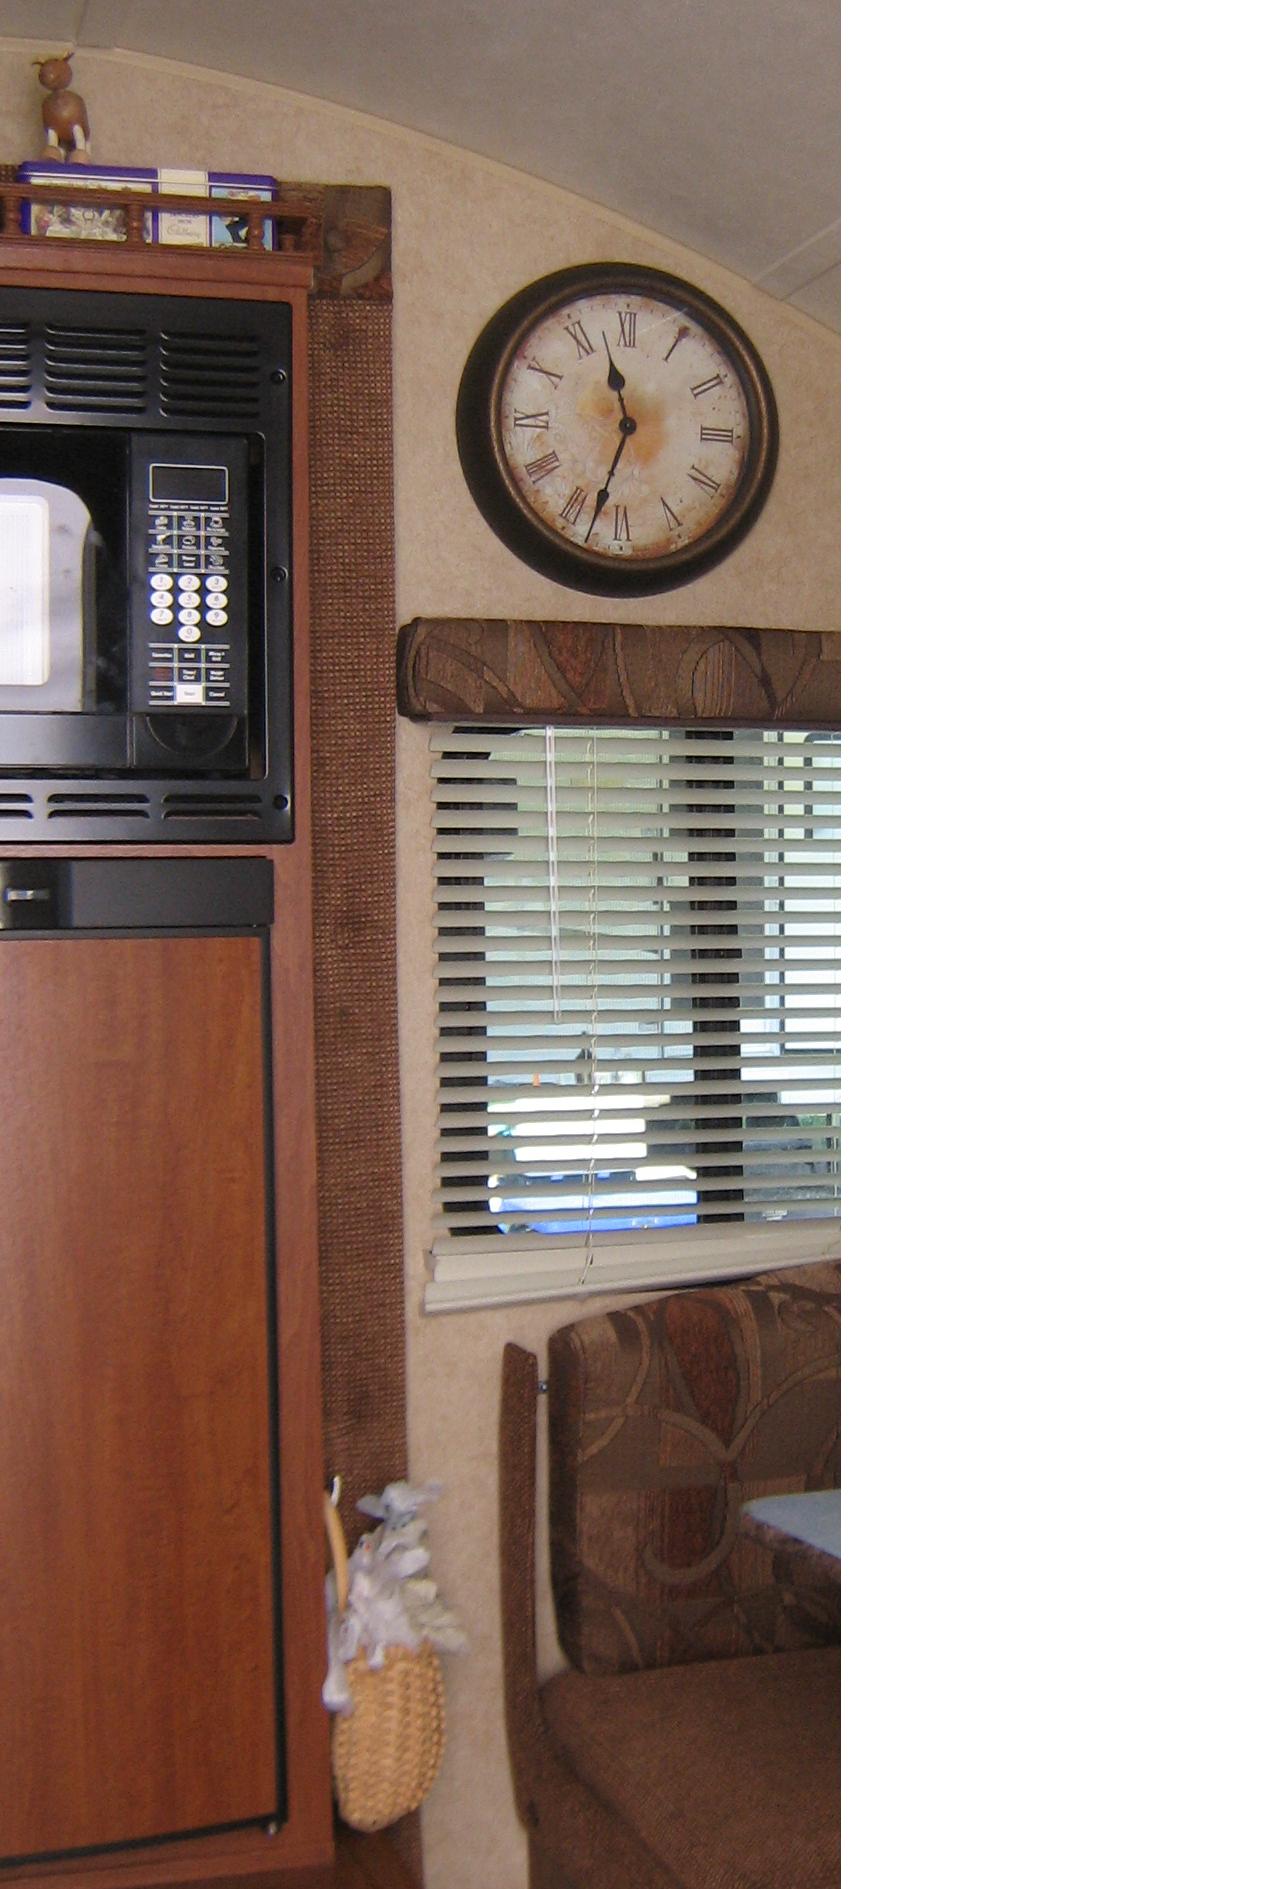
 Clock mounted to be visible from the rDome. Used velcro Command strips.
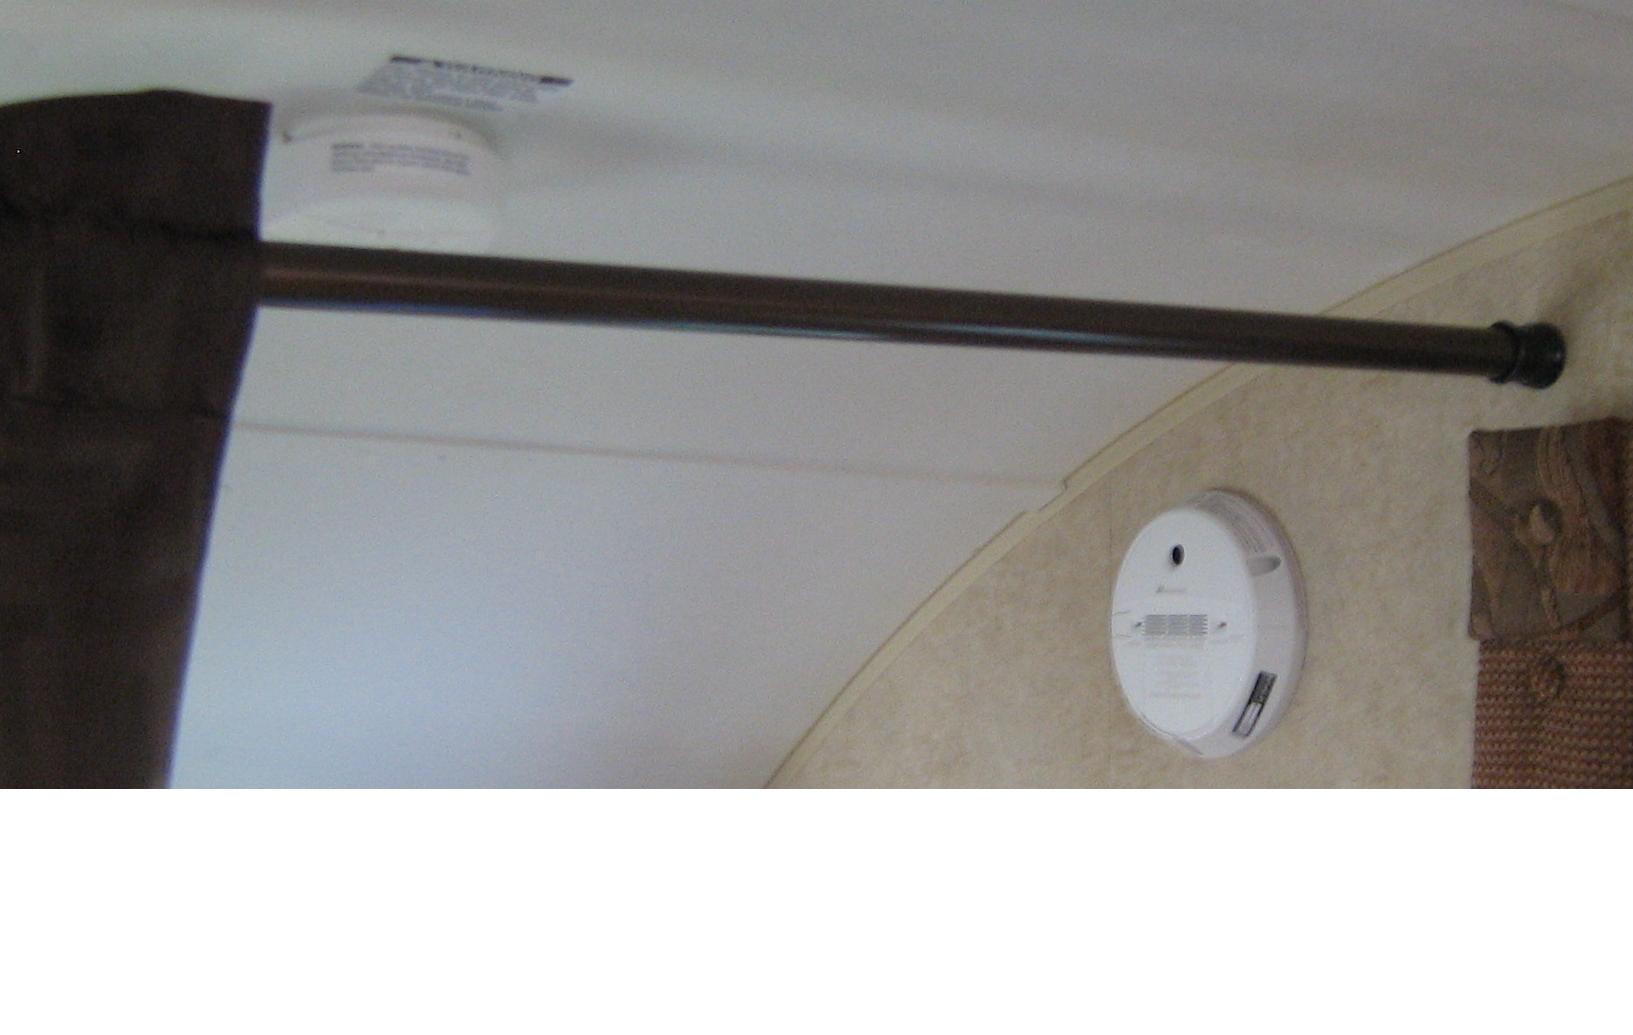
 For privacy when travelling with friends, we used a spring-loaded bathroom cutain rod and a cut-down shower curtain. Bette sewed a (loose) rod pocket to eliminate the groumets.
 Command hook next to door for the dog's leash and two Command hooks to hold a coat/hat rack on the wall above the switches for the slider, heater, etc. Since this picture we mounted a cut down over-the-door shoe organizer below the switches.
Picture shows when I paste it, but not after posting.
 Mirror (48") on the outside of the bathroom door
 A paper towel holder mounted with molly fasteners (a.k.a. hollow door anchors) and a Command hook to hang the sink cover which doubles as a splash guard.
 3 compartment dispenser (soap, shampoo, conditioner) in corner of shower.
 ------------- Tom and Bette in our 177 "The Gastropod" |
Posted By: Snowbound
Date Posted: 25 May 2011 at 1:04am
|
I don't know what happened. I was resizing the picture and suddenly it posted.
I made corrections as you suggested. Thanks.
Tom ------------- Tom and Bette in our 177 "The Gastropod" |
Posted By: techntrek
Date Posted: 25 May 2011 at 3:32pm
|
You can go into the "Post Options" to the upper-right of your post and edit it if you want. ------------- Doug ~ '10 171 (2009-2015) ~ 2008 Salem ~ http://www.rpod-owners.com/forum_posts.asp?TID=1723 - Pod instruction manual 
|
Posted By: pineview
Date Posted: 13 Jun 2011 at 11:42am
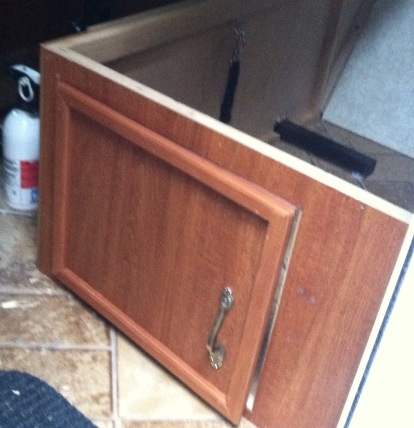
| I wanted to make a stove cover like other podders have done but I came upon an easier solution when walking through WalMart. I purchased a wooden 16x20 galley tray with 2" sides, flipped it over to cover the stove and added a cutting board. Works for me. |
Posted By: Snowbound
Date Posted: 13 Jun 2011 at 11:52am
|
Sounds like a nice simple solution. Counter space, however you get it, is really a useful addition to the Pod.
------------- Tom and Bette in our 177 "The Gastropod" |
Posted By: Hodge-PODge
Date Posted: 13 Jun 2011 at 12:36pm
Actually, that was very clever of you! And you saved yourself a whole lot of time and work. ------------- 2011 RP 177, the Hodge-PODge 2011 Mercedes ML350 "A man travels the world over in search of what he needs, and returns home to find it." |
Posted By: Hodge-PODge
Date Posted: 13 Jun 2011 at 12:38pm
|
Snowbound, where did you find that beautiful "backsplash?"
Diane ------------- 2011 RP 177, the Hodge-PODge 2011 Mercedes ML350 "A man travels the world over in search of what he needs, and returns home to find it." |
Posted By: techntrek
Date Posted: 13 Jun 2011 at 12:44pm
|
pineview - can we get a picture? ------------- Doug ~ '10 171 (2009-2015) ~ 2008 Salem ~ http://www.rpod-owners.com/forum_posts.asp?TID=1723 - Pod instruction manual
|
Posted By: Snowbound
Date Posted: 14 Jun 2011 at 11:27am
B ------------- Tom and Bette in our 177 "The Gastropod" |
Posted By: techntrek
Date Posted: 02 Jul 2011 at 10:02pm
|
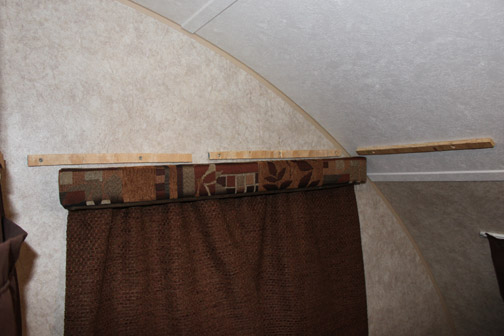
My recent additions:
Half-way through installing a rear shelf, as Outbound did http://rpod-owners.com/forum_posts.asp?TID=1829&title=podmod-rear-shelf - here . I used strips of plywood for supports. They look a little crooked here but the top edges are basically level.
Here with the shelf in place. My goal was "functional" and not "pretty" yet, since I have two trips in the next two weeks. Pretty will have to come later with some trim on the front and stain.
I notched the inside corner, there is an outlet at the edge of the bed and this will let me run an extension cord directly up to the shelf.
I also added a shelf up front.
I have an old entertainment center that I was going to trash soon, by chance the finish on it almost perfectly matches the 'pod, and also by chance one of the shelves fit this spot without modification. I cut pieces off another shelf to make the supports.
I had curtains made a month or so ago, the mini blinds that came with the 'pod didn't block much light and made lots of noise when I kicked them in the middle of the night. So they were gone after the first trip. I found material that went well with the existing material on the header. I also purchased black vinyl material which I had incorporated as a middle layer to make them completely light-proof. It is now very, very dark no matter how bright it is outside. We like to sleep in!
A final addition, three tubs. One for shoes, one for trash, one for recyclables. For a while we allowed shoes inside but there was always a huge pile in front of the door. So we banished them outside but didn't have a good solution if it rained. Now we do. We also used to tie a trash bag to the door stop outside and put a collapsible container next to it for recyclables. This should be neater. ------------- Doug ~ '10 171 (2009-2015) ~ 2008 Salem ~ http://www.rpod-owners.com/forum_posts.asp?TID=1723 - Pod instruction manual
|


Posted By: Podsible Dream
Date Posted: 03 Jul 2011 at 6:14pm
|
I like your containers for trash and recycling. We usually have plastic bags that get stashed in the back of the truck. Your shelves look neat. I just completed a couple of things - need to get photos out... ------------- Chris and Walt '10 RP-171 'Free Spirit' '13 Dodge Durango Crew 5.7 L Hemi V8 |
Posted By: Podsible Dream
Date Posted: 04 Jul 2011 at 11:26am
|
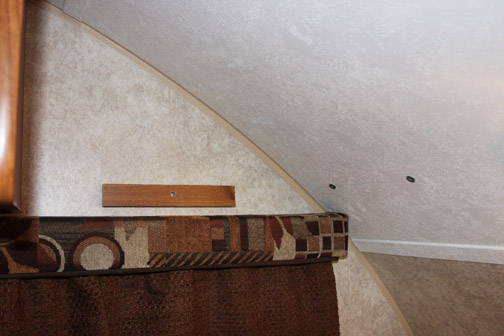
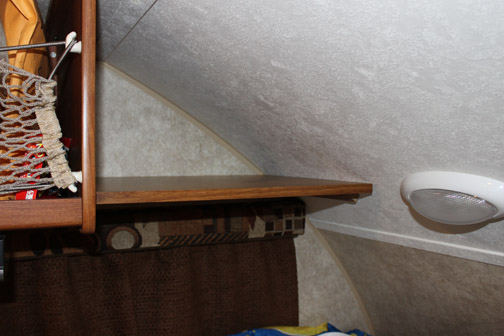
Here are the promised pictures:
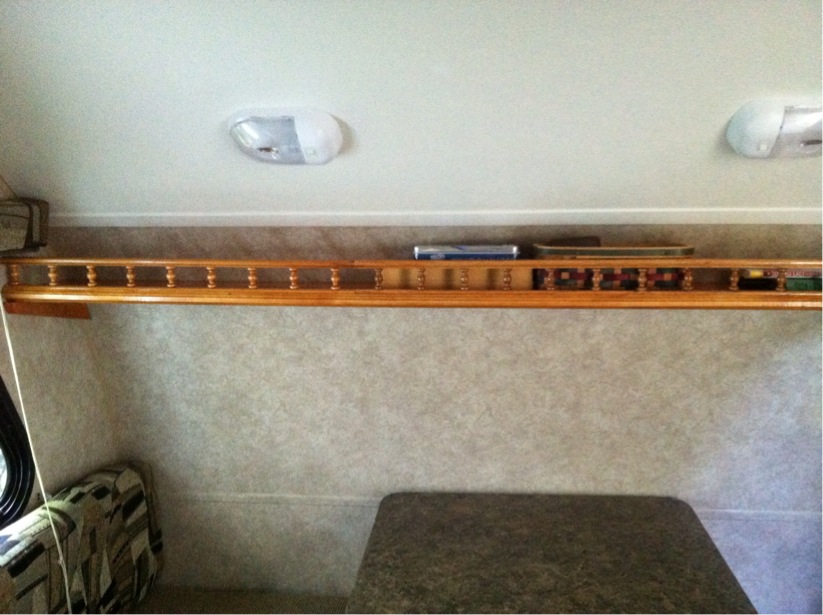
Used decorative rails along the 'breakfront' to enhance usability for storing books, games, binos, etc. The little oak box has a board with vertical holes for pencil and pen storage. It was installed by the previous owner.  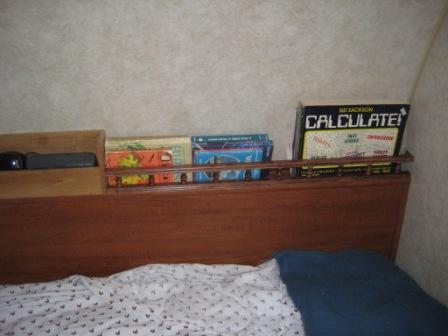
Above the window we didn't need alot of storage, but needed to gain a little space for those lightweight things that need a home. Used the left-over piece of the rail and a piece of 1/2" plywood with an oak banding on the edge. 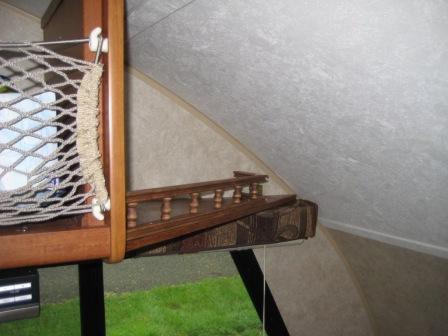
No picture of this, but we also put a piano hinge along the back edge of the large panel under the mattress of the 171 to allow easy opening and closing of that storage compartment. We use the 1x4 that I described for mountain mist and Hodge-Podge to hold up the lid and mattress. I use #8x 1/2" sheet metal screws to fasten to the walls of the pod for light weight fastening. So far nothing has pulled out. The walls are 1/8" plywood with a coarse grain center ply, so the coarse threads on the selftapping screws seem to grip well. ------------- Chris and Walt '10 RP-171 'Free Spirit' '13 Dodge Durango Crew 5.7 L Hemi V8 |
Posted By: Brin
Date Posted: 09 Jul 2011 at 4:27pm
One of the more recent mod ideas that we stole from another podder was to try to enlarge the showering area by using a curtain extender. The original one by R&T was done with pvc pipe and ours was done with 3/4 and 1/2 inch type M copper pipe pipe and a screw run threw the wall to secure it and then sealed with silicone. It seemed to work well over the last weekend.
  ------------- Terri and Craig and Panzer 2009 - 175 RPod 2000 Ford F250 XLT Extended Cab Diesel |
Posted By: Hugozork
Date Posted: 17 Jul 2011 at 9:54pm
minor change but major effect for viewing
 ------------- FrenchyPOD 171 2011 Toyota FJ Cruiser 2008 - MIA |
Posted By: furpod
Date Posted: 11 Aug 2011 at 3:47pm
|
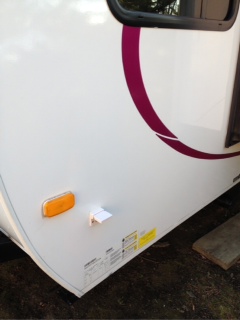
We have done the dual battery mod, added a mirror to the bath door, a white board to the entry wall, and are about to add 12v sockets in the dinette and bed frame walls. But today I was bored and knocked out this little "device".. I have been wanting to build something like it for a while.. Not quite a trailer mod, but it's only use is with our camping trailers..  It plugs into the umbilical on the trailer, draws 12v from the trailer, and one switch turns on the running lights for camping ambiance, and the second switch turns on the emergency flashers, in case you break down and have to disconnect the TV for some reason.. ------------- |
Posted By: Footslogger03
Date Posted: 11 Aug 2011 at 6:14pm
|
Do you have a pic of the front wheel mod ? Would be interested in seeing that.
Thanks in advance ... MJ ------------- Livin' the Dream ...'Slogger |
Posted By: furpod
Date Posted: 19 Aug 2011 at 12:21pm
|
Today's mods.. Added a 12v socket in the front of the dinette, and noticed there was some storage area to be recovered in that bench.. Socket..  Bench storage..   Oh yeah.. and I moved that little table mount thing to the back so it would make it easier to get in and out of the dinette on the street side. and while not a "mod" per se.. We found these two bins at wallyworld, one holds all the water stuff, the other all the electrical stuff, and they stack underneath. The larger blue bin is the Coleman stove, griddle, toast device and collapsible fire ring.  ------------- |
Posted By: Footslogger03
Date Posted: 19 Aug 2011 at 12:29pm
|
Nice touch on that 12 Volt receptacle. Don't think I've ever seen one in CHROME before !
MJ ------------- Livin' the Dream ...'Slogger |
Posted By: furpod
Date Posted: 24 Aug 2011 at 4:12pm
|
A couple more pics.. and today's 12v outlet install... Here you can see the 12v outlet below the 120v, and notice the nice, I swear as comfortable as home, mattress. I was able to just "tap" the heater 12v supply for power..  And then just a mirror and white board..   Our house couldn't operate without the magnets on the fridge and the chalkboard beside the stove.. so this gives us both, in a compact manner, feeling more like home..  We also swapped our interior lights for LED's.. but I can't get picture that looks even kind of clear of them.. OH, and I PROMISE this is the last time I will post cell phone pictures.. we do own a couple real cameras.. ------------- |
Posted By: cgarb
Date Posted: 28 Sep 2011 at 2:04pm
|
Where did you get the mirror and how did you mount it? I have been looking and haven't seen anything that I was sure would stay put and not shake off during towing.
------------- Carol 177 HRE rpod 2014 Honda Pilot |
Posted By: furpod
Date Posted: 28 Sep 2011 at 2:24pm
|
If asking us.. We got it at Lowes, We had to ask for a mirror for a dorm room.. The woman said.. "well, all I have is this.." perfect. It only weighs about a pound, and is up there with double sided sticky tape. 1sq inch of 3m sticky tape will hold up a pound.. we used 12sqin. So far, it's been on three trips, about 1000 miles total, no problems yet.. ------------- |
Posted By: cgarb
Date Posted: 28 Sep 2011 at 2:35pm
|
Great. I'll look for one and thanks for the info about the tape!
------------- Carol 177 HRE rpod 2014 Honda Pilot |
Posted By: Hodge-PODge
Date Posted: 28 Sep 2011 at 10:07pm
|
I hung my mirror with double-sided sticky back tape as described. However, I hung my clock with 3M velcro strips (that came out of a package of 3M hooks). That way the clock wouldn't bounce around on the walls while traveling, but when I needed to I could still take it down to change the battery (whereas the mirror was permanently hung). Just sharing an idea. Diane ------------- 2011 RP 177, the Hodge-PODge 2011 Mercedes ML350 "A man travels the world over in search of what he needs, and returns home to find it." |
Posted By: cgarb
Date Posted: 29 Sep 2011 at 12:03am
|
Ah, that makes a lot of sense!
------------- Carol 177 HRE rpod 2014 Honda Pilot |
Posted By: psaman
Date Posted: 24 Oct 2011 at 5:25pm
Mods done earlier this year.........
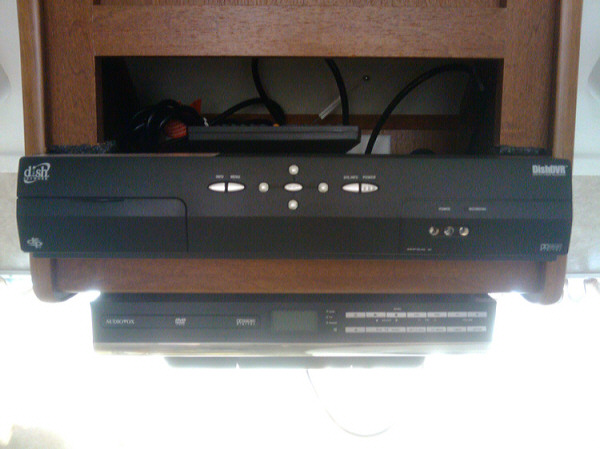 Satellite receiver installed in entertainment center at the beginning of year. Had to relieve cabinet as seen and protrudes a couple inches, but fit snuggly and cushioned with high density foam. travels well.
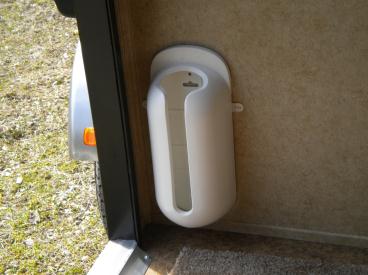
  EZ Hose Carrier from Camping World, 46" long. Because it is almost twice as long as the original, I decided to mount it further back, under the battery. Secured with 7" radiator hose clamps. Has also served well this year.
Recently completed mods.......
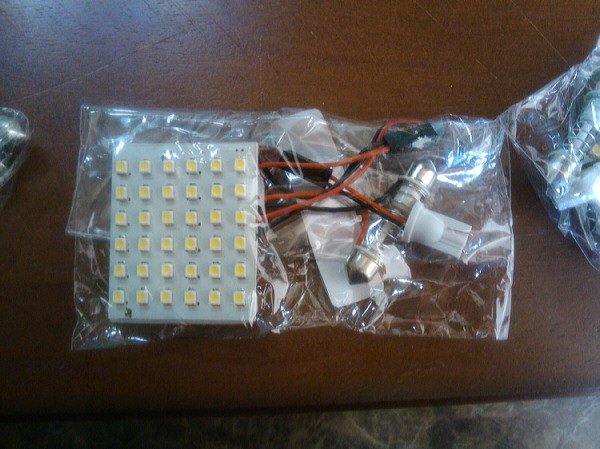 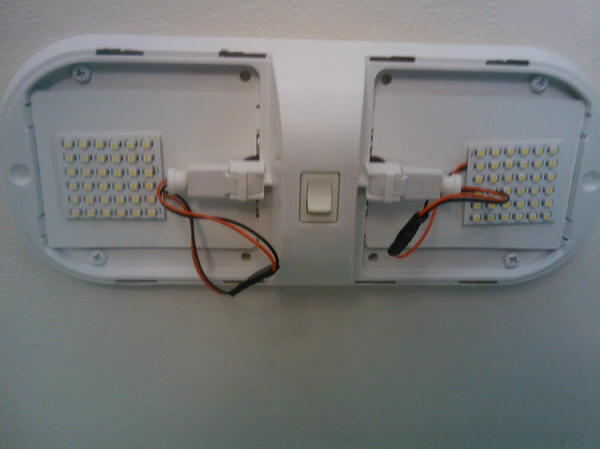 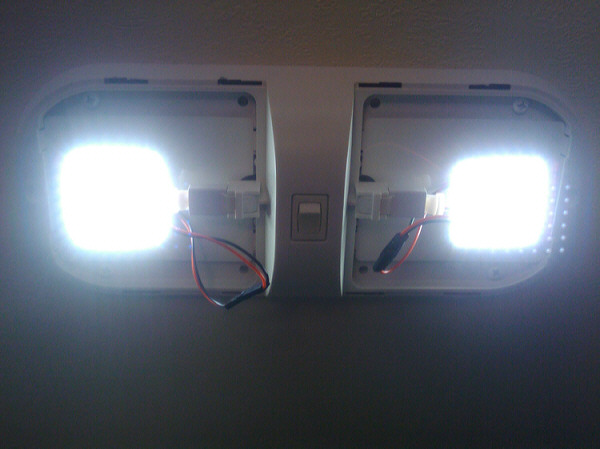 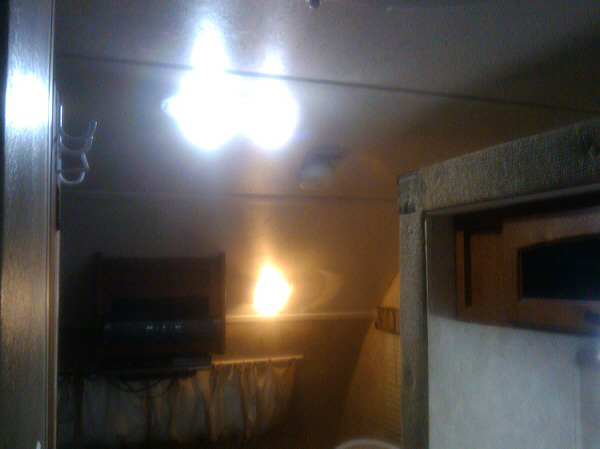 36 LED light panels purchased on EBAY for $.99 each; cost more to ship them than actual price for the lights. Last pix is a comparison as the light on the wall next to the entertainment center is an original bulb. These are MUCH whiter burning. Replaced all but the shower; mis-counted when I ordered.
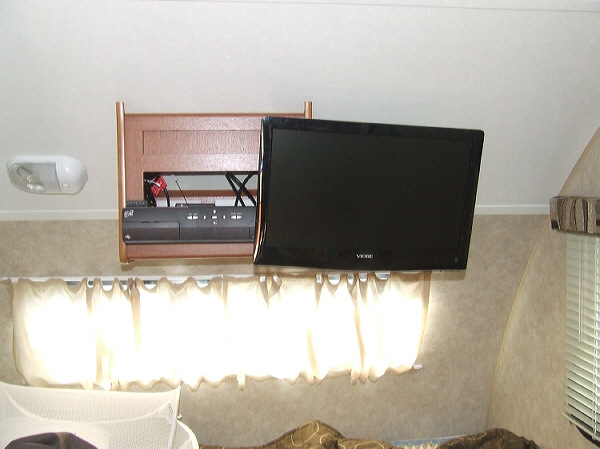 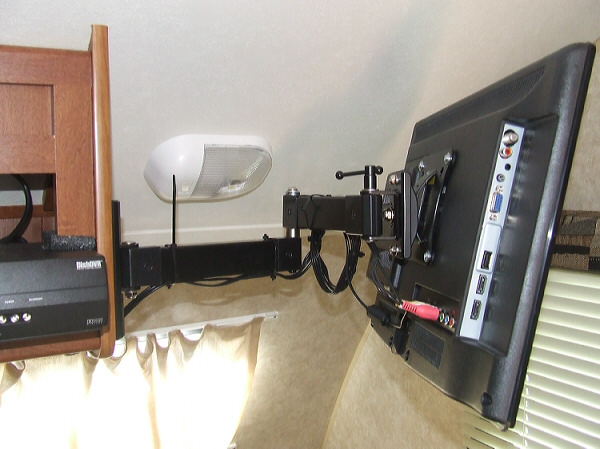 Replaced the original tv/dvd/radio combo with a 19' LED HD tv/dvd combo. Attached it with fully articulated wall mount that extends to 20''. Has enough swivel at back to watch comfortably in bed.
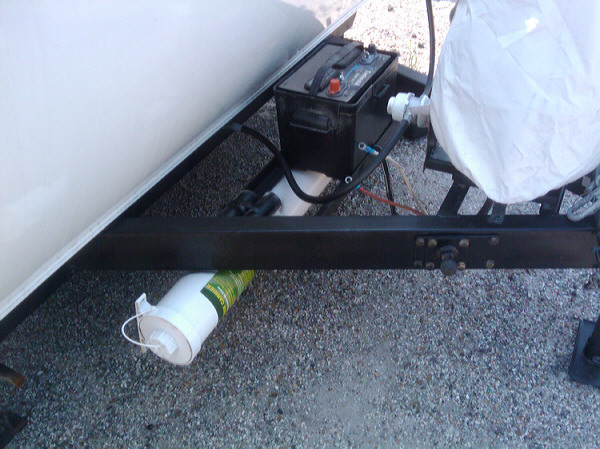
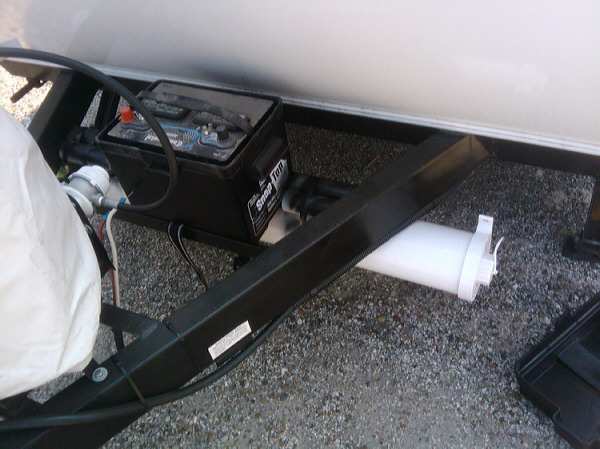
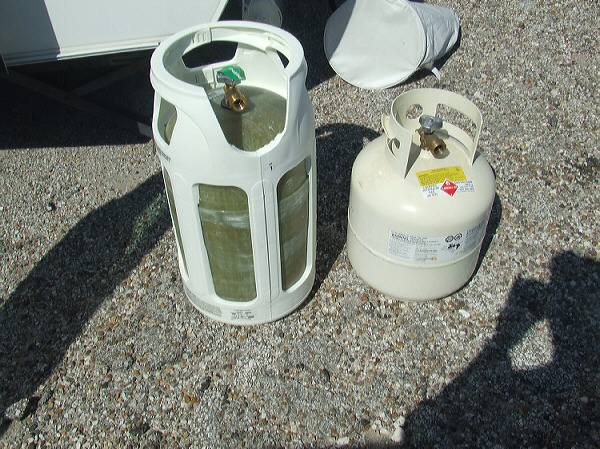 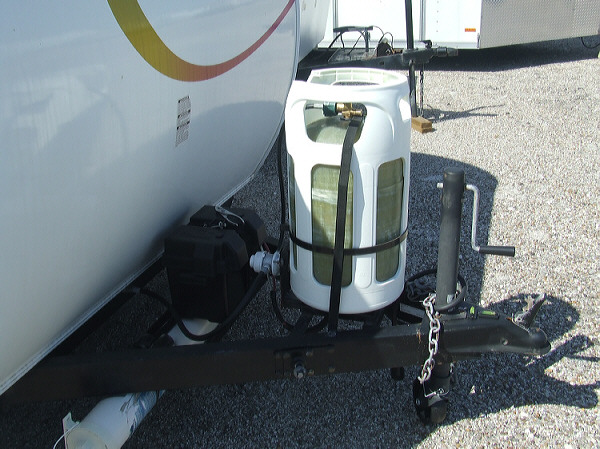 Now this mod hasn't actually been completed yet, but I decided to show the pictures for comparison. The translucent tank is a 25 lb. tank from Camping World. It fits in the bracket okay and the hose reaches fine. But the tie-down strap is about 6 inches too short. I will have to replace the long piece with a longer one yet and of course, the cover is too short. So before I install it permantly, I will address those two issues. ------------- 2011 R-177 "Sponge-Pod" 2011 F-150 XLT "Texas Edition" |
Posted By: Footslogger03
Date Posted: 24 Oct 2011 at 7:44pm
|
I'm a fairly technical guy ...so I should know the answer to this, but for some reason the whole TV reception thing with RV's is still somewhat of a mystery to me.
From what I understand there is cable and satellite. How am Imdoing so far ? In our prior life (different camper) we observed that some campgrounds offered cable and some offered satellite (Dish or Direct). We've always had a conventional cable set up so when we camped where they offered satellite we were SOL ...unless they offered satellite receiver boxes for rent. So, it sounds to me like you need either a cable box or a satellite receiver (and possibly a dish) or both. Sice we have cable at home, we have NO experience with satellite. Is it worth looking into satellite ...and am I even close to understanding the differences ? Thanks in advance, MJ ------------- Livin' the Dream ...'Slogger |
Posted By: techntrek
Date Posted: 25 Oct 2011 at 10:41am
|
Usually when a campground runs a coaxial cable to your site, it is delivering its content using standard channels any analog TV can pick up. When the kids were young we would take a VCR with us to use as a tuner (and to play their Barney and Dora tapes). You want to use the "cable" connection on the pod - inside and out - to make this work. We don't even bother now. The kids may play a DVD on the pod's TV before bed but otherwise we don't watch any TV when we camp anymore. I'll check on the news and weather on my laptop.
Satellite dishes transmit their content on higher frequencies than cable channels, which is why there is a separate "satellite" connection on the pod. You will need your own dish and box. ------------- Doug ~ '10 171 (2009-2015) ~ 2008 Salem ~ http://www.rpod-owners.com/forum_posts.asp?TID=1723 - Pod instruction manual
|
Posted By: psaman
Date Posted: 17 Dec 2011 at 4:28pm
|
Just finished replacing the analog thermostat in the pod with a Hunter non-programable digital version. Rather than go into the reasons and the particulars, I will provide the link that showed me how. I used the model shown, Hunter model 42955 purchased at Walmart for just under $20.00.
http://rvroadtrip.us/library/digital_thermostat.php - http://rvroadtrip.us/library/digital_thermostat.php ------------- 2011 R-177 "Sponge-Pod" 2011 F-150 XLT "Texas Edition" |
Posted By: pamspod
Date Posted: 20 Dec 2011 at 3:16pm
|
Stupid question with probably obvious answer - but, what are the 12v things for???
LOVE all the info/pics on mods! ------------- Pam '10 R-pod 171 '10 Chevy Equinox P's in a Pod! |
Posted By: techntrek
Date Posted: 20 Dec 2011 at 7:45pm
|
12 volt outlets?
------------- Doug ~ '10 171 (2009-2015) ~ 2008 Salem ~ http://www.rpod-owners.com/forum_posts.asp?TID=1723 - Pod instruction manual
|
Posted By: tpierce220
Date Posted: 21 Dec 2011 at 11:57am
|
Yes, they are outlets. For instance, the television for the 182G has a 12v plug so that you can watch television without having to be hooked up to electric. ------------- Adventures with ¡Podtástic!--Life in a Forest River RPod 182G with Tim and Louis and our two cats, Desi and Lucy. Check our website at http://podtastic.info for information on our journeys. |
Posted By: Tri-Pod
Date Posted: 03 Jan 2012 at 10:59am
|
Does replacing the thermostat void the manufactures warranty on the AC or heating system? ------------- 2010 PR 176 sold 2012 replaced with 2013 SP 240 w outside kitchen 2012 Toyota Tundra Crew Max 4x2 5.7L V8 Me, My Honey, and Max our GSP |
Posted By: techntrek
Date Posted: 03 Jan 2012 at 6:02pm
|
I can't say for sure, but I don't see how it would. No different than changing out the thermostat in your home.
------------- Doug ~ '10 171 (2009-2015) ~ 2008 Salem ~ http://www.rpod-owners.com/forum_posts.asp?TID=1723 - Pod instruction manual
|
Posted By: wagnert
Date Posted: 27 Apr 2012 at 6:47pm
Did a minor mod to our R-Pod 177. It is a wooden grill over the lower part of the window at end (right side) of the bed. We wanted to be able to prop up and read or watch TV. Only other place to read comfortably in the 177 is in the dinette. I used hemlock. Decided on paint over stain because it blends in well. This photo explains it best: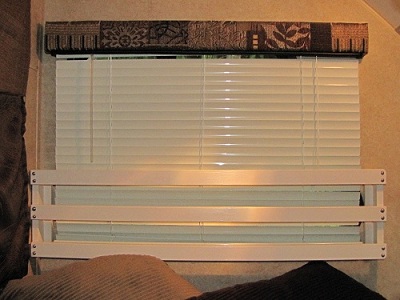 Additional minor mods: 1.
Added a wheel to the tongue jack. Must be
removed when underway as it will bottom out. Makes hook-up easier because
tongue can be moved over tow ball. No other foot needed. 2. Added 10” x 26” unframed mirror on inside of bathroom door. Size works perfectly. 3. Added 2 sets of 4 black over-door hooks, one to inside, the other to the outside of bathroom door. 4. Added 3 brushed metal stick-on hooks to wall to left as you enter. Good place to hang shirts, etc. at night. 5. We use a free standing canopy outside. ($49.97 at Walmart – Ozark Trail 9’ x 9’). It gets good reviews on Walmart site from owners. Goes up easily. 6. Sway bar from tongue to vehicle hitch works very well. Virtually no sway on our 3800 miles through some nasty mountains.
Everywhere we stopped on our 3800 mile jaunt – rest areas, camp sites, lunch breaks -- people
came over and asked about our “cute” R-pod. (“Cute” is the most frequently used
adjective.) Where did we get it? Can we see inside, etc., etc. Tom Wagner wagnert@wavecable.com 2003 Toyota Sienna 2012 177 R-Pod ------------- Tom Wagner 2012 R-Pod 177 2003 Toyota Sienna |
Posted By: Alex&Marie
Date Posted: 29 Apr 2012 at 4:51am
|
good ideas, thanks for the post. especially like the one in the pictures, as I have been trying to think of a way make a back rest for reading / tv watching. ------------- Alex and Marie 2012 R-pod 177 2006 Toyota Tundra 
|
Posted By: PodSquad
Date Posted: 29 Apr 2012 at 5:39pm
|
Hi Podders, Just wanted to post some of our pod mods for you all to see! TV Extension Bracket for our 20" TV: 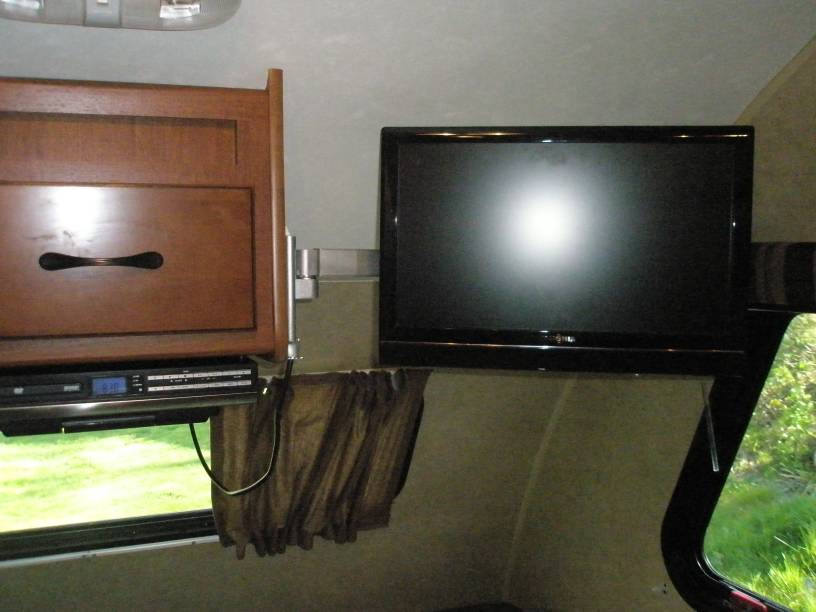 Here is the splitter inside the cabinet: 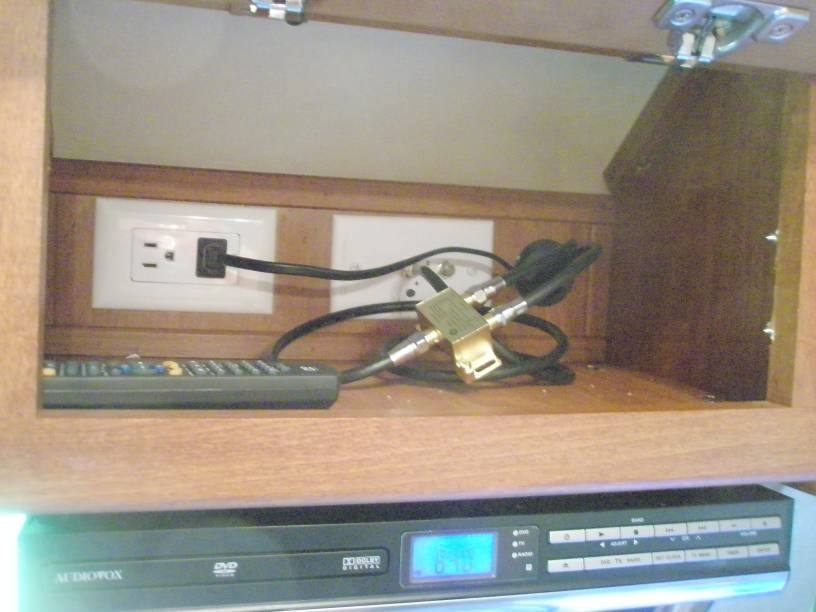 Here is the bracket which the arm connects to - this way we can disconnect the TV for travel.  Here is the Salt & Pepper Shaker:  Inside Bathroom Door Organizer: 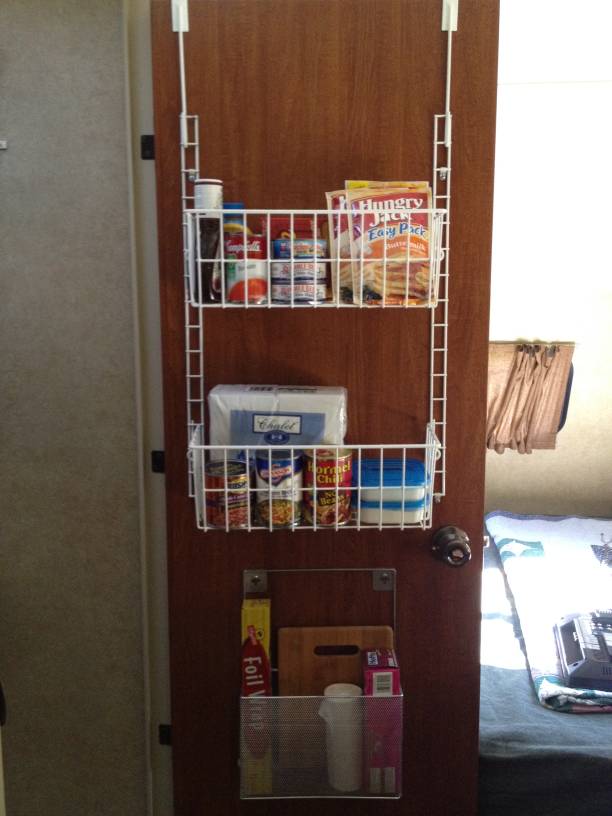 We are using the bathroom for storage. We figure when we can't make it to the campground bathroom, it's time to stop camping!!  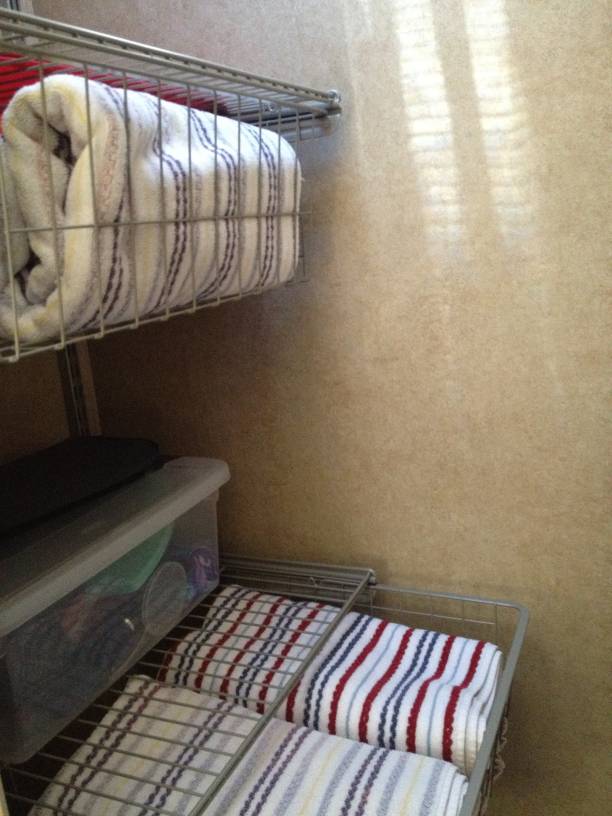 Brackets for the shelf/drawer combo: 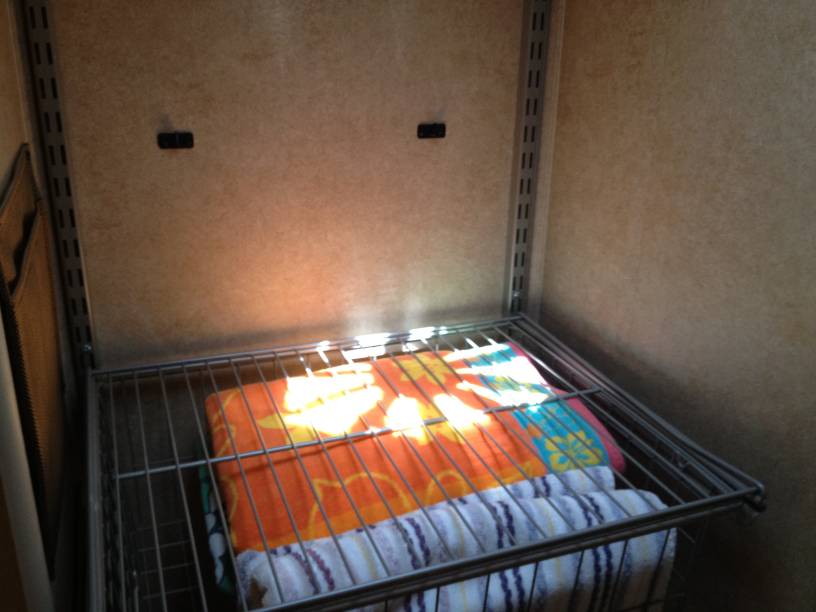 Lastly (for now) the paper towel holder!  Hopefully we'll have a few more soon. We need to put in some hooks, a mirror and a battery cut off switch next. Happy Camping! ------------- The PodSquad - Drew, Deb and Marsh |
Posted By: Snowbound
Date Posted: 29 Apr 2012 at 7:27pm
|
Thanks for pictures. It is always nice to see what ideas other people have come up with. Don't forget to use a paperclip or clothes pin or elastic band around the paper towels or they will be completely unwound when you get where you're going. I use a clothes pin as I can use it for the swim suits etc. as well.B ------------- Tom and Bette in our 177 "The Gastropod" |
Posted By: techntrek
Date Posted: 29 Apr 2012 at 8:40pm
|
Welcome. Creative use of the bathroom, but I'll tell you from experience that the day will come when its 2 am, 45 degrees and raining outside and that bathroom will call your name!
------------- Doug ~ '10 171 (2009-2015) ~ 2008 Salem ~ http://www.rpod-owners.com/forum_posts.asp?TID=1723 - Pod instruction manual
|
Posted By: Keith-N-Dar
Date Posted: 29 Apr 2012 at 10:15pm
|
For me it is every time we camp anymore. The Pod bathroom is welcome at 2:00AM! ------------- Keith-N-Dar Boris & Betty (Boston Terriers) 2011 R-Pod 177 2010 Ford F-150 |
Posted By: Hodge-PODge
Date Posted: 30 Apr 2012 at 8:01am
|
The bathroom was one of the reasons I went with the R-Pod. Nice mods though. ------------- 2011 RP 177, the Hodge-PODge 2011 Mercedes ML350 "A man travels the world over in search of what he needs, and returns home to find it." |
Posted By: PodSquad
Date Posted: 30 Apr 2012 at 8:21am
|
We hear you about the bathroom. Right now, it seems good for storage as we are travelling with a teenager. In a few years, when he is tired of travelling with us, we will probably modify again to suit us! We did keep this in mind with the mod as the only thing that was added were the two rails that hold up the shelves and baskets. That way, we can still have the bathroom to use inthe future! ------------- The PodSquad - Drew, Deb and Marsh |
Posted By: Hodge-PODge
Date Posted: 30 Apr 2012 at 10:52am
Love your backrest though. Those blinds get on my nerves when I'm trying to sit up and read. They bother me so much I finally just now got curtains instead - just for the bed area. I'm going to put them up with a Spring tension rod. (I may add some magnets to the hem of the curtains and to the wall under the window - I'll see if I need them first.) I don't think building a back rest is within my scope of skills. 
------------- 2011 RP 177, the Hodge-PODge 2011 Mercedes ML350 "A man travels the world over in search of what he needs, and returns home to find it." |
Posted By: RICHPOD
Date Posted: 30 Apr 2012 at 1:11pm
|
What do you use to screw into the fiberglass walls? ------------- Adventure Bound |
Posted By: PodSquad
Date Posted: 30 Apr 2012 at 3:38pm
|
This is what we used in the walls and it worked really well. We tried to find studs when we could, but these were good! Got them at Home Depot.
50-Piece Multi-Purpose Anchor Kit with Screws Description: < name=deion ="The TRIPLE GRIP 50-Piece Multi-Purpose Anchor Kit with Screws can be used with address plates, bathroom fixtures, electrical panels, lighting fixtures and ornamental fixtures.">The TRIPLE GRIP 50-Piece Multi-Purpose Anchor Kit with Screws can be used with address plates, bathroom fixtures, electrical panels, lighting fixtures and ornamental fixtures. ------------- The PodSquad - Drew, Deb and Marsh |
Posted By: techntrek
Date Posted: 02 May 2012 at 10:36am
|
Several of us have used molly bolts. Similar to what PodSquad posted but all metal. I forget the size - look back on this thread for shelving installation, plus I think there is a separate thread about shelving installation. ------------- Doug ~ '10 171 (2009-2015) ~ 2008 Salem ~ http://www.rpod-owners.com/forum_posts.asp?TID=1723 - Pod instruction manual
|
Posted By: elko.mike
Date Posted: 22 May 2012 at 8:05pm
|
Put a bead of clear silica seal at the intersection of floor and walls. That facilitate clean up and prevents rogue water from damaging the wood.
------------- Mike, Linda & Doxies 2013 Hood River Edition r-pod 171 Tow Vehicles: 2012 Dodge Ram 1500 (Linda's) and a 2003 Dodge Dakota (Mike's fishing truck) |
Posted By: bhamster
Date Posted: 29 May 2012 at 1:38pm
|
I made these mods last year but haven't had a chance to post them until now. I made a custom cutting board to fit on top of the stove: 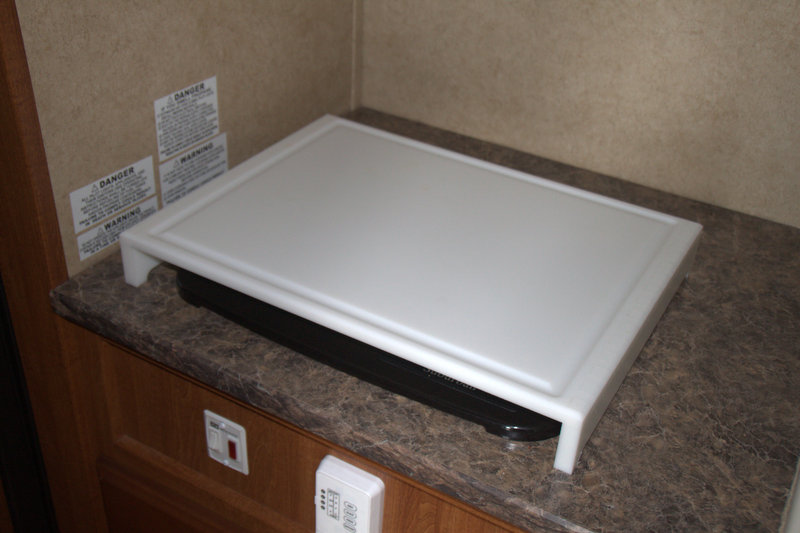 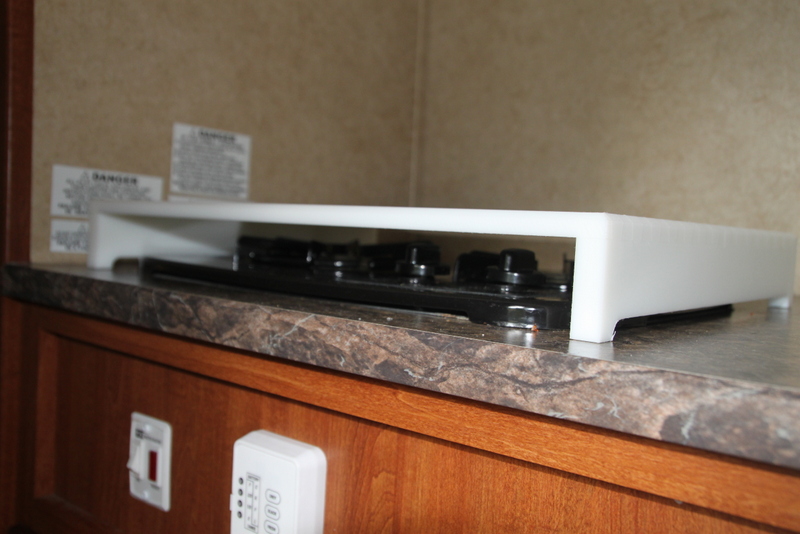 It's made from standard cutting board material (HDPE) that I ordered as a large sheet. Then I cut it to size, added a "gravy groove", and added dovetail sides with my CNC mill. We don't usually cut on it directly, but it greatly extends our counter space. I also added some shelves above the bed:  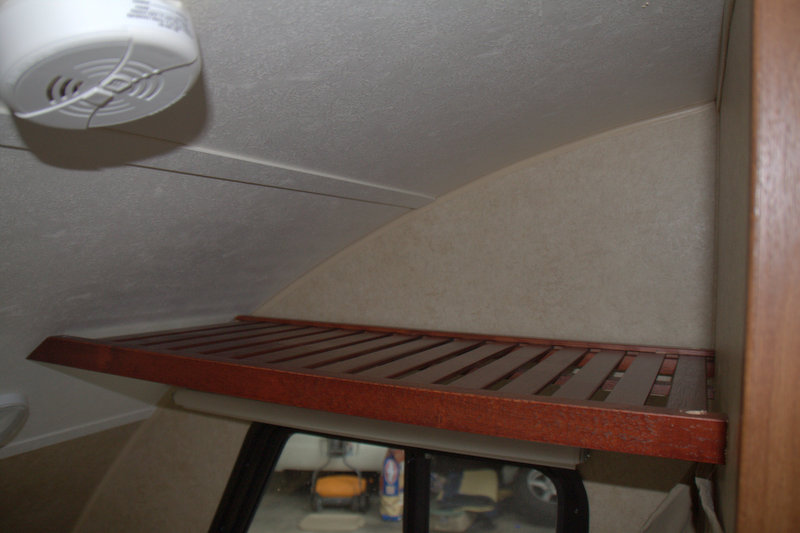 I found the lattice pre-finished at http://www.lowes.com/pd_339255-95251-WSWS-VS1672-1C_4294787398_4294937087_?productId=3378928&Ns=p_product_qty_sales_dollar|1&pl=1¤tURL=%2Fpl_Wood%2BCloset%2BShelves%2BOrganizers_4294787398_4294937087_%3FNs%3Dp_product_qty_sales_dollar%7C1&facetInfo=%20 - Lowes for closet use, but it works perfectly in this situation also. We're able to store a weeks worth of clothes and cosmetics on them (one shelf for me and one for my wife). It also works great for hanging jackets and pants since it's high enough that it clears the bed still and the lattice has a lip that the hanger can stay on. It was tricky to get the angles just right, but it's easily the most useful mod we've made.
|
Posted By: Alex&Marie
Date Posted: 29 May 2012 at 8:37pm
|
Two great mods! Thanks for sharing the pictures. I especially like the shelves. Any trick to attaching the? ------------- Alex and Marie 2012 R-pod 177 2006 Toyota Tundra
|
Posted By: bhamster
Date Posted: 30 May 2012 at 7:56pm
| The trickiest part is cutting the angles so that it meets flush with the ceiling (almost nothing is perfectly plumb or square in the pod). Usually I'm a "measure twice, cut once" kind of guy, but this time it was more of a "cut 30 times and test fit until you get it just right". Even so, they're still not perfectly aligned, but it works great and holds really solid. The screws on the curved ceiling side go up and into a stud, but the screws on the wall side go down and at an angle so the weight isn't trying to pull out the threads. |
Posted By: Snowbound
Date Posted: 30 May 2012 at 8:10pm
|
I like this idea so much and I like your material so we may be making a trip to Lowes in the near future. Even just a place to store our extra blankets (this is Canada-we have experienced snow in August.) would be so nice as they get in the way and we get tired of moving them from bow to stern and back again. Thanks for the pictures. B ------------- Tom and Bette in our 177 "The Gastropod" |
Posted By: Damour
Date Posted: 12 Jun 2012 at 9:54pm
|
I love the stove cover and the shelves ------------- rp 171 , from Québec with not a good english writing lol |
Posted By: Paige
Date Posted: 31 Jul 2012 at 8:24pm
 Adding a door in the side of the dinette bench for better access. Cabinet will be divided into two storage units. The one with the door will hold our set up tools, like the drill for the scissor jacks. Adding a door in the side of the dinette bench for better access. Cabinet will be divided into two storage units. The one with the door will hold our set up tools, like the drill for the scissor jacks.
------------- Paige and Pete 2010 177 - RPug 2012 Rav (six cylinder) New York & Florida residents 
|
Posted By: Paige
Date Posted: 07 Sep 2012 at 10:58pm
Had to modify it a couple of times by widening it as the curvature of the ceiling closed down the opening on the shelf. It allows us to get all the odds and ends off the table...books, cards, pencils, games, etc. ------------- Paige and Pete 2010 177 - RPug 2012 Rav (six cylinder) New York & Florida residents
|
Posted By: danthoman
Date Posted: 08 Sep 2012 at 4:28pm
|
I've made a few mods, so far. Nothing really new but here they are. The first was to make a cutting board which fits over the stove and a paper towel holder. 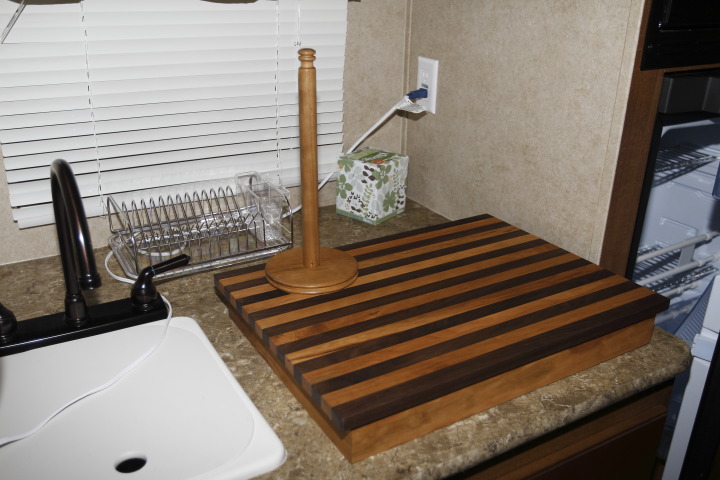 The second was to remove the boards under the sink and add some vertical slats to hold pans. There was a lot of wasted space in there. 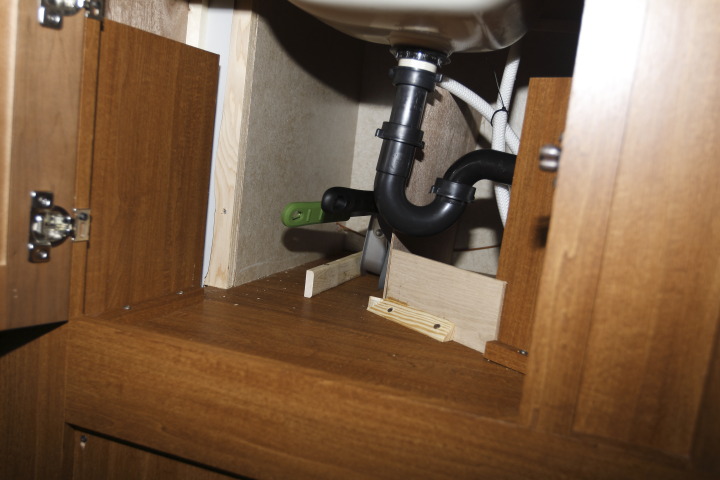 And finally, I extended the length of the drawers by 4 inches. My next project will be to change from 2 drawers to 3 drawers. Almost forgot. You can see the front of the slide out cabinet I made for under the bed. I even remembered to leave enough room for the heater. 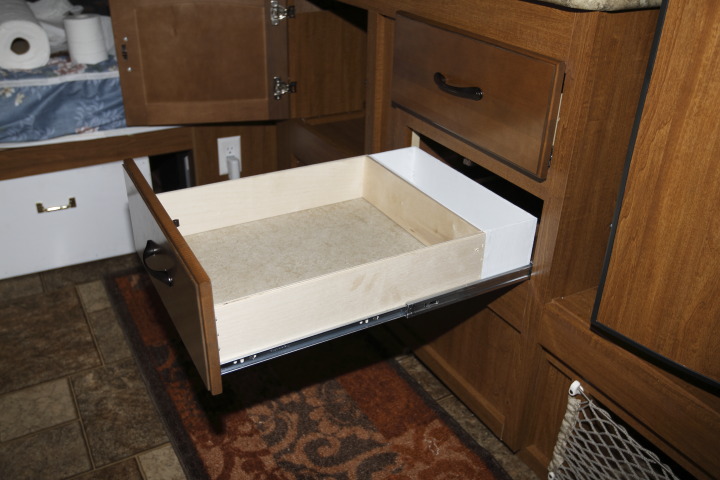 |
Posted By: Paige
Date Posted: 18 Nov 2012 at 3:34pm
We are busy doing mods before we head south to Florida. My husband made this cabinet and screwed/glued it into place.
 ------------- Paige and Pete 2010 177 - RPug 2012 Rav (six cylinder) New York & Florida residents
|
Posted By: Paige
Date Posted: 18 Nov 2012 at 3:40pm
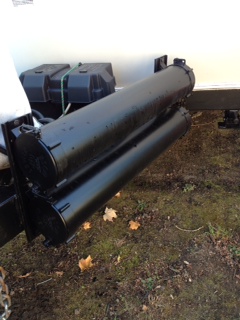
Our septic storage tube took a beating in its original location. We made a bracket and connected it to the side of the tongue. We also ordered another tube from FR so if we need the extra length, we have it. ------------- Paige and Pete 2010 177 - RPug 2012 Rav (six cylinder) New York & Florida residents
|
Posted By: Paige
Date Posted: 18 Nov 2012 at 3:46pm
We bring a small flat screen TV with us as the one that came with the RPod is too small and in a poor location. We bought a coaxial cable connector from our RV dealer and drilled the hole toward the front of the Pod. We screwed it in and sealed around the edges. We then put an interior one on the dinette bench and connected them with a cable. (photos below) Now, when we want the TV there, we have a cable connection. The next job is to put another outlet in the dinette bench area. 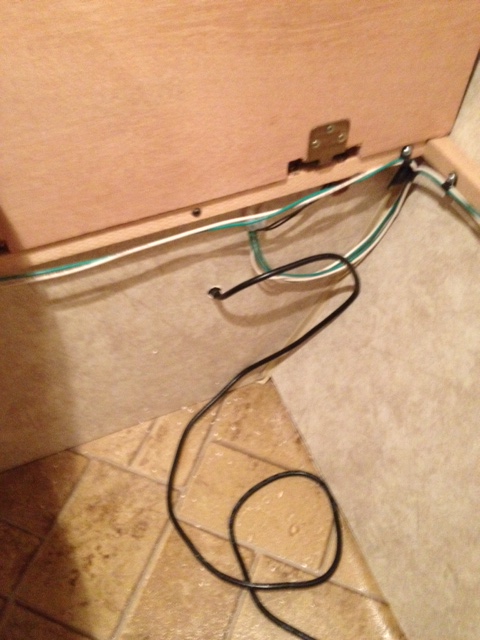 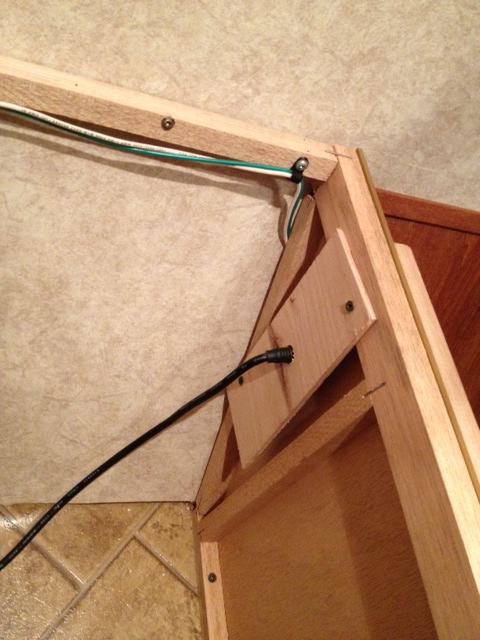 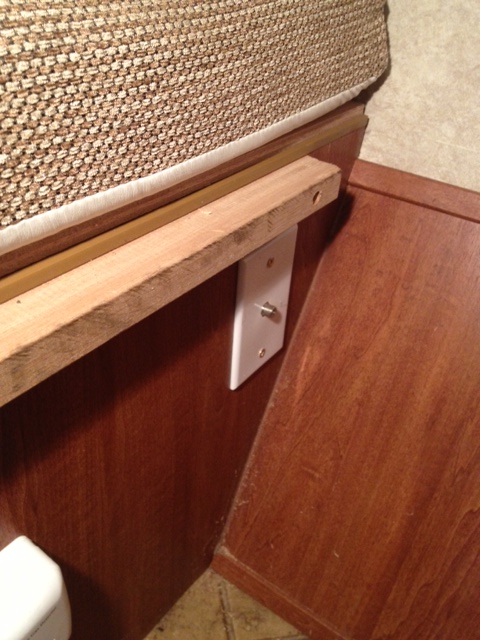 ------------- Paige and Pete 2010 177 - RPug 2012 Rav (six cylinder) New York & Florida residents
|
Posted By: danthoman
Date Posted: 02 Dec 2012 at 5:46pm
|
Here are a couple more mods I've made. The first is the wine rack on the right side of the fridge. The second was to remove the bench seat on the right and build one along the back to form an 'L'. My wife is going to make new cushions. It's amazingly comfortable. I never could read or use the computer the way it was. There just wasn't enough room to get comfortable. Wine rack 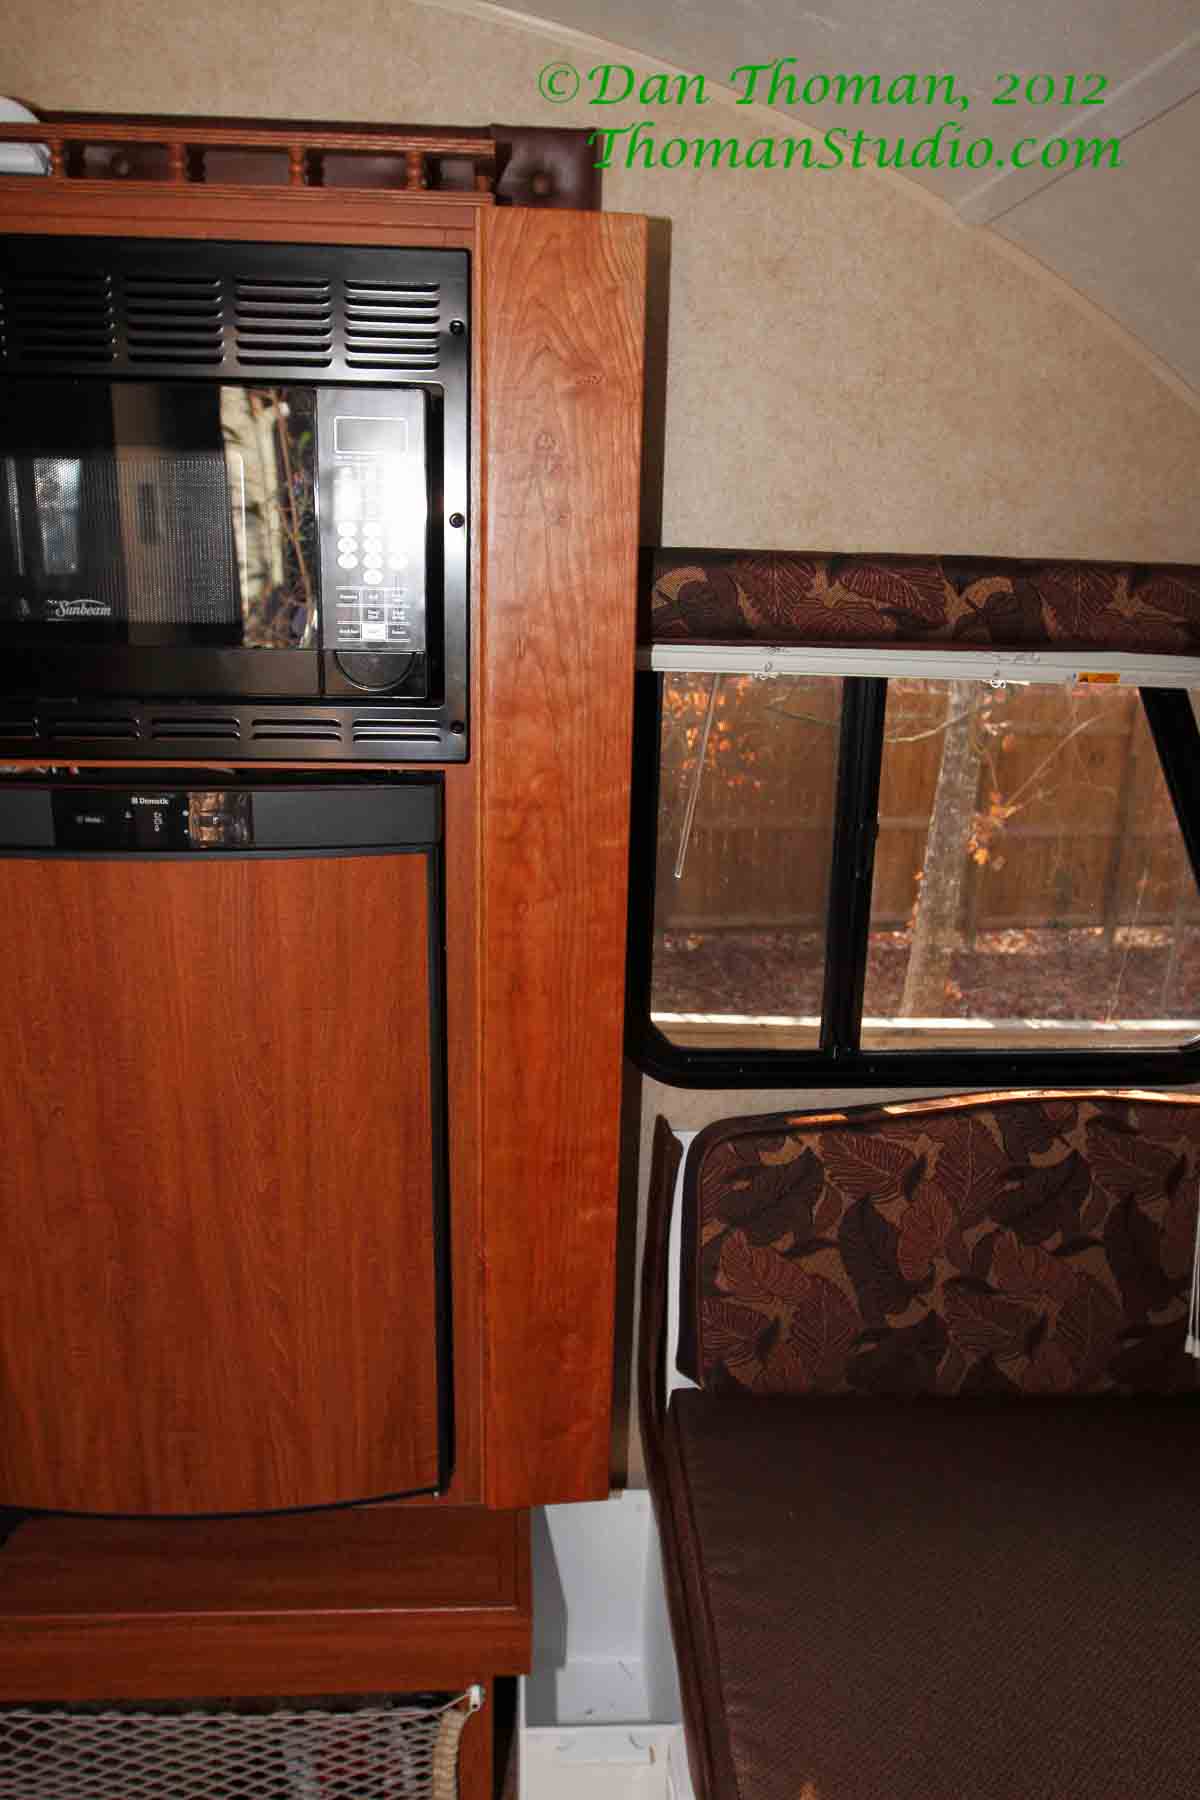 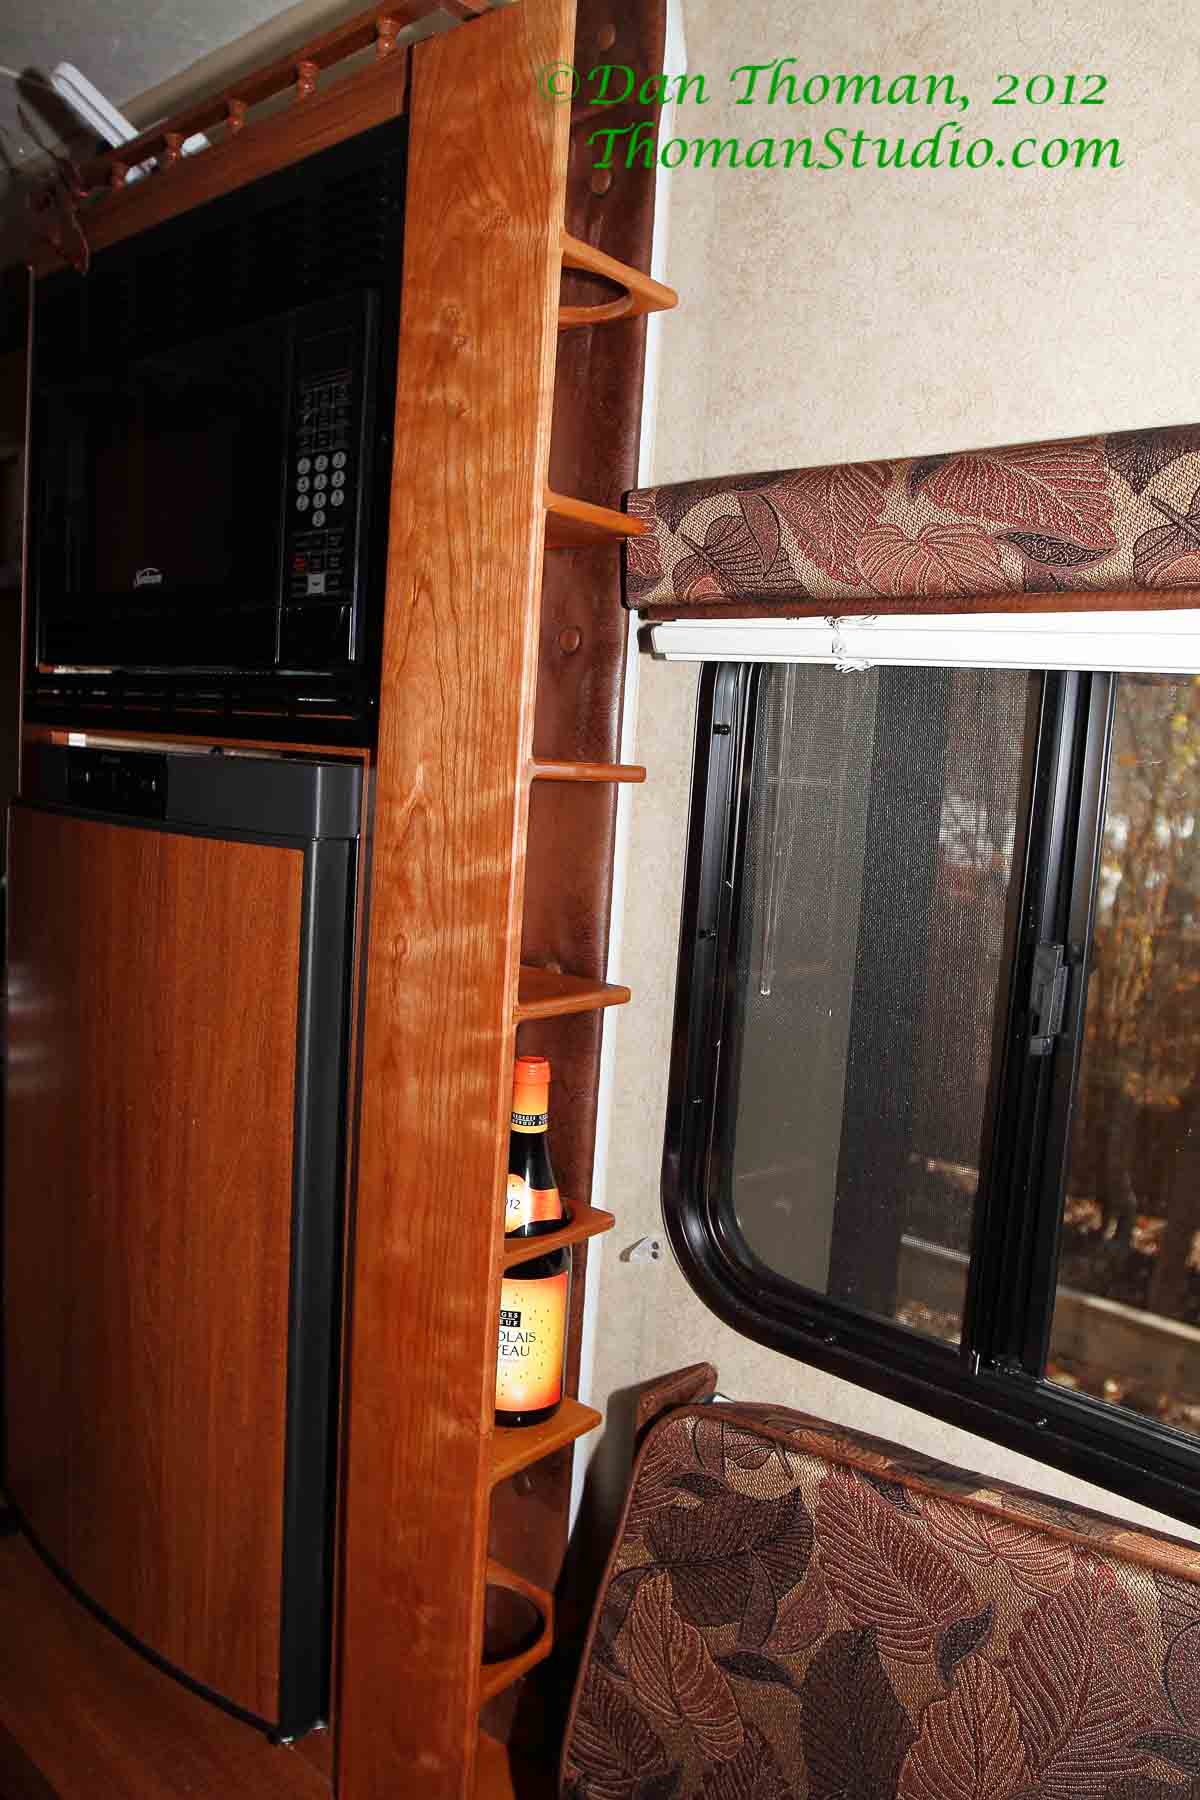 Bench seat 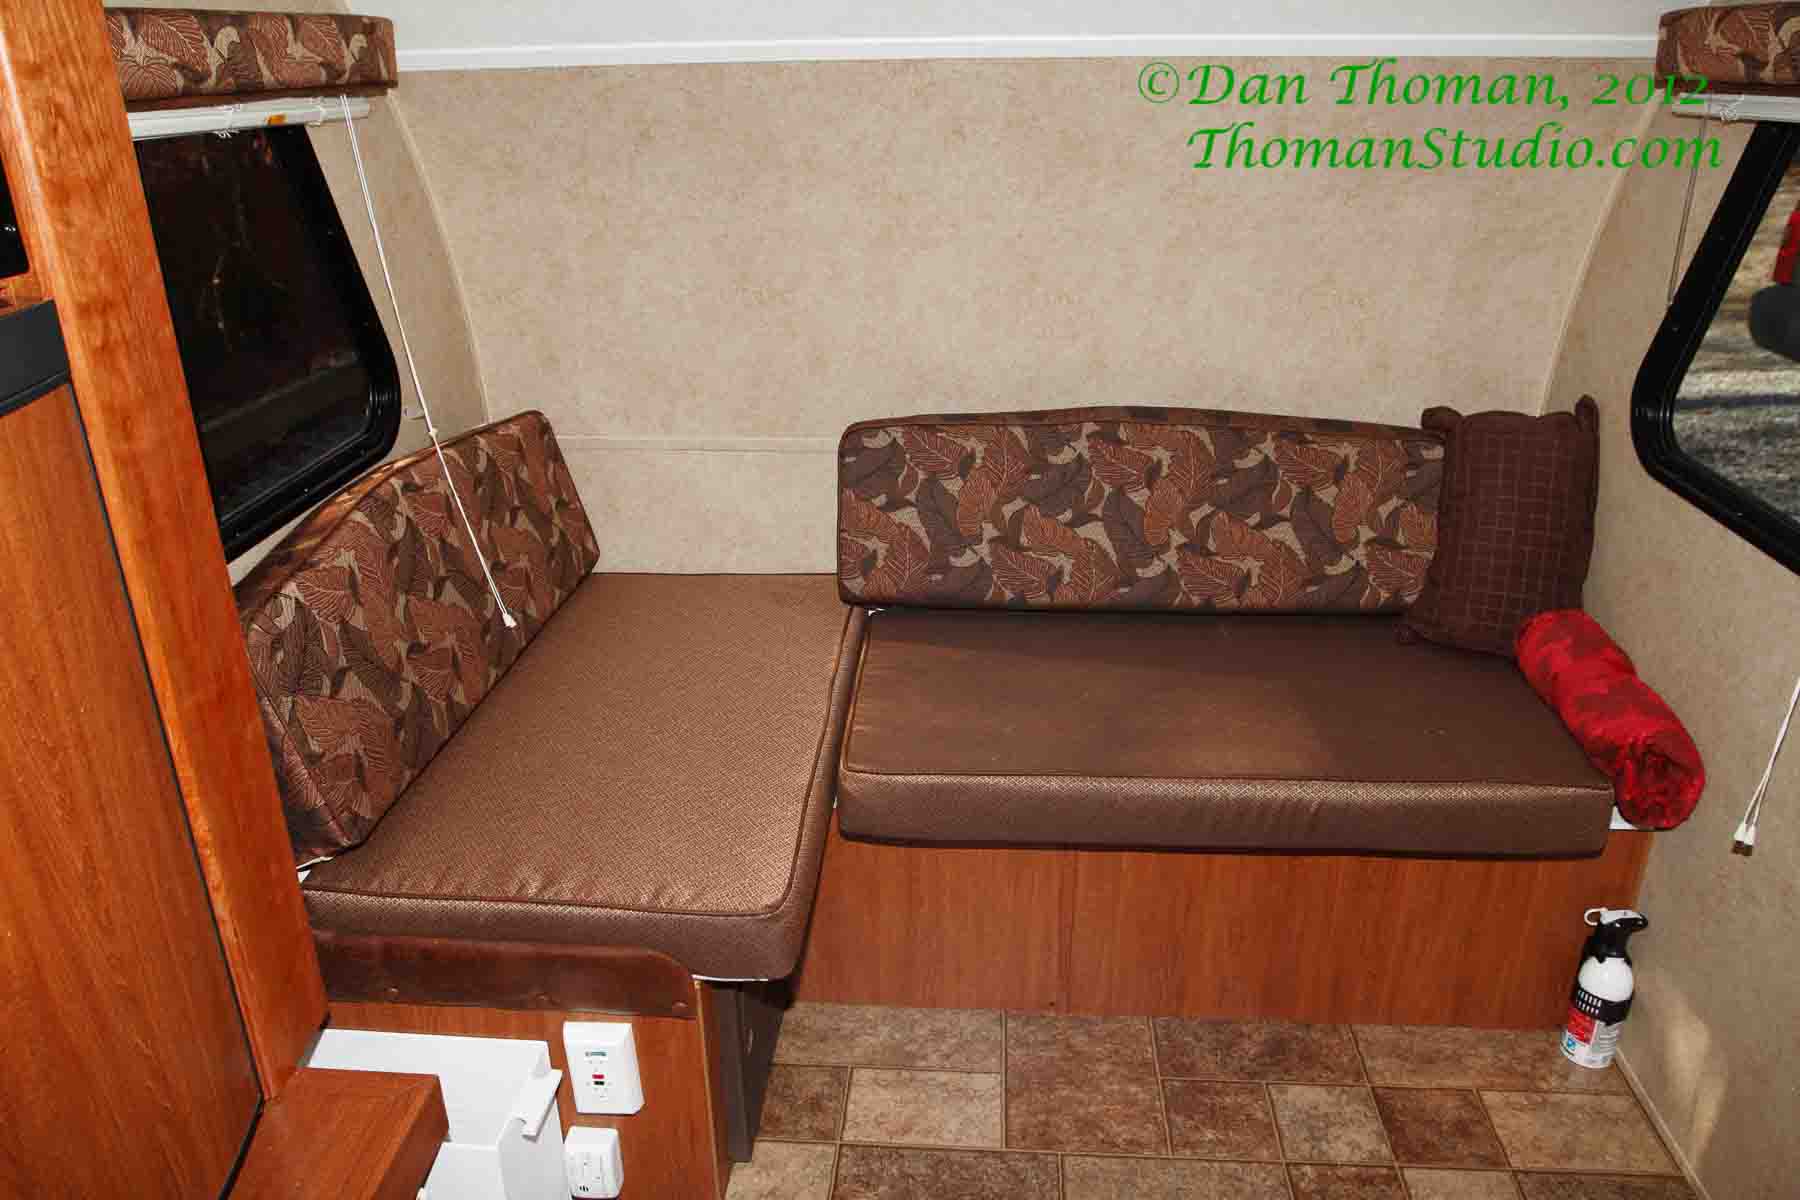 I need to thank the guy on the 'other forum' who did something similar. My wife was against the mod till she saw the photos. ------------- Linda and Dan Calley the golden retriever R-pod 177 and a Tundra 8 cyl |
Posted By: dsmiths
Date Posted: 02 Dec 2012 at 8:22pm
|
Dan, I like that wine rack, looks better than factory, I'll have another Merlot thank you very much. ------------- Dane and Donna Smith 2011 RP-172 2008 Chevrolet Trailblazer 4X4 lift kit prodigy wireless brake controller |
Posted By: danthoman
Date Posted: 03 Dec 2012 at 5:59pm
|
The wine glasses are ready the bottle is open see you in a little while.
------------- Linda and Dan Calley the golden retriever R-pod 177 and a Tundra 8 cyl |
Posted By: ReddOrion
Date Posted: 22 Jan 2013 at 4:03pm
For our 2013 RPOD 177, we have done the following:
 Finished pic below. Finished pic below.For the Springtime before we take it on it's maiden voyage, we are doing the following:
 ------------- Jason & Kim 2013 RP-177 HRE 2005 Tahoe LT |
Posted By: compubmw
Date Posted: 08 Mar 2013 at 12:18am
|
Had bed end reinforced, added second battery,
added anti-sway, added Prodigy RF brake controller, added 12v socket in tv cabinet, removed TV/DVD thing, replaced with AM/FM/CD/MP3/iPod unit, added Pur faucet filter to kitchen sink, 2000w inverter tied into breaker box and fuse panel, 68w solar panel and controller, 12v socket over kitchen, rear 4pin, shortened 7pin from trailer. Pictures coming soon To be done: Add 12v sockets at both ends, install cellular amplifier, finish and install larger battery/toolbox tray, wireframe shelf and hanger over bed end of bathroom, privacy curtain, and homemade curtains. ------------- 2009 FJ CRUISER (ARB BUMPER, Rear Airlift 1000, and some other stuff) 2013 Forest River R-Pod 177HRE ( http://goo.gl/NH3Kb - Mods ) |
Posted By: Paige
Date Posted: 12 Mar 2013 at 8:12am
We replaced the cheap cloth bench guards with wooden ones. We also put up the two tier shelf in the kitchenette to reduce the counter clutter. Happy with both modifications! ------------- Paige and Pete 2010 177 - RPug 2012 Rav (six cylinder) New York & Florida residents
|
Posted By: francoisfrogpod
Date Posted: 12 Mar 2013 at 8:49am
| Paige, I love the door in the side of your dinette bench. How did you find a door to match and any pointers on how to make this would be appreciated. (Maybe FR needs to add this at the factory on future pods!) |
Posted By: Paige
Date Posted: 12 Mar 2013 at 9:02am
|
Hi, my husband made the door by removing the whole panel from the side of the bench, measured and cut out the door right from the panel. then he framed it and with two hinges, he hung it. He also added a magnetic latch. We also divided that area in the bench into two compartments. The one just behind the door is dedicated for his tools and then the back compartment we use for items that we only have to access occasionally. ------------- Paige and Pete 2010 177 - RPug 2012 Rav (six cylinder) New York & Florida residents
|
Posted By: francoisfrogpod
Date Posted: 12 Mar 2013 at 9:13am
| Thanks for the info! It looks very professional. What a great idea to "recycle" the existing material! |
Posted By: Paige
Date Posted: 12 Mar 2013 at 5:04pm
Another modification that we did,,,can you tell we are oldies...so many pill bottles :):):)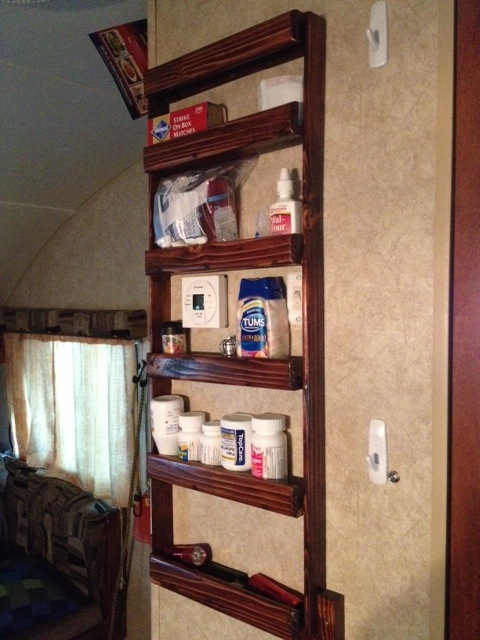 ------------- Paige and Pete 2010 177 - RPug 2012 Rav (six cylinder) New York & Florida residents
|
Posted By: francoisfrogpod
Date Posted: 12 Mar 2013 at 5:45pm
|
Paige, your medicine shelf looks really good. My walls are still fairly empty, but I'm sure it won't take me long to fill them up. I'm going to try posting a picture of a grocery bag holder I hung by the door with command strips. Love those things since I change my mind a lot uploads/1735/RS_trash_bag_holder.jpg - uploads/1735/RS_trash_bag_holder.jpg Can someone let me know if I did this right? All I see on this screen is the link to the picture 
Edit: added the picture itself - techntrek ------------- Denny and Linda 2013 Pod 177 '08 Santa Fe |

Posted By: danthoman
Date Posted: 12 Mar 2013 at 6:02pm
|
No photo, just a link. You need to upload the photo then insert it into your post. Use the green buttons (a tree I think) on the tool bar.
Paige - I think the 'pill bottle' shelf is a good idea. ------------- Linda and Dan Calley the golden retriever R-pod 177 and a Tundra 8 cyl |
Posted By: francoisfrogpod
Date Posted: 12 Mar 2013 at 6:54pm
 Thanks, Dan! It worked. Trash bag holder just inside the door. I used command strips to hang. Purchased this at the camper store. |
Posted By: francoisfrogpod
Date Posted: 12 Mar 2013 at 7:02pm
|
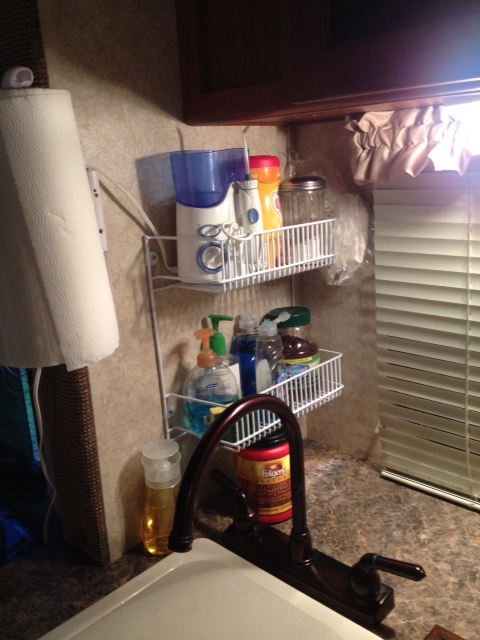
Latest Mod today. It is a polytherm wire rack purchased at the container store. You can purchase any components you want to hang on it. Best of all, it is hung with command strips so no holes! uploads/1735/RS_sink_rack_III.jpg"> 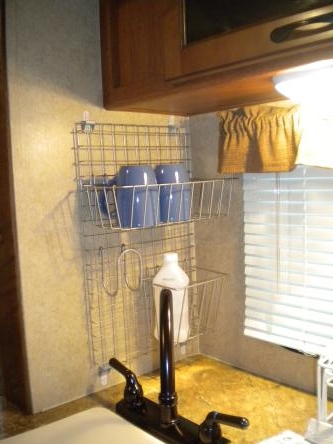 |
Posted By: techntrek
Date Posted: 12 Mar 2013 at 7:56pm
|
LOL, I added the picture for you on the last page, then saw you figured it out on this page...
------------- Doug ~ '10 171 (2009-2015) ~ 2008 Salem ~ http://www.rpod-owners.com/forum_posts.asp?TID=1723 - Pod instruction manual
|
Posted By: Paige
Date Posted: 12 Mar 2013 at 8:30pm
Well our two month stay in our RPod happens to overlap with March Madness...so a recent mod that we made was to purchase a 24 inch flat screen TV! My husband put a cable connector on the outside of the Pod (see an earlier post) and then we ran the cable wire through the dinette bench.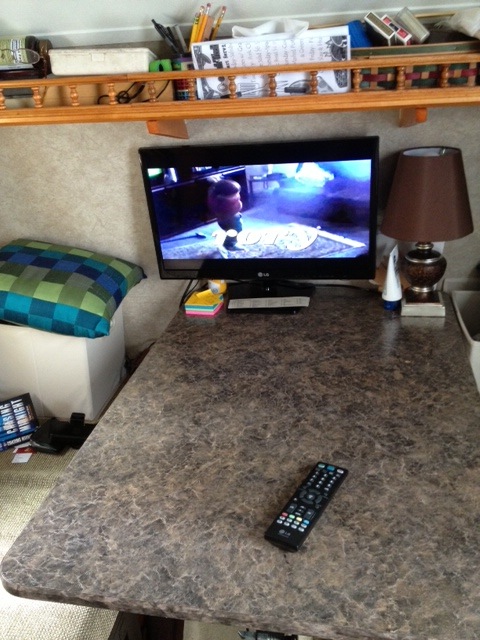 ------------- Paige and Pete 2010 177 - RPug 2012 Rav (six cylinder) New York & Florida residents
|
Posted By: Paige
Date Posted: 14 Mar 2013 at 8:41pm
This mod might be the simplest one we have, but we use it a lot!! :):):)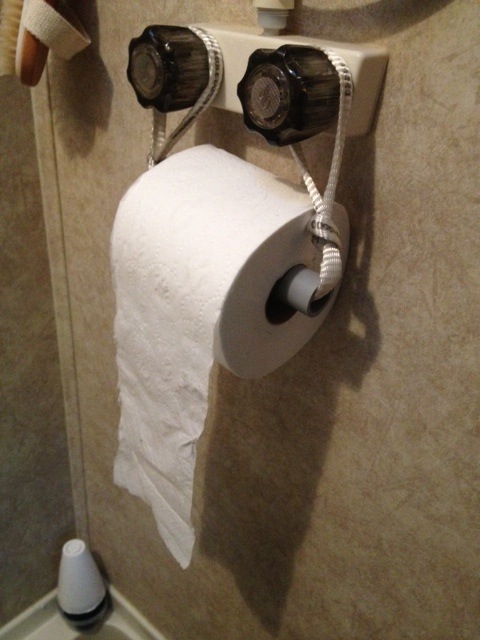 ------------- Paige and Pete 2010 177 - RPug 2012 Rav (six cylinder) New York & Florida residents
|
Posted By: Keith-N-Dar
Date Posted: 14 Mar 2013 at 8:52pm
|
TP get soggy when you use the shower?
------------- Keith-N-Dar Boris & Betty (Boston Terriers) 2011 R-Pod 177 2010 Ford F-150 |
Posted By: techntrek
Date Posted: 14 Mar 2013 at 9:03pm
|
We did something very similar, but using a length of copper wire which hooks over the shower knobs and runs through the toilet paper roll. Then we hang a plastic shopping bag from either side of the toilet paper roll as a trash bag. When we shower we hang it on something in the hallway. ------------- Doug ~ '10 171 (2009-2015) ~ 2008 Salem ~ http://www.rpod-owners.com/forum_posts.asp?TID=1723 - Pod instruction manual
|
Posted By: francoisfrogpod
Date Posted: 17 Mar 2013 at 6:45pm
|
Here is how we spent our Sunday afternoon, sleet/snow and 35 degrees... We hung an adjustable shelf unit above the toilet in the wet bath. Purchased at Bed, Bath & Beyond. Not top quality, but will serve our purpose. 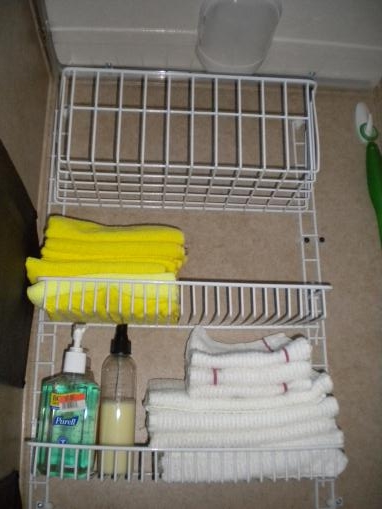 We hung a towel holder (hotel style) on the front wall of the wet bath. We are campground shower house fans, so wet bath is turning out to be a storage/water closet. Purchased online from Organizeit.com 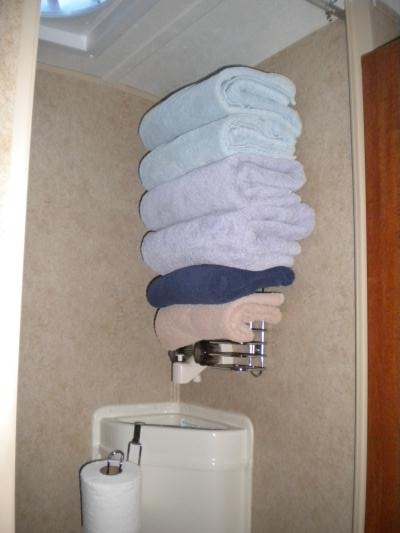 Note the toilet paper holder. One of my favorite additions Purchased from Walmart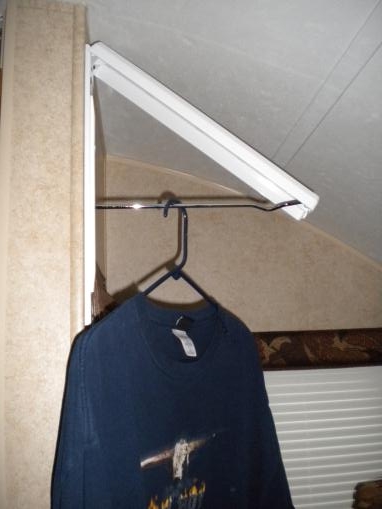 This is a folding clothes hanger hung on the "bedroom" side of the bathroom wall. It folds flat against the wall when not in use. Purchased online from Organizeit.com. Francoispod is starting to feel like our home away from home. Can't wait for our maiden voyage. ------------- Denny and Linda 2013 Pod 177 '08 Santa Fe |
Posted By: dsmiths
Date Posted: 18 Mar 2013 at 8:44pm
|
What I did is take everything off of the rod that hangs in the ceiling of the shower area, slip a roll of t.p. and push it to the back, when you come in to set on the throne, slide it forward above your head, push to the rear when not in use. never gets wet during a shower and easy to find at night, just look up ------------- Dane and Donna Smith 2011 RP-172 2008 Chevrolet Trailblazer 4X4 lift kit prodigy wireless brake controller |
Posted By: francoisfrogpod
Date Posted: 19 Mar 2013 at 9:18am
|
That's a great idea. The more "multi-use" items in the pod, the better. I'm not worried about anything getting wet since we use the campground showers. The bottom shelf above the toilet looks like it is bowing in the middle, but it's the camera lens. The shelf is straight. It was hard to get a picture of these shelves since the space is so small. ------------- Denny and Linda 2013 Pod 177 '08 Santa Fe |
Posted By: BagEnd
Date Posted: 11 Apr 2013 at 4:47pm
|
Our first mods... Water Filter Storage Box  Another view... 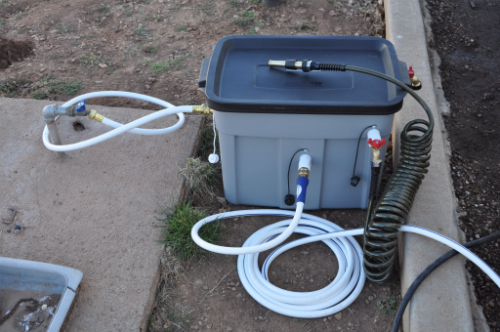 Inside view... 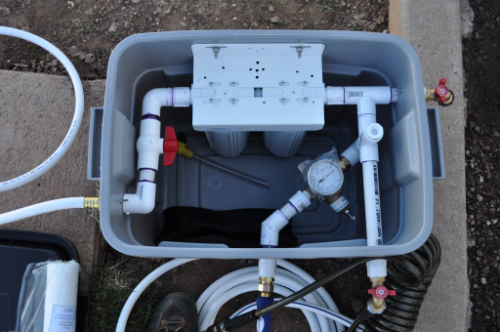 Battery Disconnect.. 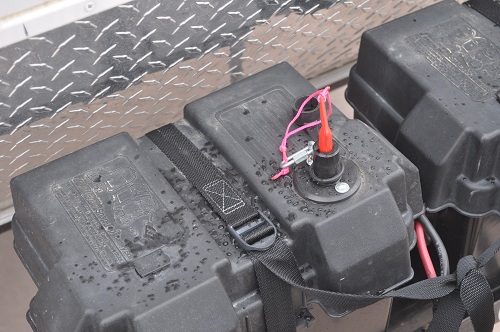 Wine Rack made from the Home Depot kit found here ( http://www.homedepot.com/p/t/203651437?productId=203651437&storeId=10051&langId=-1&catalogId=10053&ci_sku=203651437&ci_kw=%7bkeyword%7d&kwd=%7bkeyword%7d&cm_mmc=shopping%2d%5f%2dgoogleads%2d%5f%2dpla%2d%5f%2d203651437&ci_gpa=pla - Home Depot ) along with a few bungy chords... Front 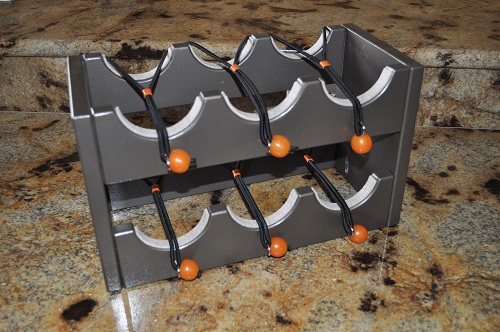 Back 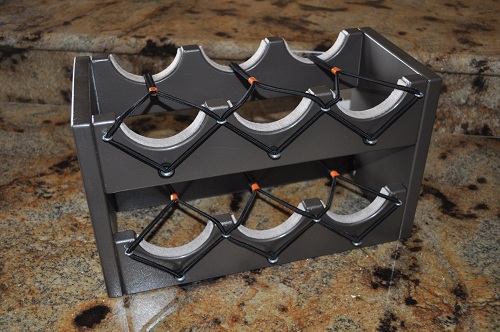 Installed ready for use and after first trip over interstate and dirt roads with no broken bottles. 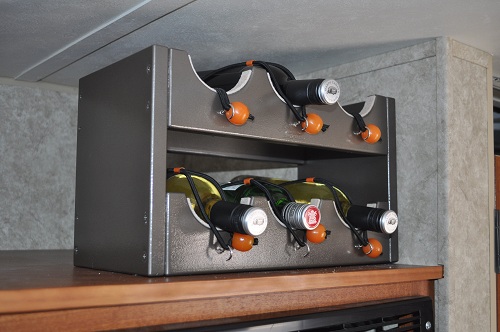 ------------- Ed, Angi, and Hunter Hagins, 2011 R-Pod 172, Montrose, Colorado 
|
Posted By: Racer|X|
Date Posted: 11 Apr 2013 at 7:52pm
|
The water system is pure genius. Love it! At first ai was thinking too big...but it would pretty hold all it needs. X ------------- |
Posted By: techntrek
Date Posted: 11 Apr 2013 at 8:04pm
|
Dang, that's some water filter system.
------------- Doug ~ '10 171 (2009-2015) ~ 2008 Salem ~ http://www.rpod-owners.com/forum_posts.asp?TID=1723 - Pod instruction manual
|
Posted By: BagEnd
Date Posted: 11 Apr 2013 at 11:26pm
|
Thanks for the compliments. I was worried about size initially until all of my hoses and extras fit in one place. That includes a section of high pressure hose for the bib, the 25' hose for the trailer and the 25' coiled hose for whatever. ------------- Ed, Angi, and Hunter Hagins, 2011 R-Pod 172, Montrose, Colorado
|
Posted By: Racer|X|
Date Posted: 12 Apr 2013 at 9:54pm
|
I think you could market and sell it. It is slick as seal snot! X ------------- |
Posted By: Goose
Date Posted: 13 Apr 2013 at 1:29am
|
Neat water system and great wine rack. Goose ------------- Mother Goose's Caboose..2011 RP171..07 Grand Cherokee 
|
Posted By: Seanl
Date Posted: 17 Apr 2013 at 4:23pm
|
I needed to find a place to hang some clothes. Apparently my wife has clothing that cannot be folded. I found this hanger at a Zellers Store here in Canada for $8 I wanted to hang it on the end of the microwave cabinet because this space on my 173 is really dead space it only had the cloth pockets on it which I am going to move to the wall outside the bathroom. The problem is the cabinet is only 1/4 inch plywood with a frame around it and would not hold a screw. 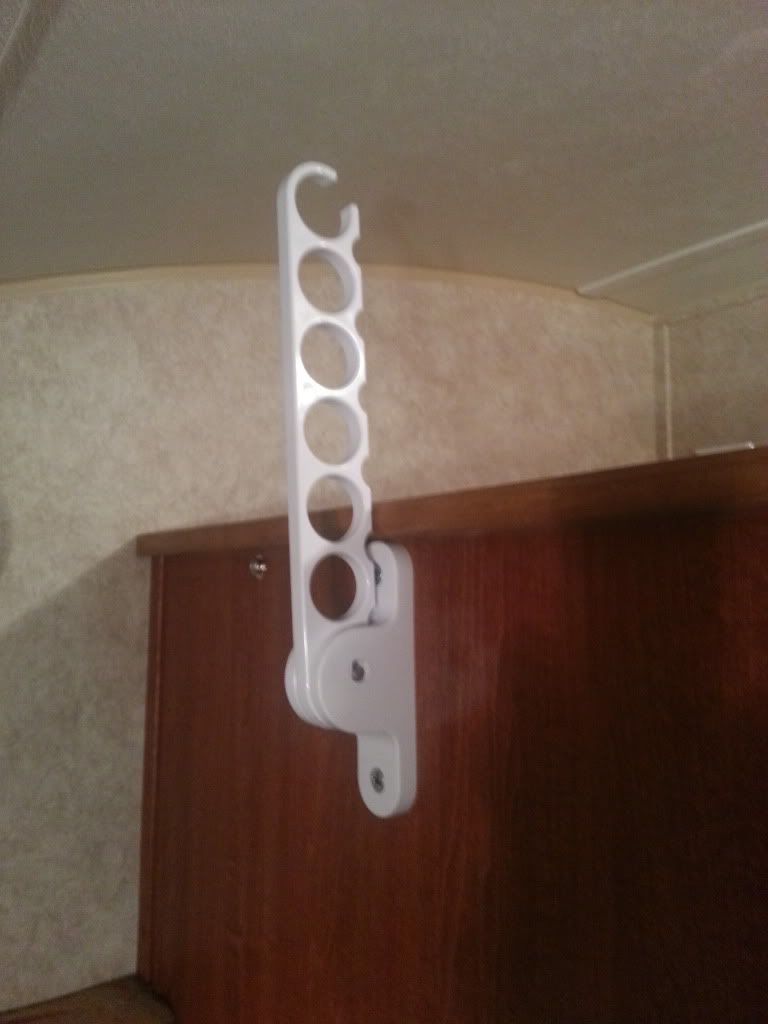 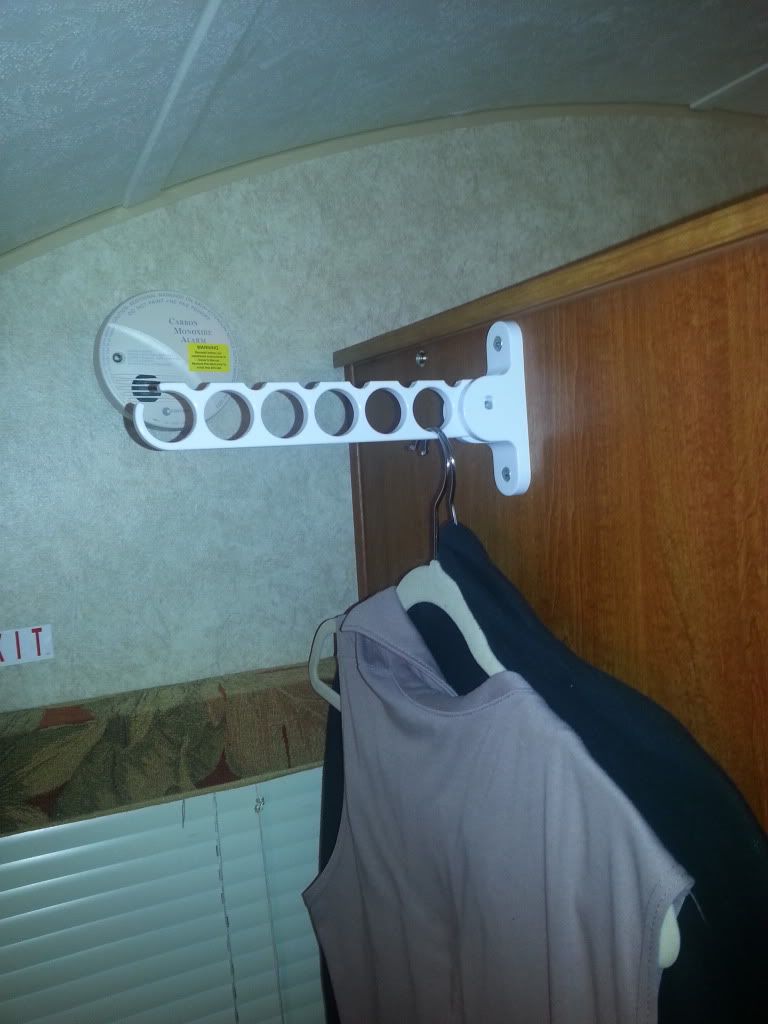 Solution take out the microwave and glue and staple in a 1"x 2" stringer to mount the bracket on. Now My wife can hang some clothes and I am a hero. 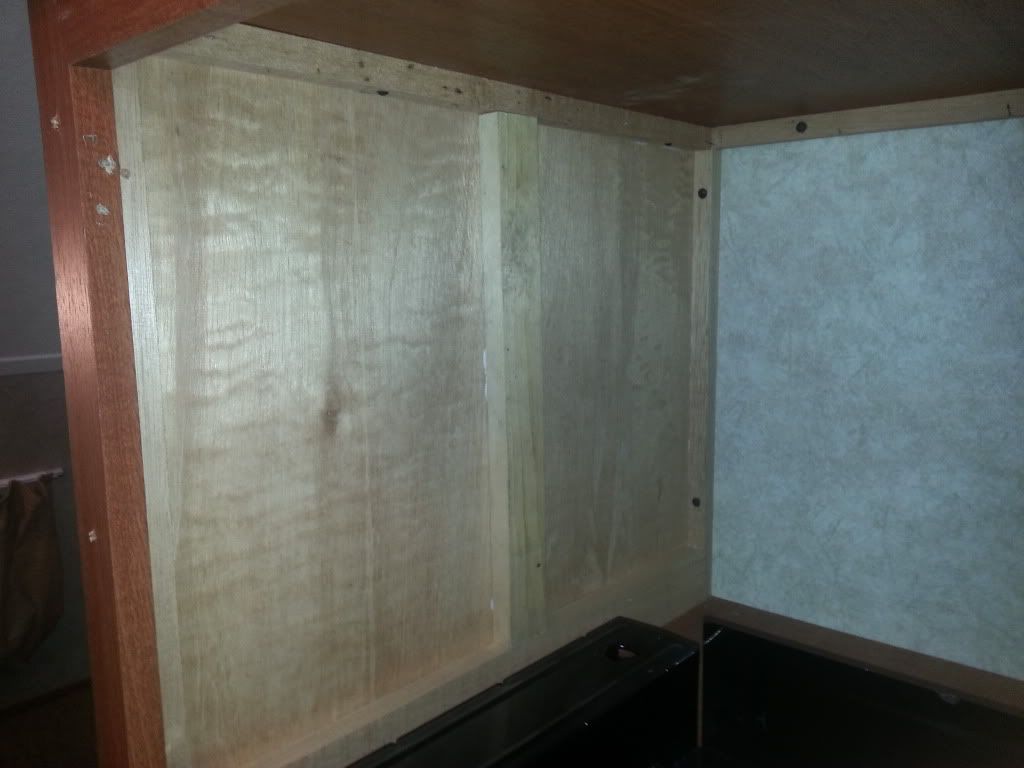 ------------- Sean, 2011 Rpod RP-173,2009 Jeep Liberty Rocky Mountain Edition 
|
Posted By: Goose
Date Posted: 17 Apr 2013 at 5:05pm
|
I know what you are saying about "clothes that can not be folded", I don't understand it because we are camping. As much as I have tried to get the other half to change her thinking it does not work, therefore the rod above the toilet is our clothes bar. I like your hanger and just got informed that she has seen those also but the bar works for her so no mods for now. Goose ------------- Mother Goose's Caboose..2011 RP171..07 Grand Cherokee
|
Posted By: Seanl
Date Posted: 18 Apr 2013 at 8:13am
My clothes bar in the bathroom is gone. Both the plastic pockets that the bar slips in split and the screw pulled through the plastic and the bar fell down. I could replace the pockets but this works better for for us. ------------- Sean, 2011 Rpod RP-173,2009 Jeep Liberty Rocky Mountain Edition
|
Posted By: BendPod
Date Posted: 23 Apr 2013 at 7:43pm
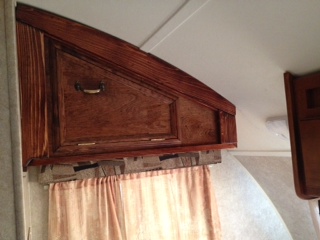
We put in a curtain tracks on both bunks so now we each have our own curtain to control light. Also didn't like that the bottom bunk didn't have wood trim like below the top bunk. Used Home Depot cherry (laminate) shelving cut to fit and installed below bottom bunk so they now match. 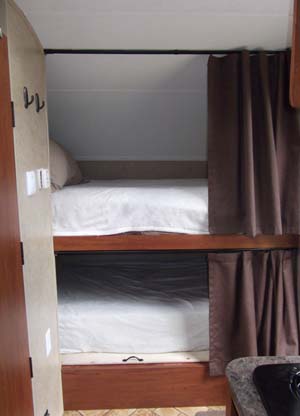 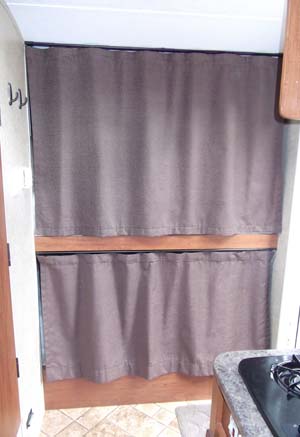
|