Our-Pod Mods
Printed From: R-pod Owners Forum
Category: R-pod Discussion Forums
Forum Name: Podmods, Maintenance, Tips and Tricks
Forum Discription: Ask maintenance questions, share your podmods (modifications) and helpful tips
URL: http://www.rpod-owners.com/forum_posts.asp?TID=9173
Printed Date: 07 May 2024 at 5:49pm
Software Version: Web Wiz Forums 9.64 - http://www.webwizforums.com
Topic: Our-Pod Mods
Posted By: GlennZippy
Subject: Our-Pod Mods
Date Posted: 02 Jan 2017 at 7:33pm
|
We haven't had a chance to name it just yet so apologies to
any others with the same name...
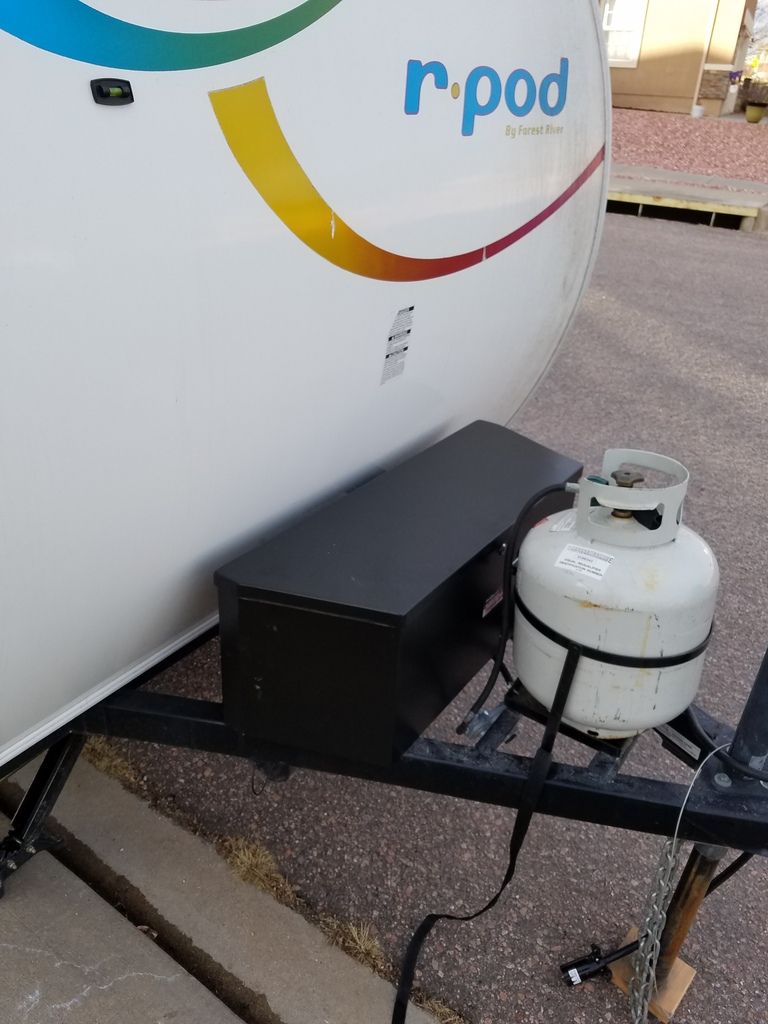
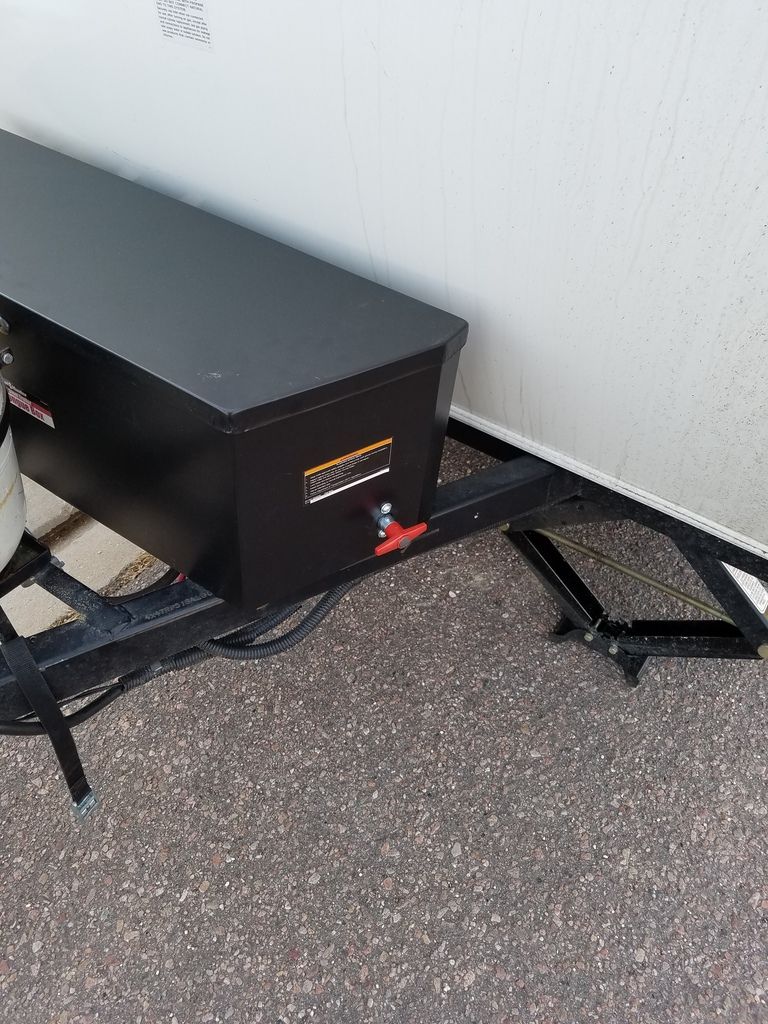
Second mod: Tongue box. I picked up the smaller tongue box
from Harbor Freight with the intention of being able to secure 2 batteries down
the road. For now, the extra space will be used for wheel chocks and such. None
of the holes lined up very well though so I did need to drill some holes and
use some self-tapping screws to get it in place. While the position is perfect,
the single LP tank is in the way, but there is plenty of space to move the
position forward and add what is needed for a second bottle. This will be a
future mod. It can't really be seen in the pictures, but I used the original straps that were holding down the plastic battery box as a hold down for the internal box. I doubled over the strap and heated up a large nail to poke a hole through the strap. I then used another screw and nut on each end of the straps with a fender washer to keep it from pulling out. I used the same buckle from the original strap.
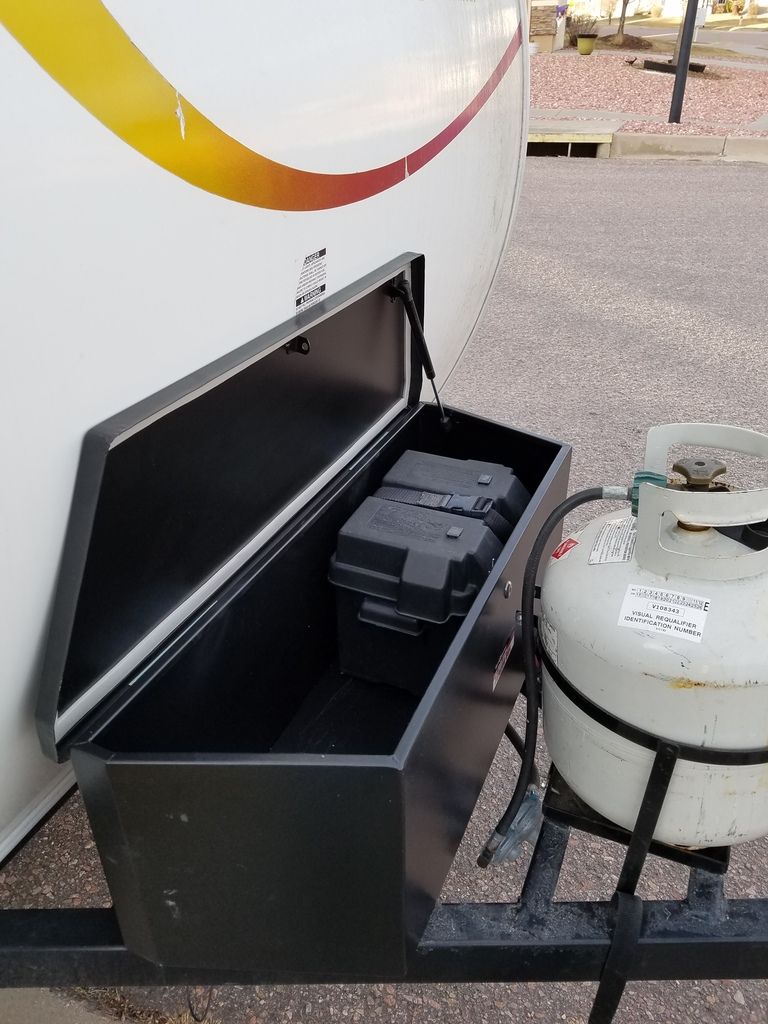
Battery cut-off switch. This also came from Harbor Freight but did require some fabrication skills to get it looking right. I removed the black center cover to have access to the small hex nut holding the handle to the switch. I then used a 1” hole-saw to create an opening for the handle and then ¼” holes for the screws. I used a rubber gasket from Ace Hardware to keep things water tight. I secured everything with a couple of ¼” by 1” screws and washers. It’s a great fit and super helpful!
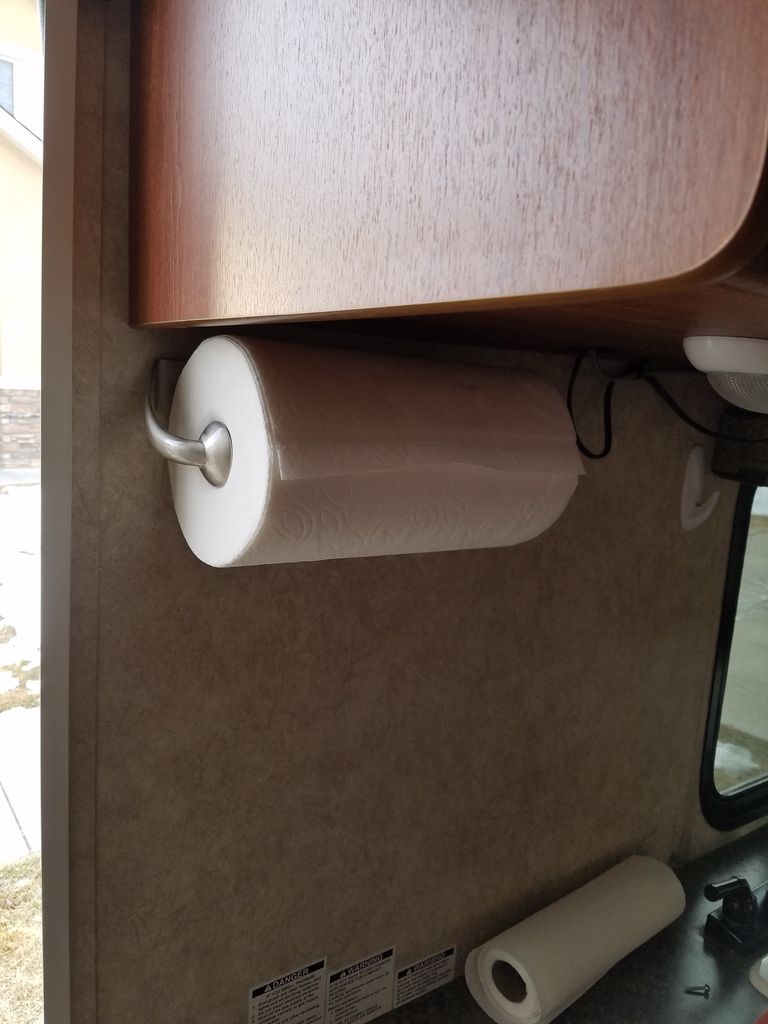
A couple of other inside mods: Naturally a paper-towel holder is helpful. This one we picked up from Wal-Mart and has a ratcheting feature that keeps the paper on the roll even when moving. A few command strip hooks for jackets and towels as well as another for a trash bag right next to the stove. We also found a command strip item that while designed for a broom, is perfect for securing a flashlight in a convenient location.
While not really modifications, so to speak, we also added a few necessities like a toolkit, water filter, dump station items (clear elbow, hoses, poop-tubes), various water adapters (Y connector, 90 degree connector, pressure regulator) and all the stuff we usually carried while tent camping. Future mods: Grills for the vents on the driver side, bed modification to better accommodate 2 people, possibly removing the DVD player/TV, storage options that may include raising the one remaining bed a bit. Some of these things will happen over the course over the next couple of months but many more will happen once we really get a chance to use the trailer. ------------- 2010 R-Pod 152 |

Replies:
Posted By: Leo B
Date Posted: 02 Jan 2017 at 8:37pm
|
Nice work!!
------------- Leo & Melissa Bachand 2017 Ford F150 2021 Vista Cruiser 19 csk Previously owned 2015 Rpod 179 2010 Rpod 171 |
Posted By: jato
Date Posted: 02 Jan 2017 at 9:55pm
|
Nice workmanship! Sure helps to be handy. Where are you located? Going podding soon maybe as I don't see any snow?
------------- God's pod '11 model 177 '17 Ford F-150 4WD 3.5 Ecoboost Jim and Diane by beautiful Torch Lake "...and you will know the Truth and the Truth will set you free." |
Posted By: GlennZippy
Date Posted: 03 Jan 2017 at 11:16am
|
Located in Colorado Springs. The weather started moving in today: 6-12 inches in the next few days. We're lucky that we still get some decent weekends to work on the pod, but most of the forest service campgrounds close until May. ------------- 2010 R-Pod 152 |
Posted By: texman
Date Posted: 16 Jan 2017 at 10:55am
|
Thanks for Sharing! ------------- TexMan 2015 182g 2018 Sequoia http://www.rpod-owners.com/forum_posts.asp?TID=9122&title=texman-182g-mods - TexManMods |
Posted By: GlennZippy
Date Posted: 28 Jan 2017 at 5:52pm
|
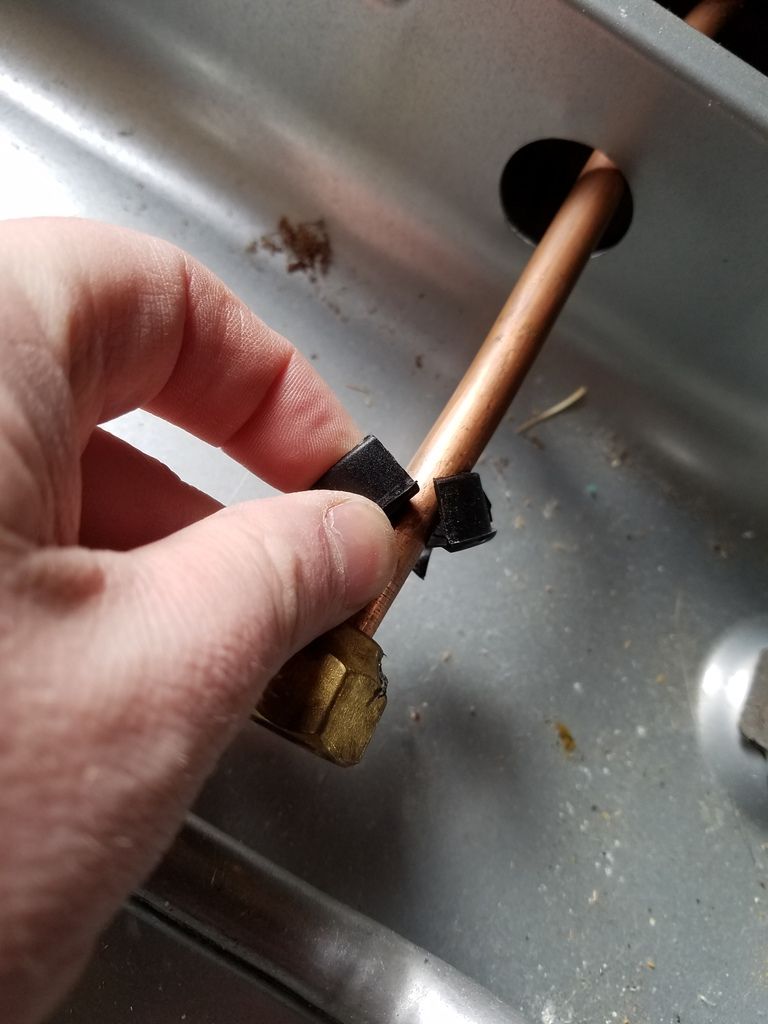
So it was in the upper 40's today so I pulled the Pod out of storage and did a mod! We tend to migrate towards boon-docking and have pretty good systems in place from years of tent camping. But since we may be out for a week or more we wanted to have a pair of tanks instead of the standard single. Our 2010 152 had the bracket welded in place, so I had to break out the grinder and go after the welds on the square part of the bracket. I left the cross-pieces to add a little stability to the new tank bracket. After about 30 minutes I had the 2 curb-side welds taken care of, and then manhandled the bracket off. After a bit more grinding to smooth out the driver side and remove some rust I hit the clean, shiny metal with some black spray paint. Once it was dry, I test-fit the bracket (from Manchester Tank via my local Camping World). I had to add a couple of holes to the bracket as the holes for the strap from the previous bracket (the strap was held on with bolts) didn't match up. After that, a pretty simple process of tightening bolts and nuts and then it was finished. The hardest part was grinding off the old bracket, but it seems like Forest River is now bolting them on at any rate. Eventually I will add a dual regulator as well, but for now, I'll switch tanks and hope that it's not raining when it needs it. (Naturally it will be pouring at that time...) http://s1377.photobucket.com/user/glennzippy/media/20170128_154600_zpscybg663j.jpg.html"> 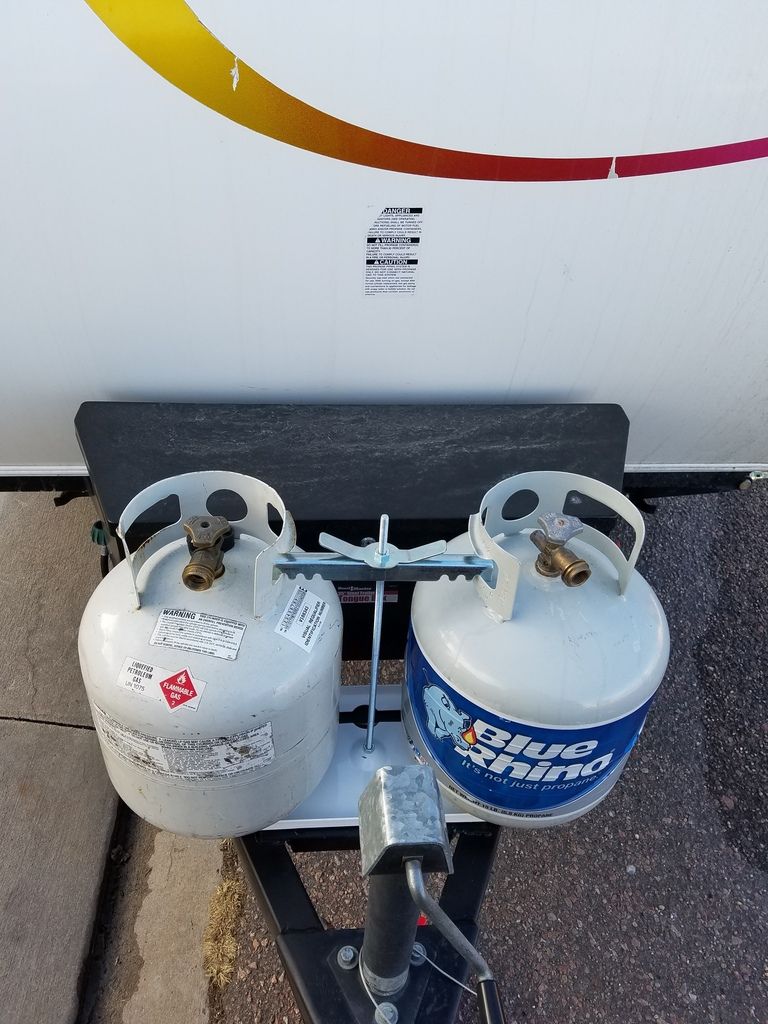 http://s1377.photobucket.com/user/glennzippy/media/20170128_154553_zpsgogustgt.jpg.html"> http://s1377.photobucket.com/user/glennzippy/media/20170128_154553_zpsgogustgt.jpg.html">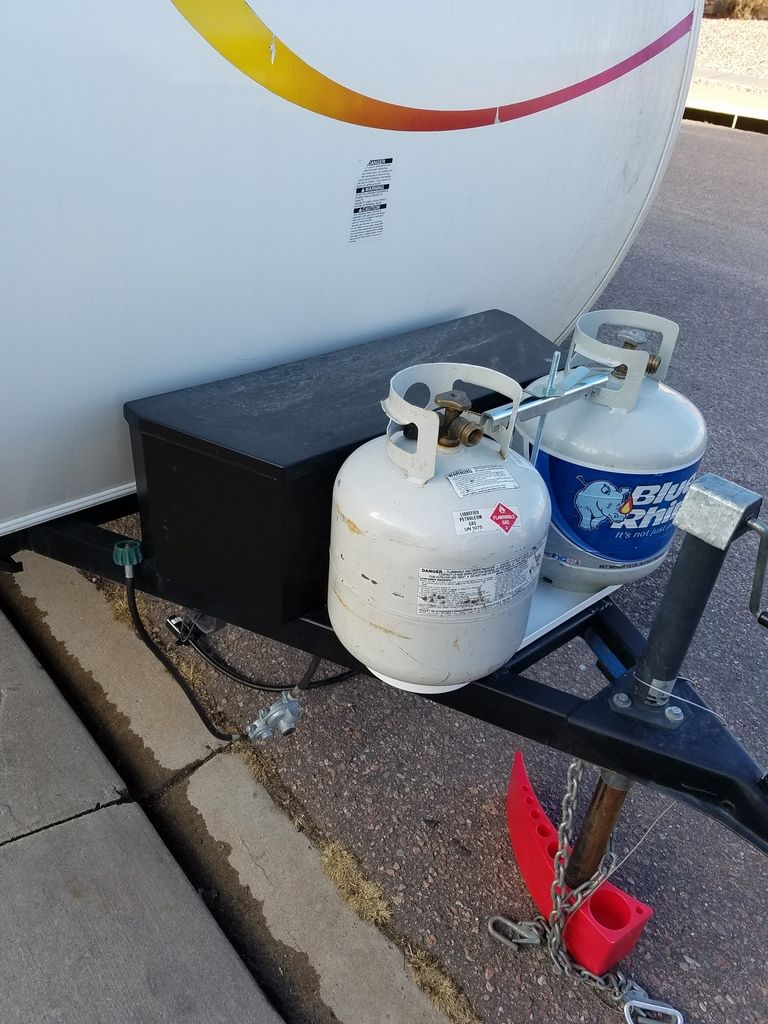 ------------- 2010 R-Pod 152 |
Posted By: jato
Date Posted: 28 Jan 2017 at 9:38pm
|
Very nice mod. We plan to come out your way in September to RMNP; it is our favorite NP. Noticed you have a blue rhino tank. You can do much better if you can find a hardware store that will fill you tank and only charge for the amount added. Normally they can fill the tank with 20 lbs of propane which is 4.7 gallons. Blue Rhino on the other hand will charge more and you will find out if you weigh it when you get home you will only get 15 lbs of propane or 3.6 gallons or put it another way you are only getting 75% of your tank filled. Where I live in Michigan I can get 20 lbs for $ 16.50, down the road 400 yards if I go to the gas station where they have Blue Rhino I will pay $22.95 for only 15 gallons. ------------- God's pod '11 model 177 '17 Ford F-150 4WD 3.5 Ecoboost Jim and Diane by beautiful Torch Lake "...and you will know the Truth and the Truth will set you free." |
Posted By: GlennZippy
Date Posted: 29 Jan 2017 at 9:21am
|
We are more Yellowstone type of people but RMNP is beautiful. We were there last Labor Day. That tank is actually empty. I have several others but when you are having a party and run out after your normal place is closed, you do what you must!  ------------- 2010 R-Pod 152 |
Posted By: john in idaho
Date Posted: 29 Jan 2017 at 10:46am
| Since you live in Colo Springs, what is the road like out to Canon City and Gunnison? OK for a rPod? I don't particularly like I-70. With a trailer the bypass around Denver is around $28 to go north. |
Posted By: GlennZippy
Date Posted: 29 Jan 2017 at 11:34am
|
From the Springs to Canon City is not bad at all. A little twisty in parts but it's not a super big elevation difference. Highway 115 runs right along side Fort Carson and there's not a ton of services until you hit Highway 50. Passing lanes are here and there and watch out for motorcycles: The riders are typically young and stupid in that area. Once you hit 50, it's a decent road but it does get pretty twisty, but is a good road with frequent passing lanes when it's not 4 lanes. Going in to Salida is one of my favorite stretches. Drop. Dead. Amazing. Surrounded by 14,000 foot mountains. One of my favorite spots. Heading out of Salida up Monarch pass is a bit of a haul as the passing lanes are less frequent. Still, it's manageable as the amount of traffic drops off. Over the pass, it is pretty bendy and the passing lanes increase as you approach the stretch into Gunnison. It flattens out though nicely about 15 miles before you reach town. I would have no hesitation about going that way. Another alternative is to head north from Poncha Springs to Buena Vista and then pick up 24 to the Springs. This can be crowded on weekends though. ------------- 2010 R-Pod 152 |
Posted By: sean p
Date Posted: 29 Jan 2017 at 11:54am
|
his route is perfect. i've towed that way several times. no sweat.. ------------- 2016 179pod--BETTY 2010 nissan frontier Sean and Doug Butchie the morkie touring the west |
Posted By: GlennZippy
Date Posted: 29 Jan 2017 at 4:02pm
|
Kitting Up Since we tend to camp in places that are pretty out of the way, I decided I wanted to have a somewhat complete took kit. So here is my primary kit, and no: it doesn’t all fit into the toolbox. http://s1377.photobucket.com/user/glennzippy/media/20170129_135319_zpsscfihwp5.jpg.html"> Some items are stored in one of the drawers for quick access: The duct tape, one of the super glue tubes, scissors, tape measure, and the orange screw driver set. The drill, along with the stabilizer socket and the charger are stored in the outside storage area or, if I feel the need for more security, in the truck. The box of screws, the terminal set, the silicone, the lithium grease, WD-40, and spray paint are in a bin together. The rest fit into the toolbox nicely. The toolbox and the bin with the chemicals and other items are stored under the bed up front. Not pictured is a basic socket set that I picked up from Home Depot:
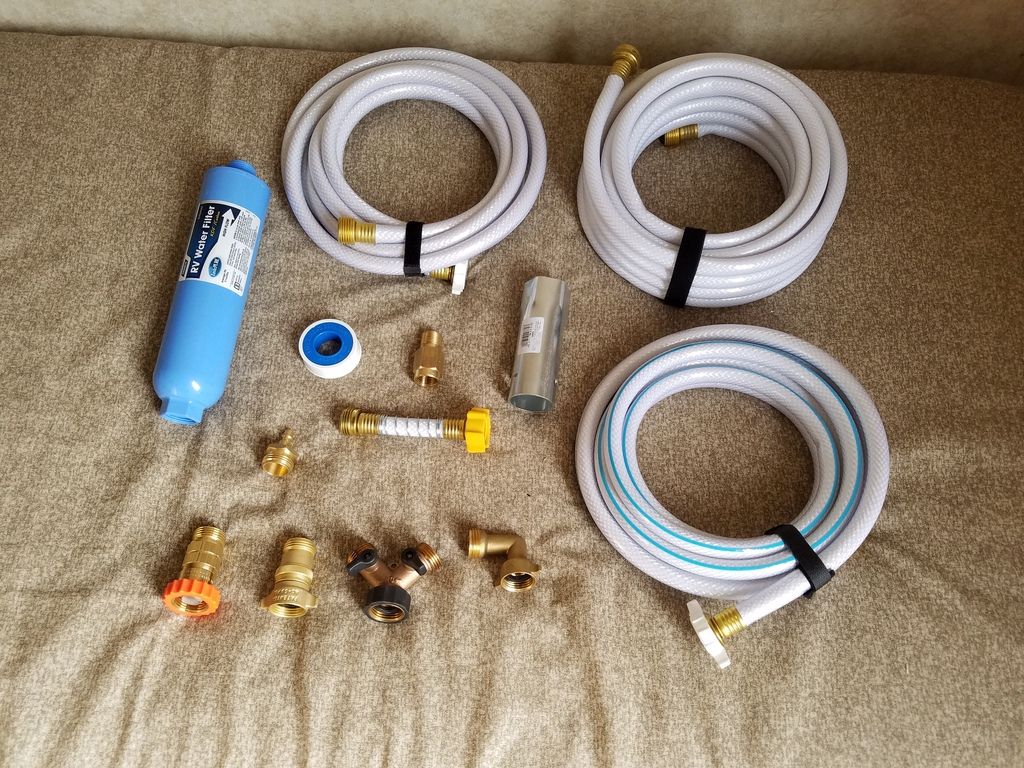
This also goes in the above bin as well. I also worked a bit on getting all of my water stuff in the same place. So i have those items here: http://s1377.photobucket.com/user/glennzippy/media/20170129_140500_zps49bdy81p.jpg.html"> The longer hose is stored loose, and the rest go into a bin together. Some parts are redundant (there are two pressure reducers shown) and I can't imagine needing the water heater element wrench in the field, but better to have and not need than to need and not have! I'm also working on a similar bin for my sewer bits and pieces, but I will wait for that another day. ------------- 2010 R-Pod 152 |


Posted By: jato
Date Posted: 29 Jan 2017 at 8:26pm
|
A very thorough kit, thanks for sharing.
------------- God's pod '11 model 177 '17 Ford F-150 4WD 3.5 Ecoboost Jim and Diane by beautiful Torch Lake "...and you will know the Truth and the Truth will set you free." |
Posted By: GlennZippy
Date Posted: 04 Feb 2017 at 3:59pm
|
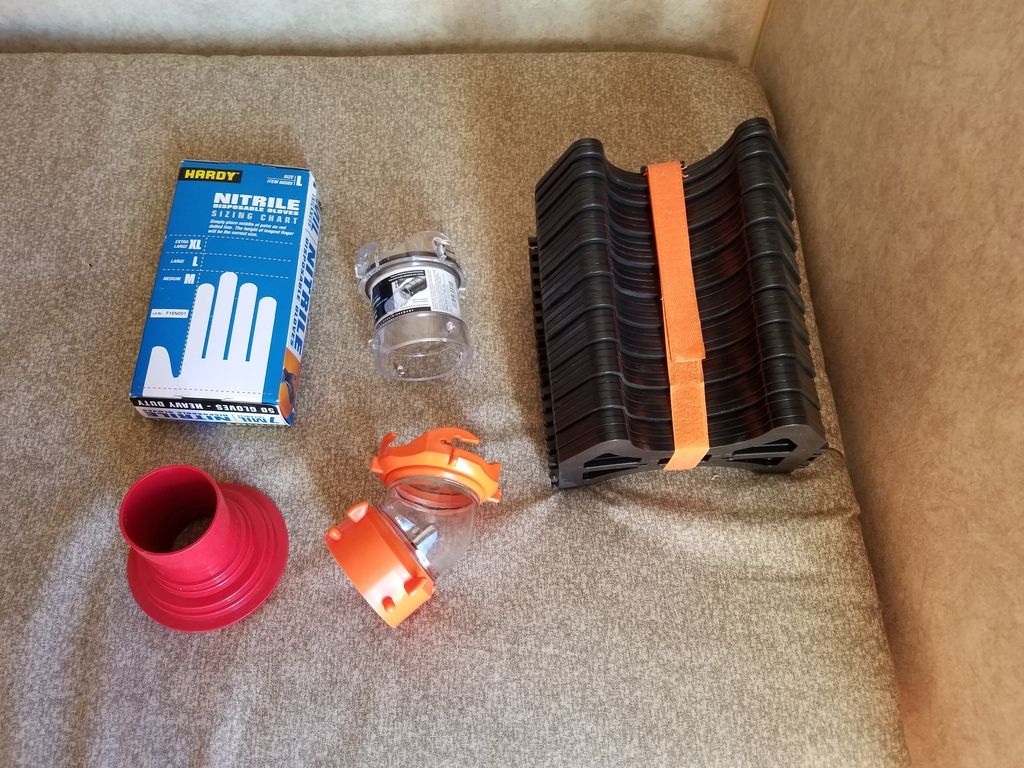
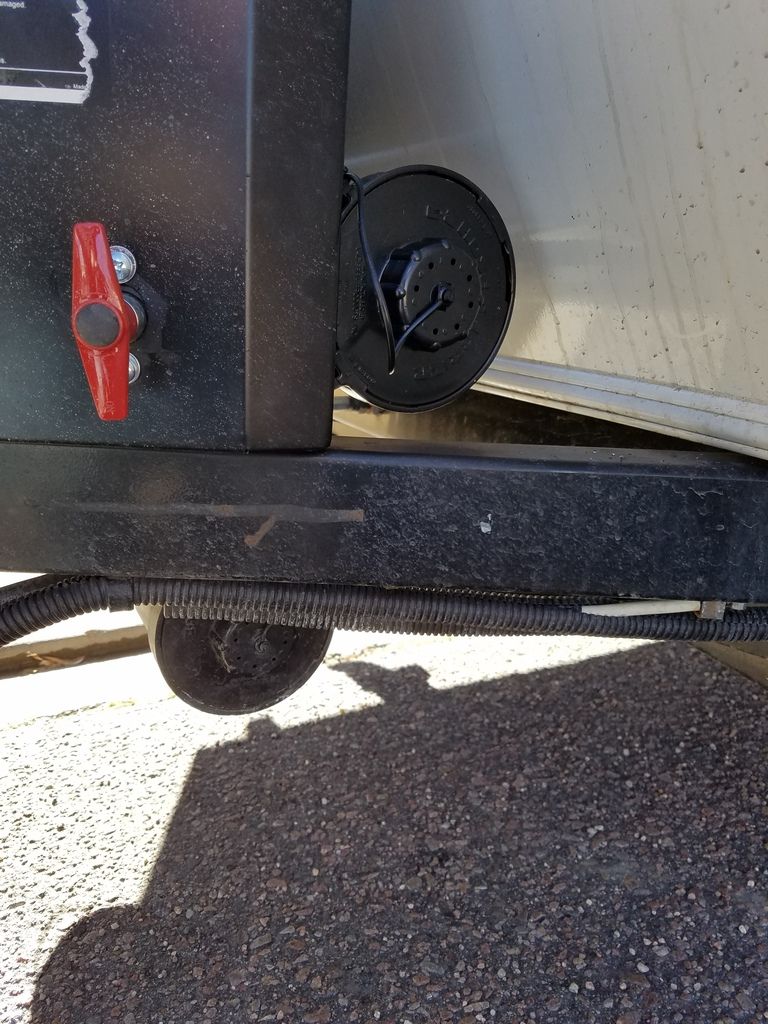
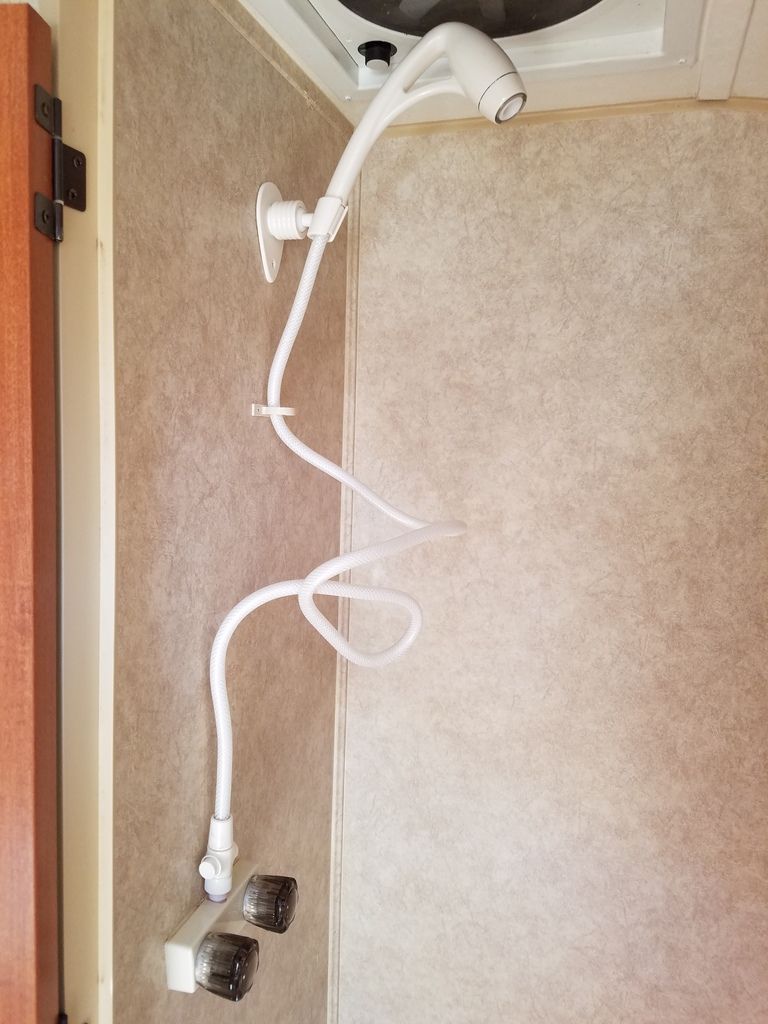
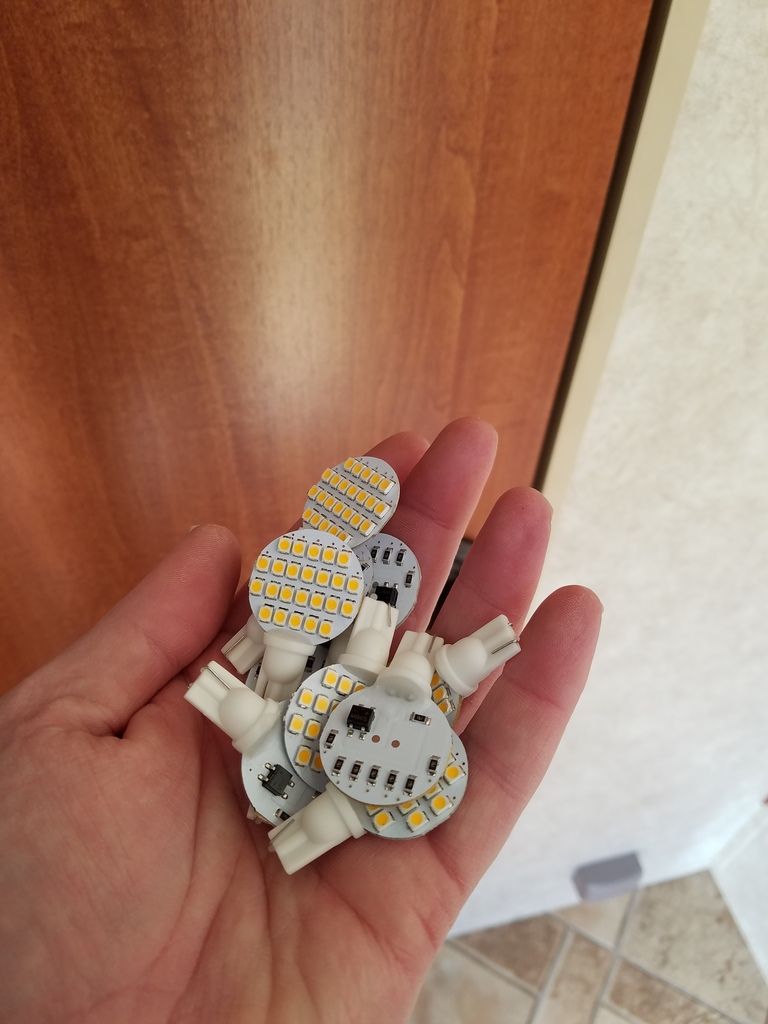
Kitting Up, Continued We were VERY tempted to take the Pod out this weekend. Temperatures were going to be in the upper 50’s and lower 60’s but schedules and wind dictated a few more mods. So continuing from my last set of mods, I finished my sewer kit. Once again, this kit goes into a plastic bin that fits into the outside storage area. This one has a clear 45 degree adapter, a coupler, nitrile gloves, a sewer adapter (with the other end already attached to a sewer hose) and a sewer hose support. This last item does not fit into the bin, but it seems to travel pretty well as is. My pod came with 2 sewer hoses, and I put a Valterra EZ coupler sewer hose connection shortly after it arrived. http://s1377.photobucket.com/user/glennzippy/media/20170204_102834_zps0qoupt0u.jpg.html"> Naturally, since I have 2 hoses, I checked to see if they would both fit in the smallish sewer hose holder and they would not. I wish I had checked that before I had put the tongue box on a few weeks ago as I had to take the box off to attach the second holder. It tucks in nicely behind the box and between the Pod. I shifted it a bit to the driver side since that’s where it would be used the most. http://s1377.photobucket.com/user/glennzippy/media/20170204_135510_zpseo6lbdok.jpg.html"> Continuing in the water vein, I swapped out the standard shower head with the Oxygenics Shower head. This was a pretty straightforward process where I removed the old hose and bracket and replaced it with the new one. The new one also came with a water cutoff switch that makes it easier to take a navy shower. My hope is that the hose will straighten out once I get some hot water running through it. http://s1377.photobucket.com/user/glennzippy/media/20170204_105726_zpscn70ddme.jpg.html"> I also went ahead and swapped out the light bulbs in the Pod for LED lamps. Also a very easy process and took all of 5 minutes to complete. I kept the old bulbs and put them into my hardware box I discussed a few posts up. http://s1377.photobucket.com/user/glennzippy/media/20170204_103044_zpsiteo5ye3.jpg.html"> A few small items were also added: A mirror (a must have for my wife), a cup-holder so that I have a spot for a water bottle at night when the dinette is turned into a bed, and a few strategic command-strip hooks. http://s1377.photobucket.com/user/glennzippy/media/20170204_105528_zpsnwrmoxug.jpg.html"> ------------- 2010 R-Pod 152 |
 http://s1377.photobucket.com/user/glennzippy/media/20170204_104322_zpsthihmhng.jpg.html">
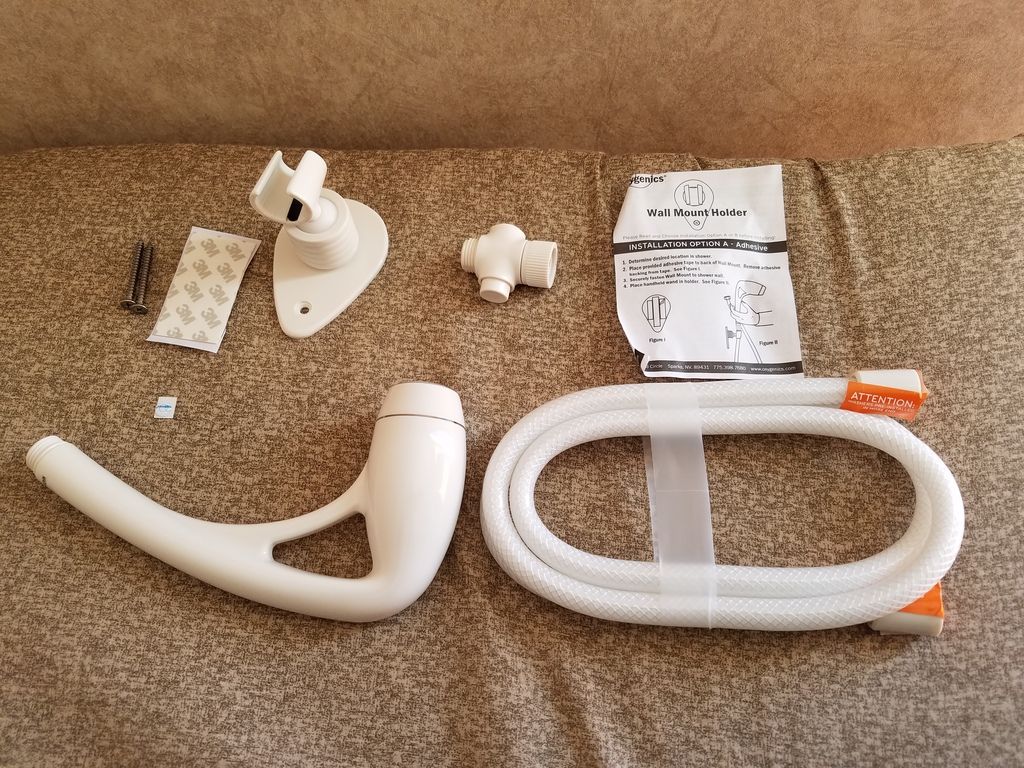
 http://s1377.photobucket.com/user/glennzippy/media/20170204_103117_zpsyqgnejju.jpg.html">
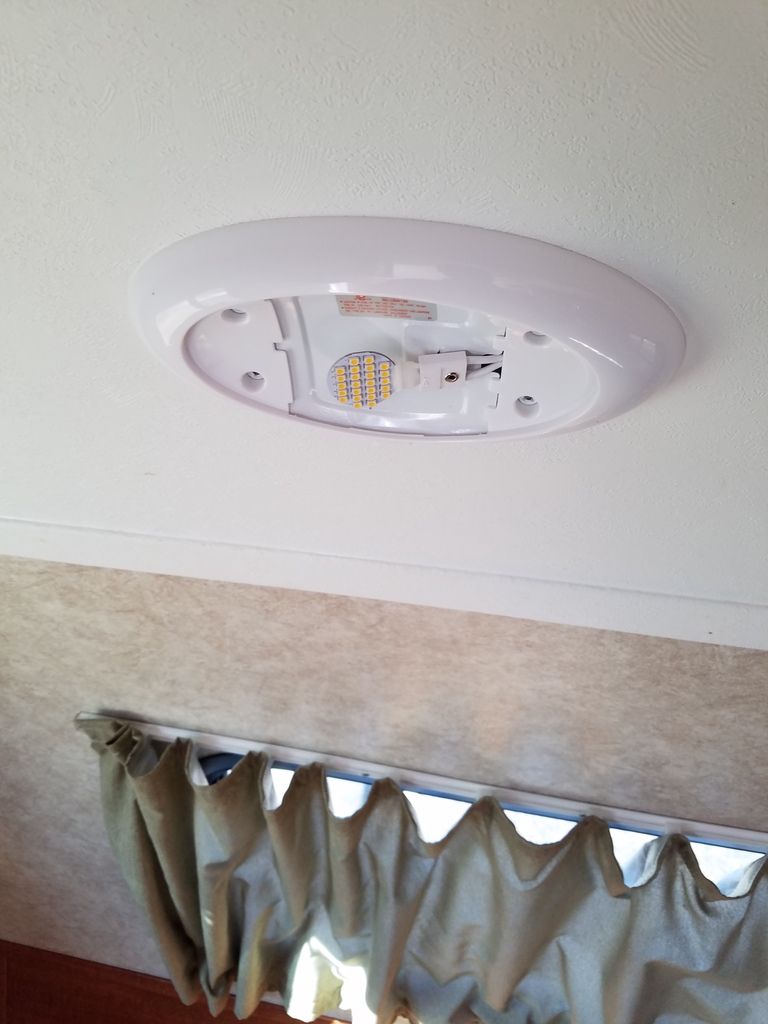

Posted By: GlennZippy
Date Posted: 05 Feb 2017 at 1:48pm
|
Stumbled onto these "floor cushions" today at Costco for $20 each. We've been trying to figure out a way to make the front bed more into a couch and these worked out quite nicely! We added in the small pillows just to see how they felt and will look for some others down the road that will fit the color scheme we are thinking. http://s1377.photobucket.com/user/glennzippy/media/20170205_115023_zpsurufjn7g.jpg.html"> 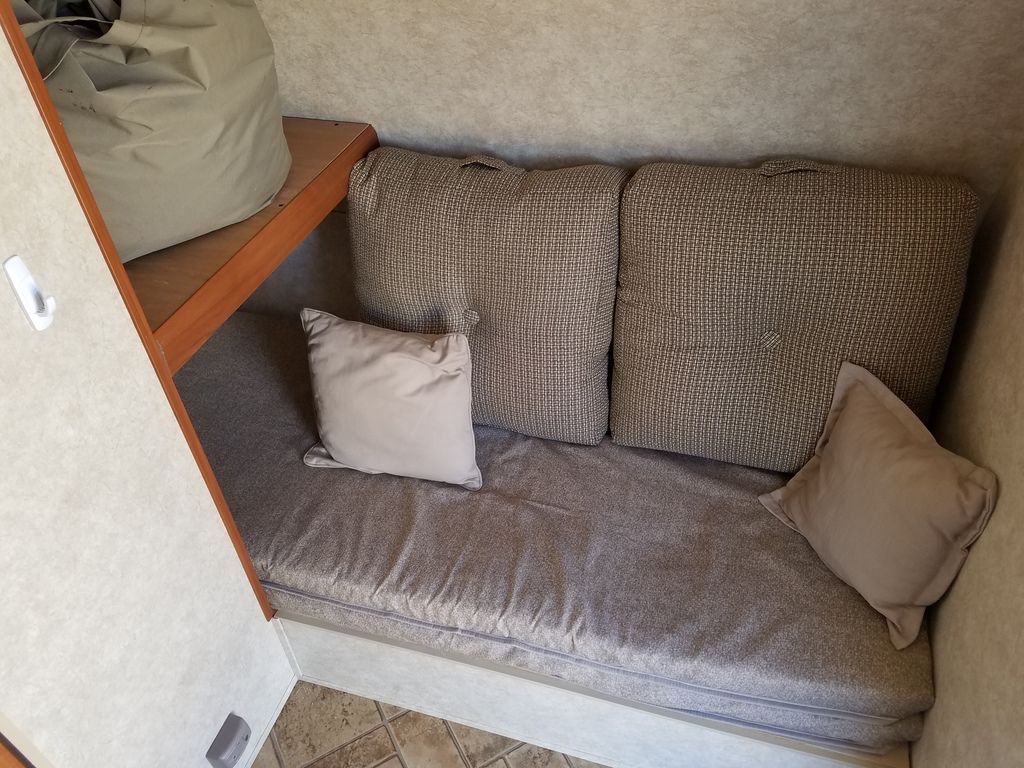 ------------- 2010 R-Pod 152 |
Posted By: osage
Date Posted: 05 Feb 2017 at 5:17pm
| where are the vice grips and baling wire |
Posted By: GlennZippy
Date Posted: 05 Feb 2017 at 6:40pm
|
Every Day Carry
------------- 2010 R-Pod 152 |
Posted By: Leo B
Date Posted: 06 Feb 2017 at 7:22am
|
Great mods!
------------- Leo & Melissa Bachand 2017 Ford F150 2021 Vista Cruiser 19 csk Previously owned 2015 Rpod 179 2010 Rpod 171 |
Posted By: GlennZippy
Date Posted: 06 Feb 2017 at 7:34am
|
Thanks. I can't take sole credit though: This site is a gold mine! "Originality is the fine art of remembering what you hear but forgetting where you heard it." ------------- 2010 R-Pod 152 |
Posted By: lostagain
Date Posted: 12 Feb 2017 at 10:19pm
|
GZ, how was the upper bunk attached? I've took a cursory look at it and didn't see where the fasteners were located. Also, what did you do to cover the faster holes? I can't see any sign of the upper bunk having been there in your pictures. The work you did really looks nice and I am hopeful I can do it as well as you did. ------------- Never leave footprints behind. Fred & Maria Kearney Sonoma 167RB Our Pod 172 2019 Ford F-150 4x4 2.7 EcoBoost |
Posted By: GlennZippy
Date Posted: 16 Feb 2017 at 8:45am
|
Sorry! Just saw this! You have to take the top deck part of the bunk off to find the screws. I used a selection of smallish pry bars to do the job. The plywood is simply nailed in and I pulled the nails out with pliers. The frame of the bunk is screwed in with a couple of different length square-drive screws. Once I cut the frame down and trimmed up one of the boards for the storage area deck, it went back in easily enough. For the screw holes, I simply used some sandpaper to smooth them out and a little bit of sand colored silicone caulk to fill the holes. If you are in the pod and know where to look the locations can still be seen, but you really can't see them at a glance. The corner trim does have to be removed and mine split pretty badly when it came off the wall, so I replaced it as part of the mod. Home Depot has a cherry colored vinyl-wrapped plastic series of trim that matches our colors almost perfectly! ------------- 2010 R-Pod 152 |
Posted By: lostagain
Date Posted: 16 Feb 2017 at 10:21am
|
Thanks, GZ, I really appreciate the reply.
The prior owner had put some rubber shelf/no slide padding on the top deck and covered everything up. I pulled it back a little and didn't see any obvious nails, so I was a little hesitant to start pulling things apart for fear of breaking something. It looks like the finished board on the front of the bunk is just nailed on but has no structural function. I plan on using it to finish off the shelf. Since it has enough length extend from the front wall to just past the wall for the head, I thought put it over the gap in the trim so I don't have to replace it. I was thinking of cutting the top and bottom decking in place and removing the framing for the part of the bunk I want to remove while leaving the part I want for the shelf in place, then finishing off the hole. Is that something that will work? I'll try to post some progress pictures after I get everything done. I also plan on installing a very tiny sink in the head using a large SS funnel, some acrylic plastic for a counter top, plastic tubing for a drain to the floor, and a slatted wood shower floor to conceal the tubing. This should give us a place to wash our hands and brush teeth away from the food preparation area. Lots to do before draining the pinks stuff. ------------- Never leave footprints behind. Fred & Maria Kearney Sonoma 167RB Our Pod 172 2019 Ford F-150 4x4 2.7 EcoBoost |
Posted By: GlennZippy
Date Posted: 16 Feb 2017 at 1:10pm
|
Your plan sounds very similar to what I did. I saved the old piece of trim though in case I ever decided to put the bunk back in fro re-sale. I seriously doubt that will ever happen though!
------------- 2010 R-Pod 152 |
Posted By: lostagain
Date Posted: 16 Feb 2017 at 4:40pm
I thought about trying to save the parts to reuse incase I wanted to put the bunk back, but they would never survive storage in my garage and it's easy enough to go out and buy new materials. With the bunk removed, we can still sleep 4 people in the trailer. I can't imaging wanting to be inside such a confined space with more than 4 people anyway.  ------------- Never leave footprints behind. Fred & Maria Kearney Sonoma 167RB Our Pod 172 2019 Ford F-150 4x4 2.7 EcoBoost |
Posted By: lostagain
Date Posted: 19 Feb 2017 at 9:34pm
|
Thanks to the help of GZ, I got the upper bunk out and converted part of it into a storage shelf. It was pretty easy to do, once I understood how the bunk was attached. I cut top and bottom bunk plywood and removed the panels. They're held in place by a lot of wire brads so they are easy to remove. Luckily the cross piece closest to the cut for shelf was lined up with the wall for the bath room, so I didn't have to deal with moving it. Removing the platform frame was a bit of a hassle because the screws holding it onto the forward wall were impossible to remove with a drill motor. They were long phillips head screws that were about 3" long. I ended up cutting out the wood around the screw heads and using a vice grip. Once the bunk was out, I reused the bottom finished plywood to finish the top and cut the facia to fit the open edge. I used little brass nails around the edge and some molding glue. There was some 5/8" edge trim around the plywood on the bottom of the bunk that I reused to finish the edges of the plywood I added to the top surface of the shelf. The same plywood is under the shelf as well. Once the frame was exposed, it was a matter of taking it out. Here's the finished product: I filled the screw holes in the wall with some tan caulk I happened to have laying in the garage. The total cost for this project $0 as all materials were things I had laying around in the garage. I also put in a folding table that I bought at Costco. The nice thing about the table is that it is smaller than the stock one. I put a base and post to hold the table so we're not fighting table legs. I removed the table legs from the stock table and put a base on it too. Now we have 2 table tops that attach to a post and no clutter under the table. Also, the Costco table can be used outside as a coffee table with the short folding legs. Finally, I added a bamboo shower mat in the wet bath. I bought 2 so one can serve as an entry mat outside the trailer. The next project is to add a little hand washing/tooth brushing sink in the corner of the bath. My problem is getting at the water line behind the shower wall. I don't want to have to take out the refrigerator to do it, so I'll probably put in a little y valve on the shower line so I can have access to water for the sink. I plan on using a water filter faucet (I checked out ones w/o valves from marine suppliers and they cost more than the ones with the valve. I'll use acrylic sheet plastic to make the sink counter and supports and an 8" or so stainless steel funnel for the sink. To the bottom of that I'lll attach a drain line and run it down the wall to the drain on the floor concealed by the slats of the bath mat. That way, I don't have to drill any holes. So, those are my R Mods as I wait for the snow in the Sierra to become a little more manageable. ... though it sure is pretty as seen from the Carson City side of the mountains. ------------- Never leave footprints behind. Fred & Maria Kearney Sonoma 167RB Our Pod 172 2019 Ford F-150 4x4 2.7 EcoBoost |
Posted By: lostagain
Date Posted: 19 Feb 2017 at 9:35pm
|
Looks like pasting Snagit Fotos into the text doesn't work. I don't like posting fotos to outside photos sites so if you want to see any of them, send me a pm and I'll forward to them to you. As usual, I'm lost again. ------------- Never leave footprints behind. Fred & Maria Kearney Sonoma 167RB Our Pod 172 2019 Ford F-150 4x4 2.7 EcoBoost |
Posted By: rGod2013
Date Posted: 20 Feb 2017 at 7:51pm
|
Well, I'm right there again. I had so much trouble trying to post pics and text before I though I would give it a rest for a while. Now that I thought I would try again........... it's even worse. I don't understand why I have to post a pic on another web site to repost it here? I don't care much for the idea. It's obvious I don't possess the advanced computer skills necessary to properly post something on this site. Why a photo sharing web site? Seems like the way the local snail mail post office sends our local mail two hours down the road then back again for delivery. I am guessing that the pic issue has something to do with web site memory space? I really like this (rpod owner's forum) web site. Lots of good stuff. Nice people. I'll visit often but I will no longer try to post anything. I don't need that kind of aggravation. Time to take my meds now. Sorry for the rant. Good day to everyone. Keeping poding. |
Posted By: lostagain
Date Posted: 21 Feb 2017 at 12:03pm
|
I forgot to mention: The foam mattress for the upper and lower bunk are the same size, so I put the extra one on top of the bottom bunk. Now, if we have an extra to throw in back of the truck in case we have to accommodate more than 4 people. As for fotos, life is too full of other fun things to do than to worry about it. Again, anyone who wants to see my pictures can PM me. I'll post a note when I finish my probably very strange sink plan for the head (I come from sailboats so it ain't a bathroom to me). ------------- Never leave footprints behind. Fred & Maria Kearney Sonoma 167RB Our Pod 172 2019 Ford F-150 4x4 2.7 EcoBoost |
Posted By: GlennZippy
Date Posted: 19 Mar 2017 at 7:32pm
|
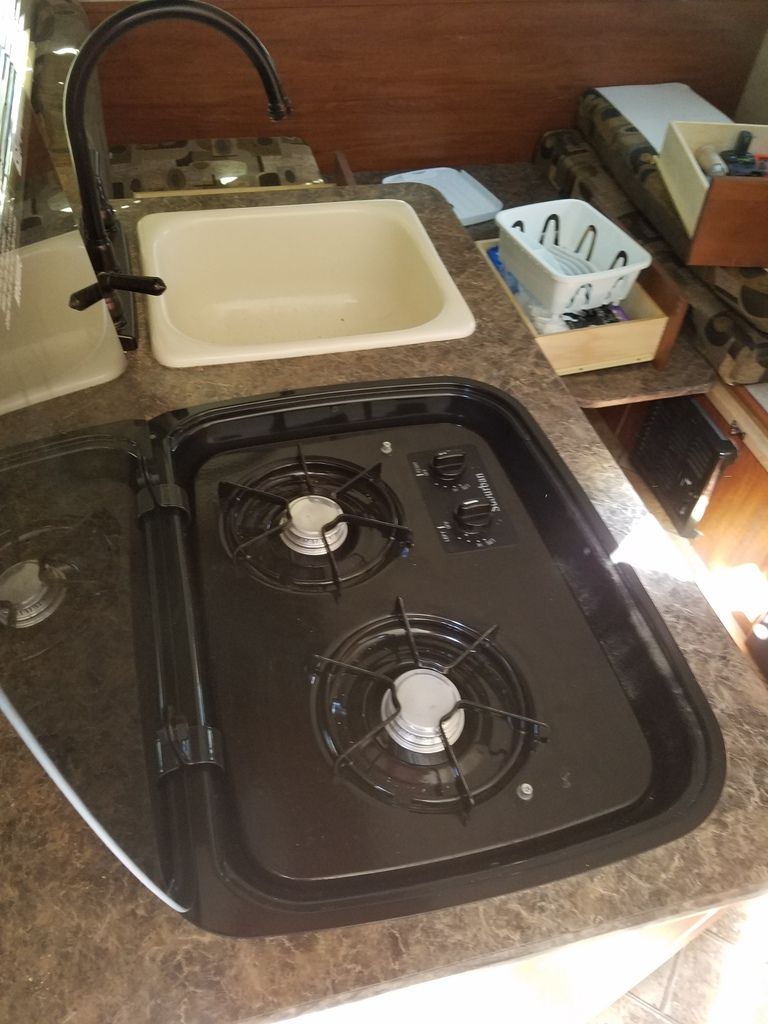
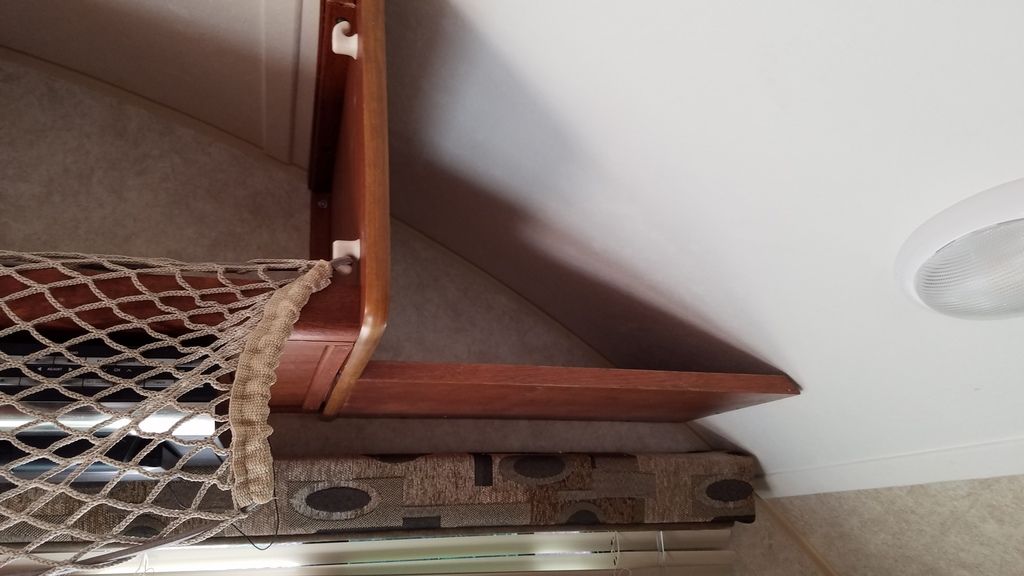
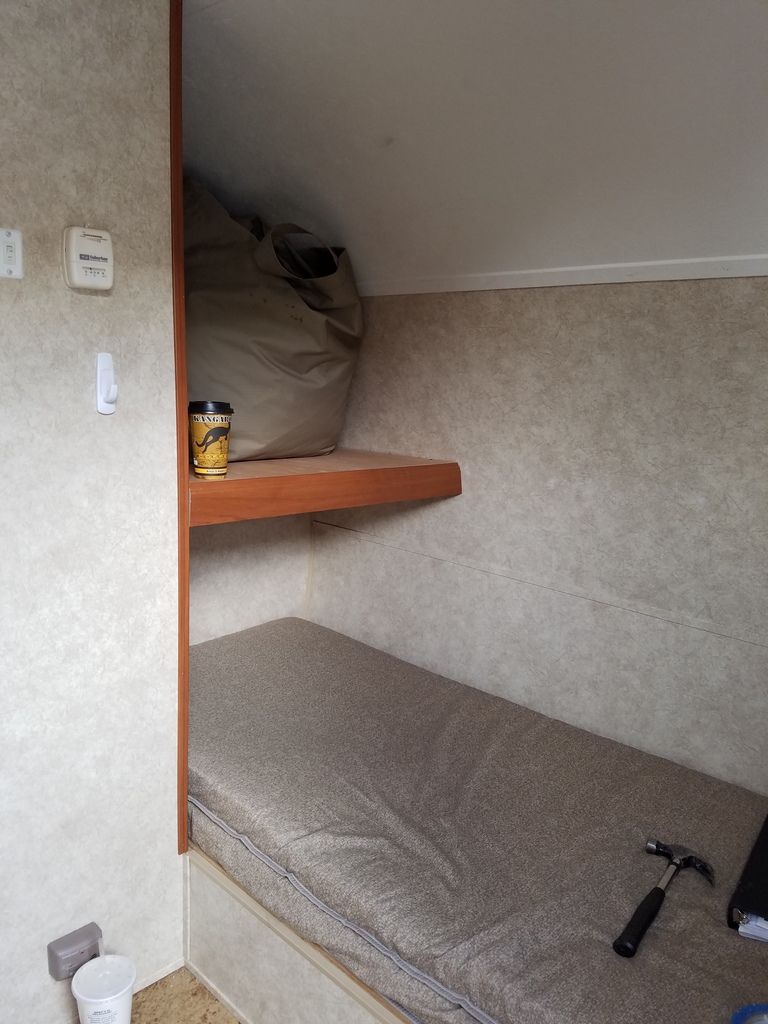
Continuing the thread I started for the modifications for the R-Pod 152 my wife and I bought in November… No pictures for this mod, but you can use your imagination. The dinette area in the 152 is even smaller than just about any other. Since I’m not a small guy (6’3” and 200 pounds) and there are times we will have three in the pod, I needed to make a bit more room. On the refrigerator side, there was a small nightstand (for lack of a better term). I removed this entirely as it had limited usefulness. I cut a bit of birch plywood I had lying around to allow me to move the table forward to give a little more bed. I also re-located the small receiver for the pin on the underside of the table to secure the table when down in the new, further forward position. The side rails also needed extending to add stability. I had a cushion made to fill the space at the back of the pod when the existing cushions are moved forward, making for a bed that is about 10-12 inches wider for 2/3 of the length. When the bed is in its extended mode, the drawers (particularly the middle drawer) are difficult to open, but that’s a small cost for a bigger sleep space. After a shake-down weekend we discovered that the existing cushions were tortuous to sleep on. To remedy this, I ordered a 4” memory foam topper. Although I could have likely made replacement foam with a queen-size version, the king size was actually cheaper and I figured I could possibly use the extra bits in another project. The topper cut easily with an electric knife and now the converted bed is much more comfortable. Also on our shake-down weekend we decided that a couple of other mods were necessary. One of them was getting a flush-mount stove kit for the existing stove. We bring a coffee maker when we have power and the countertop is likely the smallest of the r-pods, so extra counter space was a must. Remember, it you are working with the propane system, do NOT have a tank hooked to the system. Removing the existing stove was easy enough: Remove the two visible thumbscrews, un-do the brass nut that connects the propane supply line. Then remove the plastic grommet at the back of the “pan” of the stove and then slip the line out after removing the three screws holding the stove in place. http://s1377.photobucket.com/user/glennzippy/media/20170311_104004_zpscncyk6lz.jpg.html"> I taped up the countertop to protect it and placed the recessed-mount chassis onto the tape to find the spot I liked. This can be a little fiddley as you also have to make sure that there is nothing underneath that you are hitting when you saw. Having found my spot, I traced the outline of the kit onto the tape and then shifted the kit to trace a cut line about 3/8” inside the outline. This required moving the kit several times. Once I was set, I also taped up the bottom of my jig-saw to make sure I wouldn’t scratch things up. I also had to move a few electrical bits out of the way to make sure that they were clear. This was perhaps the hardest part. http://s1377.photobucket.com/user/glennzippy/media/20170311_105806_zpsfi51xwrc.jpg.html">
I’ve been in the construction business for 11 years so I’m not afraid of cutting things up. I can understand where some might be though. Just take your time and measure twice before cutting once. Once the opening was cut the rest was pretty straightforward. I did have to add a couple of blocks to make sure I could hit something solid with the screws to secure the kit. Then I reversed the steps to remove the stove and the project was finished! http://s1377.photobucket.com/user/glennzippy/media/20170311_113842_zpso1b6gkdn.jpg.html"> Another thing we found was that we really needed more storage. In most R-Pods, you can add a shelf pretty easily over the bed. In the 152, this simply wouldn’t work if you wanted to use the space as a dinette from time to time. There just isn’t the room. That said, there is a touch of space just behind the cabinets that was crying out for a shelf. Making the shelf was pretty easy: Again, leftover birch plywood. The shelf is about 12”x17” and took some tweaking to get it right. I used Minwax cherry stain to get the color. It took 3 passes and I let the stain sit for about 30 minutes each time. I then used some lacquer to give it a more durable finish. I secured it using 3 molly bolts for the side wall and a couple of screws to the side of the cabinet. Doing this required removing a small piece of trim which I them nailed back up using brads. http://s1377.photobucket.com/user/glennzippy/media/20170319_142954_zpsqpbrijhp.jpg.html"> ------------- 2010 R-Pod 152 |