
|
|
Post Reply 
|
Page <1234 7> |
| Author |
 Printable Version Printable Version Google Google Delicious Delicious Digg Digg StumbleUpon StumbleUpon Windows Live Windows Live Yahoo Bookmarks Yahoo Bookmarks reddit reddit Facebook Facebook MySpace MySpace Newsvine Newsvine Furl Furl Topic Search Topic Search  Topic Options Topic Options
|
Patriot Dave 
Senior Member 

Joined: 06 Feb 2016 Location: LaSalle, Mi. 48 Online Status: Offline Posts: 206 |
 Topic: Diary of a Madmodder Topic: Diary of a MadmodderPosted: 29 Mar 2016 at 3:52am |
LOL, that sounds great.....new speakers......please give details when you are done. |
|
|
Dave & Joyce
Never Forget, In God We Trust; This Our National Motto. Member; Patriot Guard Riders, Michigan Chapter Retired; So Every Day is Saturday.... Except Sunday |
|
 |
|
|
Retroactive
Senior Member

Joined: 15 Mar 2016 Location: Bolton, MA Online Status: Offline Posts: 270 |
Posted: 29 Mar 2016 at 10:54pm |
|
Interior Speaker Upgrade
Tools: Drill & Bits, Screwdriver, Pencil. Materials: The most expensive speakers you can afford, that also come with a grill and mounting clips. Skill: Novice Time: 1-2 hours 1) Remove screws from old speaker. 2) Carefully lift the speaker out of the hole. 3) Write down which wire goes to the "+" terminal, it should be the striped wire. Remove wires. 4) Use the template included with the speaker to mark the holes. Be careful to make sure to center the template around the old cutout, so none of the new marks are too close to the edge. 5) Drill a hole a with a bit the same diameter as the screws included with the speaker. 6) Attach the clips included with the speaker, making sure it is centered over the drilled hole. 7) Attach speakers, making sure each screw engages with the hole/clip. The sound was a night & day difference! Even the wife noticed the huge improvement. 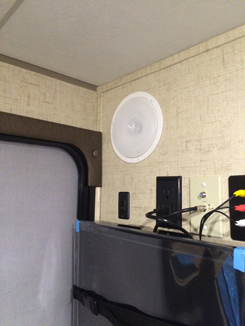 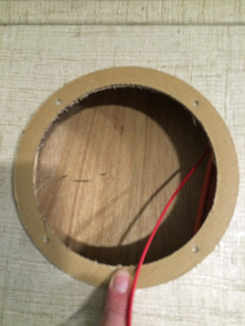 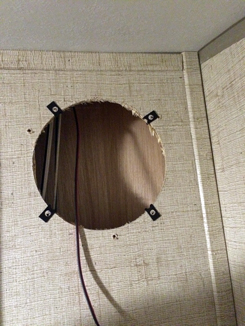 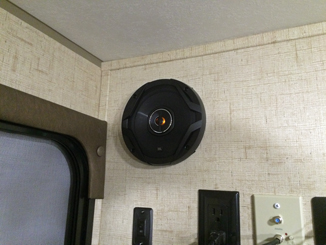 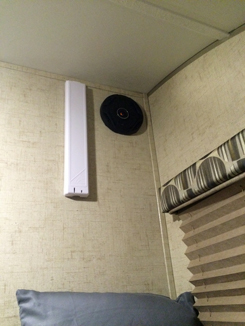 |
|
|
|
|
Patriot Dave
Senior Member
Joined: 06 Feb 2016 Location: LaSalle, Mi. 48 Online Status: Offline Posts: 206 |
Posted: 30 Mar 2016 at 6:36am |
|
Awesome......definitely on the To Do List.
|
|
|
Dave & Joyce
Never Forget, In God We Trust; This Our National Motto. Member; Patriot Guard Riders, Michigan Chapter Retired; So Every Day is Saturday.... Except Sunday |
|
|
|
|
Retroactive
Senior Member
Joined: 15 Mar 2016 Location: Bolton, MA Online Status: Offline Posts: 270 |
Posted: 30 Mar 2016 at 7:43am |
|
Thanks! The last pic shows the queen bed compartment.
|
|
|
|
|
Patriot Dave
Senior Member
Joined: 06 Feb 2016 Location: LaSalle, Mi. 48 Online Status: Offline Posts: 206 |
Posted: 30 Mar 2016 at 8:10am |
Oh Boy, I'll be watching for your post. |
|
|
Dave & Joyce
Never Forget, In God We Trust; This Our National Motto. Member; Patriot Guard Riders, Michigan Chapter Retired; So Every Day is Saturday.... Except Sunday |
|
|
|
|
Retroactive
Senior Member
Joined: 15 Mar 2016 Location: Bolton, MA Online Status: Offline Posts: 270 |
Posted: 30 Mar 2016 at 1:49pm |
|
Quick lunchtime sorta-pod mod: Stabilizing Receiver Pin
The ball assy rattling around inside the receiver was making me crazy, my Tahoe is otherwise very quiet. I happened to be at wallyworld, and saw the stabilizing pin for $13. It took me all of 5 minutes to install. It totally stopped any movement horizontally, and I had to use all of my weight to move it vertically. I'll know for sure tonight, I have about 80 miles of driving to do later on so it will get quite a workout - we only have two seasons in MA "Winter, and Roadwork".  |
|
|
|
|
StephenH
podders Helping podders - pHp

Joined: 29 Nov 2015 Location: Wake Forest, NC Online Status: Offline Posts: 6288 |
Posted: 30 Mar 2016 at 2:32pm |
|
This is what I used to cinch down the hitch. It does not move vertically or horizontally when this is tightened down.
http://www.amazon.com/StowAway-Cargo-Carriers-20-6-Tightener/dp/B0001CMUV4?ie=UTF8&psc=1&redirect=true&ref_=oh_aui_detailpage_o06_s00 |
|
|
StephenH
Happy is the man that findeth wisdom,... ouR escaPOD mods Former RPod 179 Current Cherokee Grey Wolf 24 JS |
|
|
|
|
Retroactive
Senior Member
Joined: 15 Mar 2016 Location: Bolton, MA Online Status: Offline Posts: 270 |
Posted: 30 Mar 2016 at 2:46pm |
|
I didn't bother to put the lock on. I figure if they want to spend time stealing a $13 pin, and have the right wrench, good luck to them.
|
|
|
|
|
Retroactive
Senior Member
Joined: 15 Mar 2016 Location: Bolton, MA Online Status: Offline Posts: 270 |
Posted: 31 Mar 2016 at 1:30pm |
|
dupe |
|
|
|
|
techntrek
Admin Group - pHp 
Joined: 29 Jul 2009 Location: MD Online Status: Offline Posts: 9059 |
Posted: 01 Apr 2016 at 8:51pm |
It isn't about stealing the pin, it is about stealing the expensive WDH hitch the pin is in....
|
|
|
|
|
Post Reply
|
Page <1234 7> |
| Forum Jump | Forum Permissions You cannot post new topics in this forum You cannot reply to topics in this forum You cannot delete your posts in this forum You cannot edit your posts in this forum You cannot create polls in this forum You cannot vote in polls in this forum |


 Diary of a Madmodder