
|
ouR escaPOD mods |
Post Reply 
|
Page <1 1213141516 58> |
| Author |
 Printable Version Printable Version Google Google Delicious Delicious Digg Digg StumbleUpon StumbleUpon Windows Live Windows Live Yahoo Bookmarks Yahoo Bookmarks reddit reddit Facebook Facebook MySpace MySpace Newsvine Newsvine Furl Furl Topic Search Topic Search  Topic Options Topic Options
|
StephenH 
podders Helping podders - pHp 

Joined: 29 Nov 2015 Location: Wake Forest, NC Online Status: Offline Posts: 6289 |
 Post Options Post Options
 Quote Reply Quote Reply
 Topic: ouR escaPOD mods Topic: ouR escaPOD modsPosted: 03 Aug 2020 at 9:05pm |
|
Another topic mentioned a rather severe sagging of the floor of the RP179 under the slide-out. It makes sense that the weight of the slide-out does stress that area of the floor as there is no support outboard of the frame. I looked at mine, and it did look like it had a small bit of sagging so I got busy trying to figure out how to fix it. The larger RPods now have outboard support brackets welded to the frame. so I took the idea and decided to try to make my own brackets. Materials: Eye protection/safety goggles Welding Steel - Angle 1/8" X 2" -3 FT Welding Steel - Flat 1/8" X 2" - 3 FT. Harbor Freight wire feed flux core welder, welding helmet, gloves and arm protectors and other protective clothing. Angle grinder with cutting and grinding disks Rotary wire brush File Paint (I used Krylon Rust Reformer as a primer and topped with gloss black paint). Helpful Tools: Vise 5 lb. sledge hammer. carpenter's square or speed square Method: Measure both the height of the frame and the distance from the frame to the inside edge of the metal molding screwed on to the underside of the wall. This will be your measurements. Add the lengths together to get the total length of material needed. Cut two pieces of angle iron to the total length from above measurements. Cut two pieces of flat stock to the total length from the above measurements (matches angle stock) Take the measurement of the frame and measure from one end of the stock on all pieces of material you cut. Use the square to mark a line. Mark 90 degrees on the flat stock across the width of the material. For the angle, use the square to mark a 45 degree angle pointed away from the center of the line on each side of the line so you end up with a V shape that is 90 degrees on one leg of the angle iron. Mark the line on the other leg of the angle. Use the angle grinder with a cutting blade to score a line part way though on the flat stock. Make sure you do not go too deep. You want to make a folding hinge, not cut them apart. Use the angel grinder to cut the V shape out of the one leg on each piece of angle iron. Save the cut-out pieces as you will use them later. Then score the line on the other leg. That should be in line with the point of the V. Clamp the angle iron in the vice with the scored line even with the top of the vice jaws. Use the hammer to bend the iron to a 90 degree angle. Keep checking until it is 90 degrees. This will close up the V shape you cut off earlier. Likewise, clamp the flat stock in the vice and bend it to 90 degrees to match the bend of the angle iron. Double-check to make sure these angles match, one piece of flat stock to one angle stock and the other to the other angle stock. Because you scored the metal, you should have a pretty square angle bend and not a curve. Now for the weldng: Weld the edges of the V which should now be touching or very close to touching. When that is cool, check to see if the V shape cut out earlier matches the angle. Grind as appropriate to get a good fit. When it fits, weld one V shape into the angle of each piece of angle stock. (the pictures below will help). Take one piece of bent flat stock and match it up with one of the angles. This should be on the side that does not have the leg. This will form a T shape when you look at it from the end instead of an inverted L shape. Repeat with the other angle and flat stock. Go back to the vice and angle grinder. Using a cut-off wheel, trim the end of the V which will be sticking out. Change to a grinding disk and smooth off your welds, especially on the parts that will sit against the frame and bottom of the RPod. Clean up the welds on the inside as much as you can or care to. Then clean all your welds to get rid of any slag. Drill holes in the side of the bracket that will sit against the frame rail. Use part of a coat hanger to hang the two brackets. Then prime and paint them.  Now for installing them, you will need a couple of jacks, some boards, and blocks as needed for height. I used a 12 ton capacity bottle jack and my 2 ton floor jack. I also used some pieces of 4x4 lumber and some pieces of 2x4 lumber to spread the stress. Using the jacks, place the boards just inside the metal molding strip. Raise the wall up to remove any sag. If yours does not have any sag, skip this step. Place one bracket in position. You may need the assistance of a jack to raise it up tight against the bottom of the floor and to make it even with the frame bottom. I did because my 179 did have a little sag, nothing too bad, but enough so I needed to use the above steps. Using #12 self-drilling screws, insert one screw through each hole you drilled earlier. You can use a drill bit to drill a pilot hole first. That may be easier. Repeat with the other bracket. Remove all jacks, boards and blocks. Congratulations! You have just provided the support that should have been there in the first place. 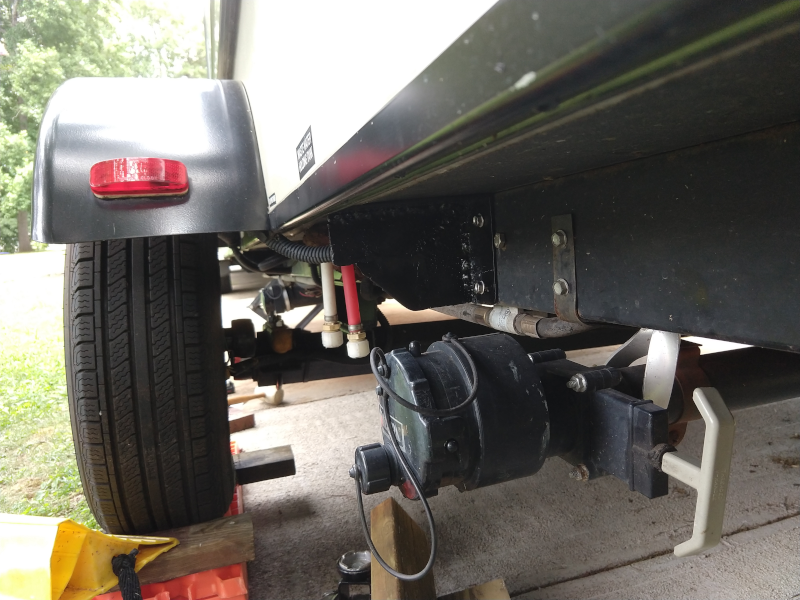  Now, if you look close, you will see that my welding skills leave a lot to be desired. However, these brackets do appear to be very strong and should hold up. I am not attaching them to the floor at the moment as attaching to the frame seems to provide enough support and I don't expect them to shift. If I had a better welder, I expect I could make better looking welds. The Harbor Freight welder is 110V. I have a 30A male to 15A female dogbone that I plug into the 30A RV outlet I installed for doing my welding. It seems to be better than using one of the two outdoor outlets we have.
|
|
|
StephenH
Happy is the man that findeth wisdom,... ouR escaPOD mods Former RPod 179 Current Cherokee Grey Wolf 24 JS |
|
 |
|
|
StephenH
podders Helping podders - pHp
Joined: 29 Nov 2015 Location: Wake Forest, NC Online Status: Offline Posts: 6289 |
Post Options
Quote Reply
Posted: 30 Jul 2020 at 4:47pm |
|
Simple. I used part of the keder rail that came with the slide-out cover. I attached it with the screws that came with it and used Lexar sealant. The Lexar should provide a good part of the holding power since the screws did not seem to contact the frame as I had hoped.  |
|
|
StephenH
Happy is the man that findeth wisdom,... ouR escaPOD mods Former RPod 179 Current Cherokee Grey Wolf 24 JS |
|
|
|
|
DavMar
Senior Member

Joined: 04 Aug 2017 Location: Lexington, NC Online Status: Offline Posts: 592 |
Post Options
Quote Reply
Posted: 30 Jul 2020 at 4:34pm |
|
Nice mod but what would interest me is to see how you attached your window awning to the Pod?
|
|
|
Dave & Marlene J with Zoey the
wonder dog. 2017 Rpod 180 2016 Toyota Tacoma SR5 4x4 Lexington, NC |
|
|
|
|
StephenH
podders Helping podders - pHp
Joined: 29 Nov 2015 Location: Wake Forest, NC Online Status: Offline Posts: 6289 |
Post Options
Quote Reply
Posted: 29 Jul 2020 at 8:06pm |
|
Here are a couple of detail shots that will help make clear how I did this. One is of the self-adhesive rubber bumpers/feet used to pad the side of the RPod and hold the end of the awning support rod in place. The other is of the rod hinge that supports the outer edge of the awning. The two are fabricated from pieces of Shark Bite white PEX tubing. The inside of this is just a little bigger than the fiberglass driveway marker poles I used. One end was heated with a heat gun and then flattened. I drilled a hole in the end to fit the fiberglass rod that is on the outer edge of the awning. Since the awning is about 5 feet long, I used one full and one part of a pole and used a piece of copper tubing as a ferrule to hold the two pieces together. These were glued in place with Lexel. The plastic hinges were inserted through slots cut in the awning (heat sealed so they won't unravel) and the outer edge rod was inserted through the holes. These work great for the awning and should be visible enough to keep me from walking into them. A section of parachute cord is inserted through a grommet on each end and then a bungee cord is used to hold the cord and with it the awning down. The tension placed on the awning causes it to have a little upward bow which really helps it to shed water. We had a heavy downpour last night and the awning functioned remarkably well. I use a tautline hitch on the parachute cord so I can adjust the tension depending on where I hook the bungee cord. 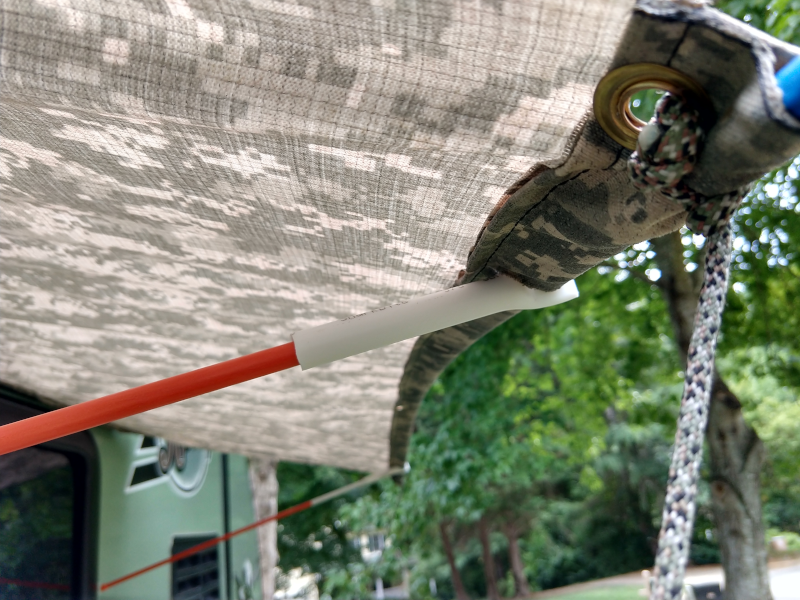  |
|
|
StephenH
Happy is the man that findeth wisdom,... ouR escaPOD mods Former RPod 179 Current Cherokee Grey Wolf 24 JS |
|
|
|
|
StephenH
podders Helping podders - pHp
Joined: 29 Nov 2015 Location: Wake Forest, NC Online Status: Offline Posts: 6289 |
Post Options
Quote Reply
Posted: 28 Jul 2020 at 10:26pm |
|
I'm not sure that using the emergency escape that way is the best idea since I don't know if the hinges are strong enough for that type of use. Just having the sliding part open will be a great improvement over what we had before. I'm debating whether to do the two windows by the bed also since I have enough rail and material available. What I'm not sure of is if I have enough keder strip on hand.If I do that, it will increase the available ventilation also.
|
|
|
StephenH
Happy is the man that findeth wisdom,... ouR escaPOD mods Former RPod 179 Current Cherokee Grey Wolf 24 JS |
|
|
|
|
Pod People
Senior Member
Joined: 22 Sep 2011 Location: Chapel Hill,NC Online Status: Offline Posts: 1067 |
Post Options
Quote Reply
Posted: 28 Jul 2020 at 5:28pm |
|
That is a great idea and nice craftsmanship to complete it. Plus you were able to salvage and reuse existing materials for a better solution. The problem is that you still only have 1/2 of the window area available for ventilation because of the side sliding operation of the emergency escape window. Even with it fully open, there is still half of the area covered in glass. We solved the same problem differently. We opted to open the complete window and also be able to do it in the rain. We used mosquito netting and cut it to exactly the size of the interior window frame and then Laura sewed a border around the netting and sewed the velcro hooks side onto the edge. We glued the other velcro loop side to the window trim. So, with the velcroed netting installed, it covers the entire window on the inside of the pod. Just open both emergency escape window latches and push the entire window out. the new mosquito netting stays on the inside , velcroed to the window interior trim. We have 3 different pvc sticks of varying lengths that we can use to prop the entire emergency escape window open for full ventilation. By keeping the window slider closed, it will keep out the rain and still provide full ventilation . 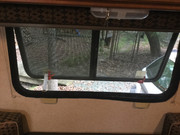 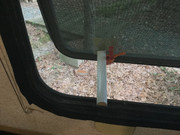 Vann
|
|
|
Vann & Laura 2015 RPod 179 
|
|
|
|
|
StephenH
podders Helping podders - pHp
Joined: 29 Nov 2015 Location: Wake Forest, NC Online Status: Offline Posts: 6289 |
Post Options
Quote Reply
Posted: 28 Jul 2020 at 1:10pm |
|
Okay, Dinette Awning 2.0. I did not quite like the looks of it and thought an additional length would provide better protection for when it rained. I lengthened the awning by a foot and now it now only looks better, it should perform better. Since the fabric is longer, I used a short length of copper tube to joint together two pieces of fiberglass driveway stake to strengthen the outside edge. I thought about removing the 4 foot length of keder rail and making that longer too, but I do't want to take the risk of messing up the fiberglass while removing the rail. Plus, I'm not sure the screw holes would line up exactly. The insert is stiff enough to hold the ends and the flex in the outside edge is now up instead of down. That should help it to shed rain better. Plus, the additional fabric should provide better shade as well. 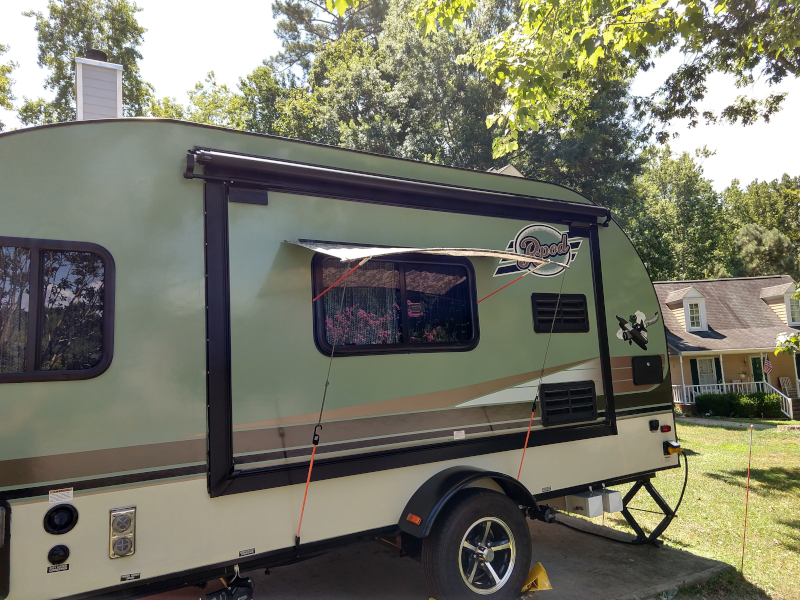 I'm just waiting on Amazon to deliver the stops that will hold the rod ends that are currently resting on the window frame.
|
|
|
StephenH
Happy is the man that findeth wisdom,... ouR escaPOD mods Former RPod 179 Current Cherokee Grey Wolf 24 JS |
|
|
|
|
StephenH
podders Helping podders - pHp
Joined: 29 Nov 2015 Location: Wake Forest, NC Online Status: Offline Posts: 6289 |
Post Options
Quote Reply
Posted: 26 Jul 2020 at 3:15pm |
|
Exactly!
|
|
|
StephenH
Happy is the man that findeth wisdom,... ouR escaPOD mods Former RPod 179 Current Cherokee Grey Wolf 24 JS |
|
|
|
|
fwunder
Senior Member

Joined: 04 Oct 2013 Location: New Jersey Online Status: Offline Posts: 1676 |
Post Options
Quote Reply
Posted: 26 Jul 2020 at 2:56pm |
|
That's a nice addition, Stephen. It's great to be able to keep that window open in a rain and keep the sun out a bit. |
|
|
2014 RPod 178 => MyMods and Buying Habits
2008 4Runner Limited 4.0-liter V6 Yes, those are wild ponies dining on grass while dumping tanks! |
|
|
|
|
StephenH
podders Helping podders - pHp
Joined: 29 Nov 2015 Location: Wake Forest, NC Online Status: Offline Posts: 6289 |
Post Options
Quote Reply
Posted: 26 Jul 2020 at 2:45pm |
|
This is a corollary to the slide-out cover installation. It isn't quite done but is enough so that I will post it now. As I said above, I did not need the awning rail that came with the cover. What I have found lacking was a way to open a window when it is raining for ventilation. Since I now have the Thule awning, adding the door window helped, but that is only one small window. I wanted to do something to allow me to open other windows. This is the first one and, if successful, will probably lead to me adding similar awnings to the other windows. I chose to add one to the dinette window. I cut a 4' length of the awning rail and used Lexel sealant and the screws that came with the rail to attach it just above the window. My homemade slide-out cover provided the material for the awning. I just cut a 4' length of the cover and added another grommet. I cut a driveway marker stake in half to act as support rods and cut a couple fo small lengths of PVC tubing. I used a heat gun to soften one end of these pieces and then flattened them. I am using another driveway marker stake to stiffen the outer edge, so I drilled a hole in each piece. I cut and sealed a slot in the edge and inserted the stake through the pocket and the tubing brackets. One end of the side supports goes there and the other end will eventually sit in a door protector once they arrive. For testing, they are simply resting on the dinette window frame. To hold the awning, I am using short sections of parachute cord and elastic bungee cords. Here are some pictures:  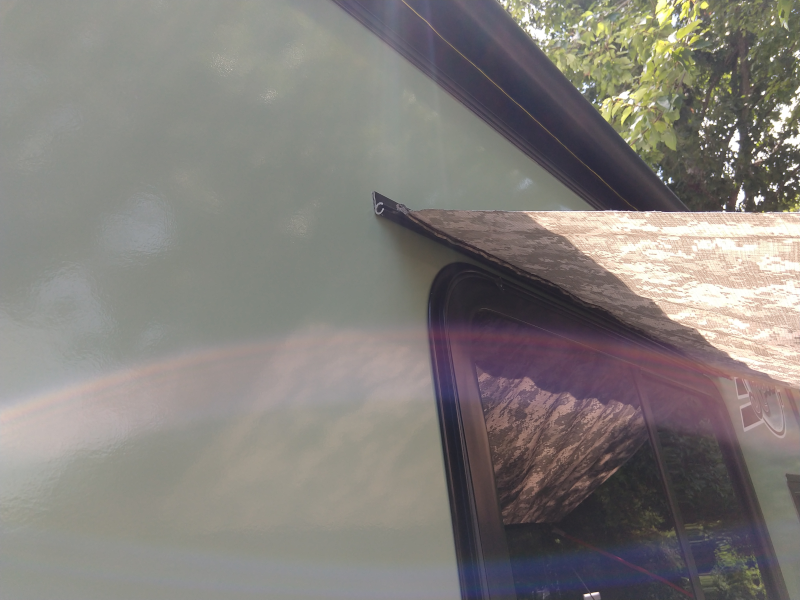 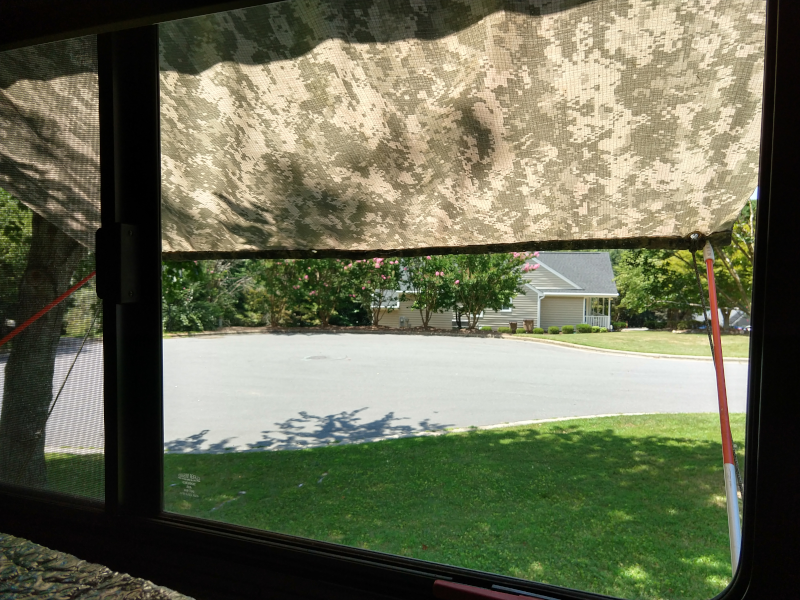 My local stores did not have what I needed to finish. I ordered Small Clear Door Knob Bumpers which will stick on to the wall and provide places for the rods to rest when the awning is on. I will test different locations for the rods before sticking them in place. Since there are a dozen in the package, if one comes off along the way, I won't be too worried. However, I think they will hold on well since I plan on cleaning the surface where I want to stick them with denatured alcohol first.
|
|
|
StephenH
Happy is the man that findeth wisdom,... ouR escaPOD mods Former RPod 179 Current Cherokee Grey Wolf 24 JS |
|
|
|
|
Post Reply
|
Page <1 1213141516 58> |
| Forum Jump | Forum Permissions You cannot post new topics in this forum You cannot reply to topics in this forum You cannot delete your posts in this forum You cannot edit your posts in this forum You cannot create polls in this forum You cannot vote in polls in this forum |


