|
ouR escaPOD mods |
Post Reply 
|
Page <1 23456 58> |
| Author |
 Printable Version Printable Version Google Google Delicious Delicious Digg Digg StumbleUpon StumbleUpon Windows Live Windows Live Yahoo Bookmarks Yahoo Bookmarks reddit reddit Facebook Facebook MySpace MySpace Newsvine Newsvine Furl Furl Topic Search Topic Search  Topic Options Topic Options
|
Patriot Dave 
Senior Member 

Joined: 06 Feb 2016 Location: LaSalle, Mi. 48 Online Status: Offline Posts: 206 |
 Post Options Post Options
 Quote Reply Quote Reply
 Topic: ouR escaPOD mods Topic: ouR escaPOD modsPosted: 04 May 2016 at 7:49am |
|
|
|
Dave & Joyce
Never Forget, In God We Trust; This Our National Motto. Member; Patriot Guard Riders, Michigan Chapter Retired; So Every Day is Saturday.... Except Sunday |
|
 |
|
|
StephenH
podders Helping podders - pHp

Joined: 29 Nov 2015 Location: Wake Forest, NC Online Status: Offline Posts: 6288 |
Post Options
Quote Reply
Posted: 04 May 2016 at 10:53am |
|
I used Arrow 18 GA Brad Nails, 5/8" #BN1810 and a Black & Decker PowerShot stapler to attach the strips. I did not use glue on them.
|
|
|
StephenH
Happy is the man that findeth wisdom,... ouR escaPOD mods Former RPod 179 Current Cherokee Grey Wolf 24 JS |
|
|
|
|
Patriot Dave
Senior Member
Joined: 06 Feb 2016 Location: LaSalle, Mi. 48 Online Status: Offline Posts: 206 |
Post Options
Quote Reply
Posted: 04 May 2016 at 11:10am |
|
|
|
Dave & Joyce
Never Forget, In God We Trust; This Our National Motto. Member; Patriot Guard Riders, Michigan Chapter Retired; So Every Day is Saturday.... Except Sunday |
|
|
|
|
StephenH
podders Helping podders - pHp
Joined: 29 Nov 2015 Location: Wake Forest, NC Online Status: Offline Posts: 6288 |
Post Options
Quote Reply
Posted: 06 May 2016 at 8:42am |
|
This one is not for the trailer, but is quite useful.
What do you do with the hitch when you are not towing? That was the problem I had. in my 179, I was beating up the bottom of the storage area opening trying to get it in and out. the bars were not a problem. It was the shank and head. I did not want to leave the hitch attached to the car. That would not be good for it. I did not want to leave it outside, and I certainly did not want to put it in the trailer. I decided to do something about it. First, I was having a problem with the bottom of the shank scraping on our driveway when we pulled in or out of our driveway. The Ford Escape is low enough that the shank did not need to be so long. I used an angle grinder with a cut-off wheel to cut 2" off the bottom of the shank. Then i smoothed and painted the cut area to prevent rust. This served two purposes. The first is to eliminate the scraping of our driveway. The second was to make it possible to finish this mod. I purchased a Ridgid 22" tool box from Home Depot. I used some scrap wood to build a cradle for the hitch. Then i put a plastic bag in and filled it with Great Stuff insulating foam. I sprayed it with some water to speed the curing. I had previously found that if I did not spray it with water that it would not cure, probably because the plastic bag kept moisture from the air out. After it expanded and cured, I had a custom-formed cushioning cradle for the hitch. There is room inside for me to keep my Hitch Grip (which I highly recommend) and the hitch locks, pins, and covers. The end result is a place where I can keep my hitch head that is clean, watertight, and which I can keep in the back of our Escape while traveling and in the R-Pod when at home. Since it is watertight, I could also keep it outside, under the R-Pod, but I would want a good cable lock if I were to do so. Now for some pictures: 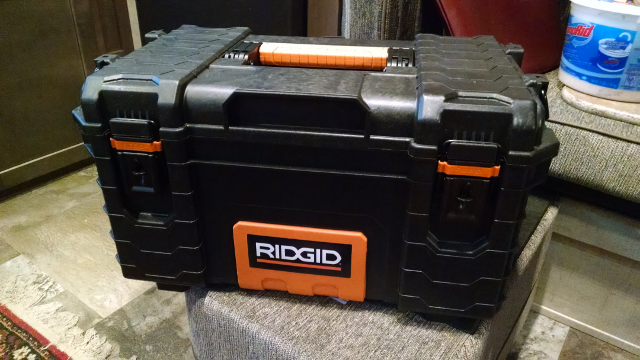 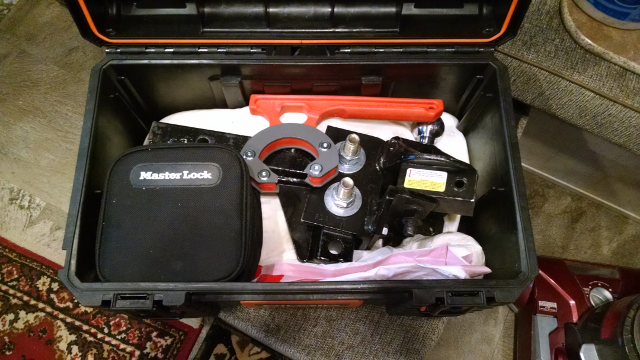 |
|
|
StephenH
Happy is the man that findeth wisdom,... ouR escaPOD mods Former RPod 179 Current Cherokee Grey Wolf 24 JS |
|
|
|
|
StephenH
podders Helping podders - pHp
Joined: 29 Nov 2015 Location: Wake Forest, NC Online Status: Offline Posts: 6288 |
Post Options
Quote Reply
Posted: 15 May 2016 at 5:02pm |
|
The top shelf in the R-Pod 179's pantry is not very well thought out. There is no shelf in it. Well, I thought to remedy that.
removed the panel that is covers the side of the pantry that is on the inside, covering the thermostat and indicator gauge wiring. I found a framework behind the panel. This was screwed into the bathroom wall and the face of the cabinet. I removed that and, after figuring out where I wanted the shelf, I added a cleat about midway on that bracket to support the end of a new shelf. I also added cleat stock around the bathroom wall, outside wall, and inside the face on the outside wall end of the cabinet. The new shelf was cut to shape to sit on top of this new supporting cleats. I had a piece of oak stock. I used my table saw to cut a notch for the shelf and attached it to the shelf. This strengthens the front of the shelf at the opening so that it won't sag. The shelf was finished with stain and polyurethane finish, then installed. 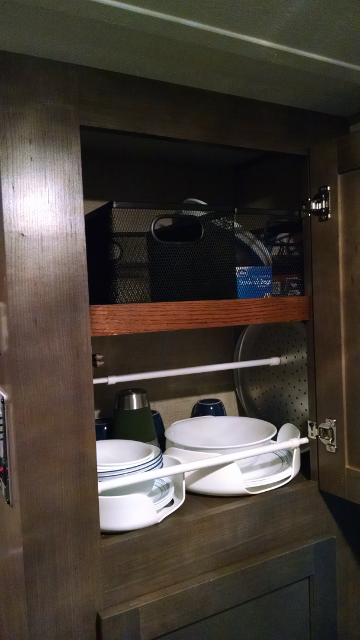   I cut the panel which I had removed roughly in half to fit both below and above to cover the wiring again. It is good to have another shelf in the pantry. The baskets were purchased at our local Aldi store. They were part of a set of a larger and smaller basket. The smaller ones fit the pantry perfectly. The larger ones are on the shelf above the bed and in the cupboard below the stove. One goof I did was to purchase the "short" moly bolts at my local Lowe's store. These were too long. I needed extra short. I ended up putting a hole in the side of my R-Pod before I realized that it would do that. The second moly bolt, I was able to cut down before I tightened it down, so it did not make a second hole. Any hints on how to repair a hole? I filled it with a dab of silicone to keep water out until I could find out how to fix it properly. |
|
|
StephenH
Happy is the man that findeth wisdom,... ouR escaPOD mods Former RPod 179 Current Cherokee Grey Wolf 24 JS |
|
|
|
|
StephenH
podders Helping podders - pHp
Joined: 29 Nov 2015 Location: Wake Forest, NC Online Status: Offline Posts: 6288 |
Post Options
Quote Reply
Posted: 20 May 2016 at 10:44pm |
|
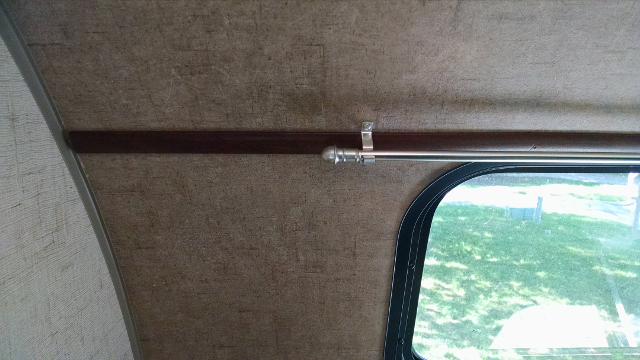
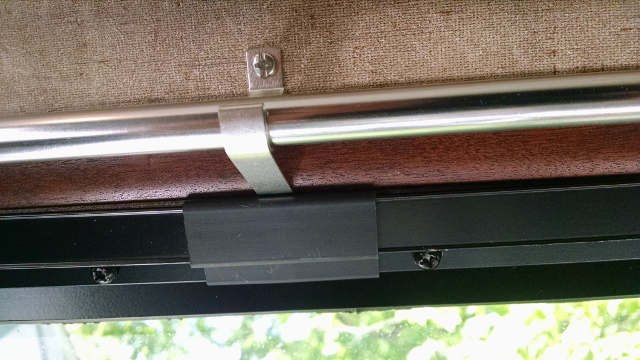
Who wants to go out and spend several hundred dollars for an awning? I certainly did not. After completing my slide-out cover, I thought, "Why not make an awning using the same fabric?" So I did.
The fabric is a camouflage, carbon fiber reinforced, rip-stop coated, waterproof fabric. Like the slide-out cover, I decided to use rope to fit the rail. It was, of course, a larger one than used for the slide-out. The first thing I did was do a rough cut for length. I used a "hot knife," which in actuality was a smoothing tool for a wood burning iron. When turned on edge, it worked great for cutting the fabric, sealing it so that it will not unravel. I folded the fabric, stitched it, and then folded it over the rope and sewed it using a zipper foot so that the seam could be as close as possible to the rope. The outside edge just got a double 1/2" fold. The two ends are the cut ends since they are sealed. After looking online for ideas, I had decided to use PVC pipe for the supports. I changed my mind in the middle of things so I need to get some 3-way connectors in 1" size to replace the 4-way connectors which I currently have. I had originally thought to have a free-standing frame, but that ended up being too cumbersome. I now have two sections of 1" PVC pipe stretching the front of the awning with short stubs to reach the ends and make the curve to follow the gutter. For legs, I have three 1" PVC pipes with holes spaced every 6" for adjustments. These slide into 1-1/4" PVC pipes and 1/4" x 2" wire locking pins (rounded) are used to secure them in place. The foot end of the supports got a cap, drilled to go over a pin which slides into the lower track. I still have some final fitting to do so that they will slide in smoothly over the screw heads. These were made of 1/2" round welding steel rods and 5/16" round welding steel rods. The part that slides in the track was cut to 6" and the other part was cut to 8", welded into a hole drilled in the 1/2" rod pieces, and bent to make a suitable angle for the awning when it is set up. Now for some pictures:       To do yet: make tie-down ropes to use either with weights or stakes to help hold the outer edge. Also, re-sew one of the seams where it isn't holding properly. This is on one of the end rod pockets. Perhaps it is time to change the name of our R-Pod to CamoPod.  Edit: I am adding a picture of the awning in use at the Whispering Winds RV park in Newark, NY recently. It shows how I add tension to the awning without stakes. 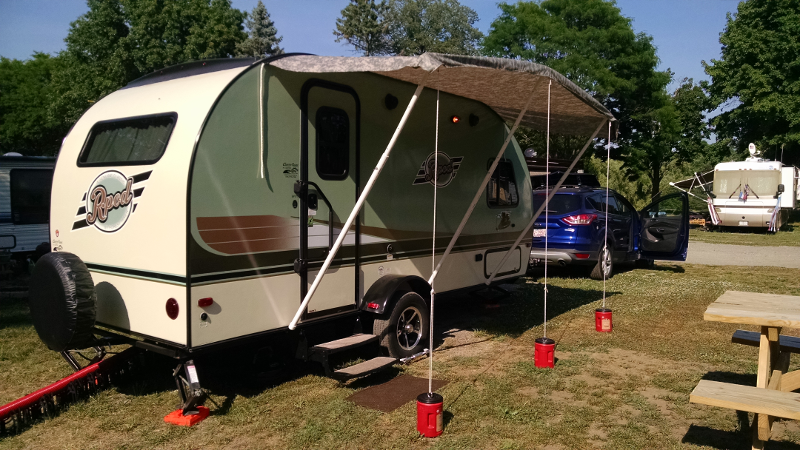 The red cans are plastic Folgers cans from a local restaurant. I made four of them. Each has a quarter-bag of ready-mix and an eye bolt with two nuts holding a fender washer. The fender washer was sunk into the wet concrete and the lid held it in place while the concrete was curing. I made ropes sufficient in length to be able to adjust the poles. I use a tautline hitch to tighten the ropes so I can easily adjust them as needed. |
|
|
StephenH
Happy is the man that findeth wisdom,... ouR escaPOD mods Former RPod 179 Current Cherokee Grey Wolf 24 JS |
|
|
|
|
StephenH
podders Helping podders - pHp
Joined: 29 Nov 2015 Location: Wake Forest, NC Online Status: Offline Posts: 6288 |
Post Options
Quote Reply
Posted: 24 May 2016 at 6:52pm |
|
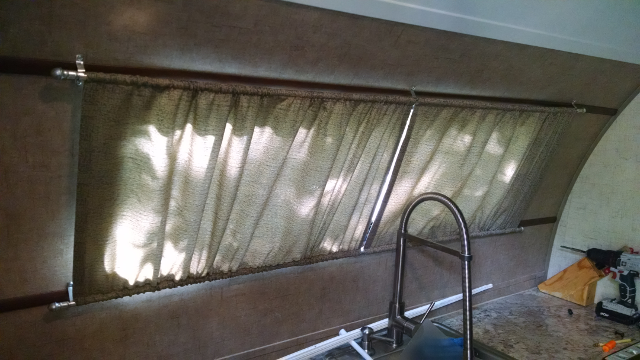
The latest mod: Making replacement curtains for the kitchen window and making a curtain for the door window. The original curtains were a bit too tight to fit the curtain rods I used to replace the plastic track. The door did not have one since it was a mod (listed above).
Forest River did not have fabric available. However, one of the things that came with the R-Pod was a bedspread/quilt that had one panel with the same fabric as the window and another fabric that harmonized. Since we had purchased a replacement quilt that we liked better, I went ahead and deconstructed the bedspread. The matching fabric was on insufficient quantity to be useful. However, the harmonizing fabric had plenty. The rest was measuring, cutting, serging, and sewing the new curtains. My wife has multiple machines and tools that make it easier. For the door, I purchased small curtain rods. Anyway, here are the pictures: 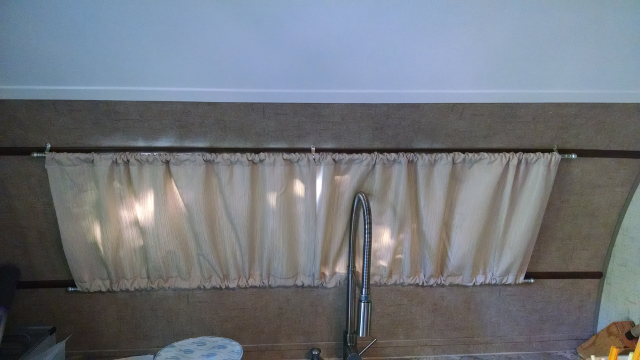 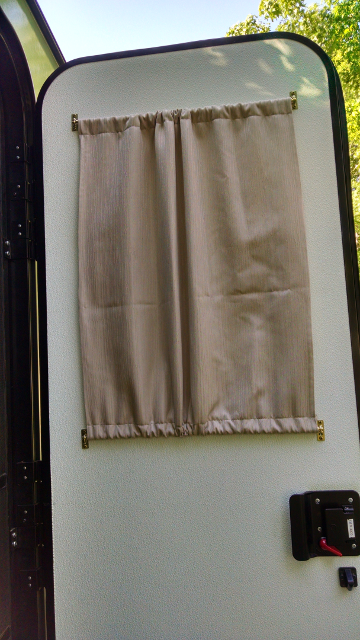 |
|
|
StephenH
Happy is the man that findeth wisdom,... ouR escaPOD mods Former RPod 179 Current Cherokee Grey Wolf 24 JS |
|
|
|
|
StephenH
podders Helping podders - pHp
Joined: 29 Nov 2015 Location: Wake Forest, NC Online Status: Offline Posts: 6288 |
Post Options
Quote Reply
Posted: 26 May 2016 at 10:11pm |
|
This one is a simple one. I noticed that the spare tire cover was collecting water since there was no real way for it to drain. I did not want to just cut a hole in the cover. I remembered that I had a grommet kit. I installed two grommets (one would probably have been sufficient) in the bottom of the cover where the overlap is. This should drain out any water that gets in there. It has the added advantage of eliminating a mosquito breeding pond.
Why the cover was made in such a way as to almost guarantee water accumulation is beyond me. Adding a grommet (or some other way to keep a drain hole from tearing) to the bottom of the cover would seem to be a simple, inexpensive, common-sense thing to do. However, the bean counters probably thought that if it went out the door, it would be a while before people figured it out, and by that time, it would be an SEP (Somebody Else's Problem) situation. |
|
|
StephenH
Happy is the man that findeth wisdom,... ouR escaPOD mods Former RPod 179 Current Cherokee Grey Wolf 24 JS |
|
|
|
|
StephenH
podders Helping podders - pHp
Joined: 29 Nov 2015 Location: Wake Forest, NC Online Status: Offline Posts: 6288 |
Post Options
Quote Reply
Posted: 08 Jun 2016 at 10:58pm |
|
The last time I took our R-Pod out, I realized that even with a pretty good mattress topper, the original mattress that came with our R-Pod was not going to be something that either my wife or I would want to use much longer. I ordered a new mattress from Amazon. It is this one:
Sleep Master Ultima Comfort Memory Foam 10 Inch Mattress, Short Queen. The difference is amazing, even though I have not had the opportunity to sleep on it yet. Just lying down on it is enough to know it is a world of difference.
The new mattress: 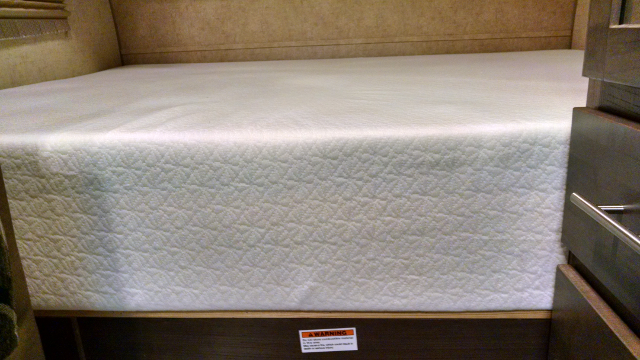 The old mattress was three layers of polyester fiber-foam. There was a thick, denser middle layer and two thin outer layers of a fiber/foam that was a little softer. These three layers were held together with short straps and the cover seems to be a polypropylene, non-woven material. It is no wonder that this just does not hold up very long. I expect the new one to provide long and satisfying service. 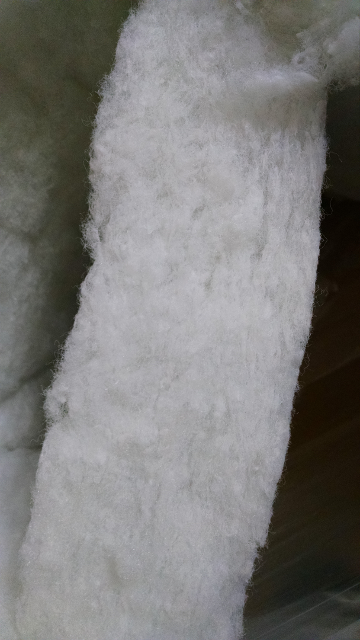 This is a shot of the middle layer. I figured out a use for it and the thinner layers. I was never pleased with the two end cushions for the dinette. The foam there was too soft. When we sat on it, we sank way too much. When I saw how the old mattress was constructed, I had the idea to replace the foam in those two cushions with material from the mattress. I used one thick layer and three thin layers. One thin layer is on bottom, next the thick layer and another thin layer. These got put into a plastic bag. The last thin layer got placed inside the cushion to be the top. I used our vacuum to remove the air and compress the foam sandwich so that I could slide it in to the cushion. Once it was in, I removed the vacuum and let the foam return to full size. I repeated that for the other cushion. The improved cushions provide much more support, and yet should still be comfortable if someone should need to sleep on them. I need to check the other dinette cushions to see if they could be similarly improved. I have enough fiber-foam to do so if I think it is worthwhile.  |
|
|
StephenH
Happy is the man that findeth wisdom,... ouR escaPOD mods Former RPod 179 Current Cherokee Grey Wolf 24 JS |
|
|
|
|
StephenH
podders Helping podders - pHp
Joined: 29 Nov 2015 Location: Wake Forest, NC Online Status: Offline Posts: 6288 |
Post Options
Quote Reply
Posted: 08 Jun 2016 at 11:24pm |
|
Another one recently completed was to replace the single step with a double step. The new step is the 74960 Manual Double Step ordered from Camping World. Installation was a little tricky as the original step was stretched to fit brackets that were about 1/2" too wide for the new steps. The solution: Make a couple of shims out of 1/4" x 1-1/2" steel welding stock. These were cut, drilled, and then painted black. The bracket for the new steps was wider. This meant that in order for it to fit properly, I needed to notch the back to fit around the frame. I did so by cutting, then scoring and bending the excess into a tab that rests against the bottom of the frame which should provide a little more resistance to twisting. You can see one of the notches at the top-left corner where the steps fasten to the bracket.
The new steps should make life a bit easier for me and my wife. We should not need to carry a step-stool now. 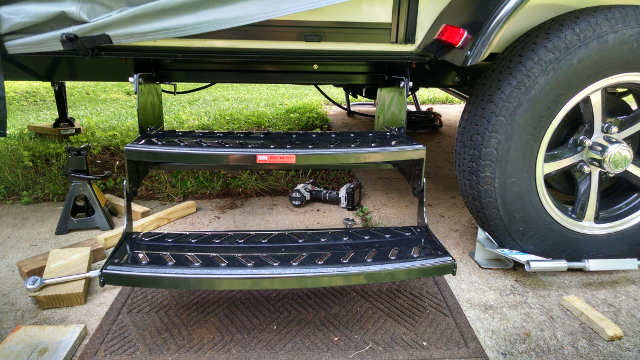 |
|
|
StephenH
Happy is the man that findeth wisdom,... ouR escaPOD mods Former RPod 179 Current Cherokee Grey Wolf 24 JS |
|
|
|
|
Post Reply
|
Page <1 23456 58> |
| Forum Jump | Forum Permissions You cannot post new topics in this forum You cannot reply to topics in this forum You cannot delete your posts in this forum You cannot edit your posts in this forum You cannot create polls in this forum You cannot vote in polls in this forum |